Welcome To
Corey's FJ Cruiser Page Of Mods
Page One
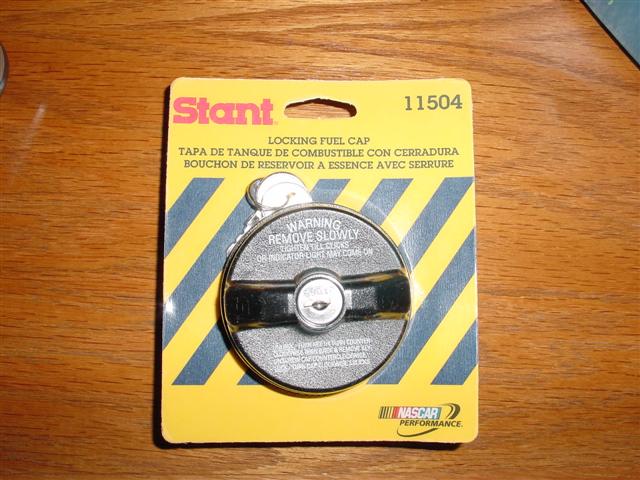
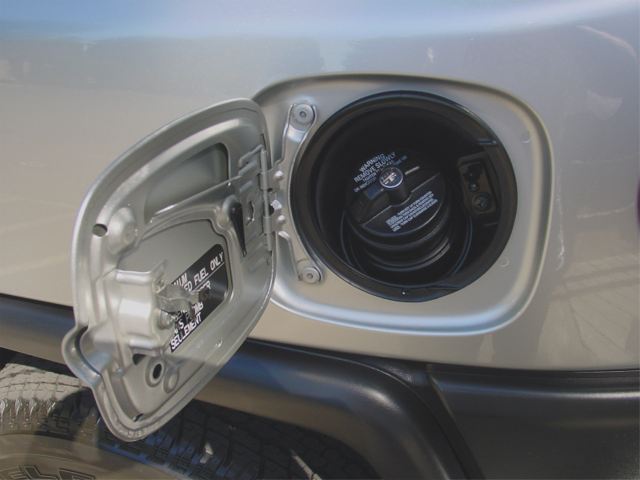
Stant Locking Gas
Cap
Installed 7-24-2006
Toyota really goofed on this one, they did not include a locking gas door on the
FJ Cruiser.
Heck, even my old '91 4Runner has one of those.
Researching online found that a Stant 11504 locking gas cap made for the 2004
Tacoma will fit the FJC without throwing a code into the check engine light.
In other words, it seals perfectly.
Do not fall victim to the various locking gas caps being sold on EBay, they are
rip offs.
The Stant cap is the one you need.
You can take the tether to your stock cap off to
make room for the Stant.
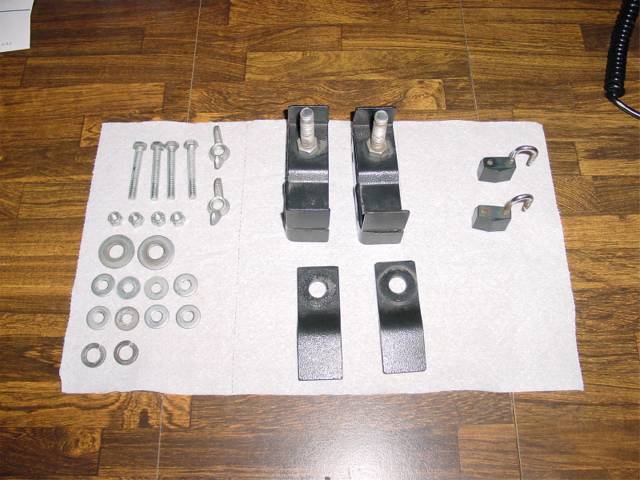
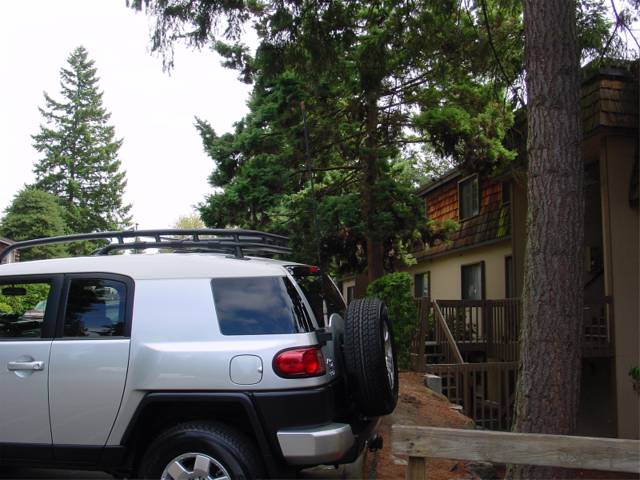
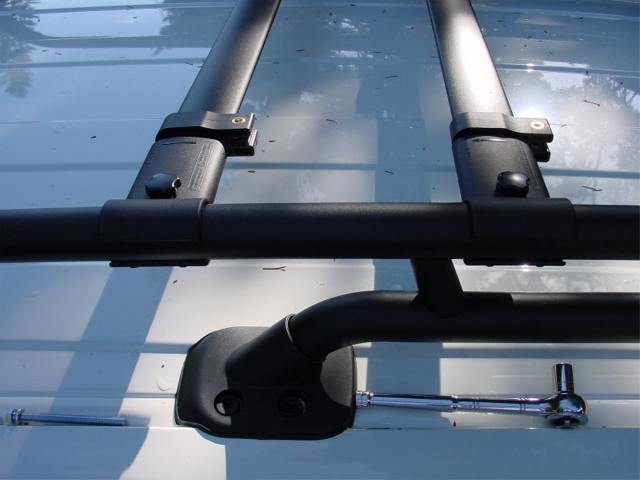
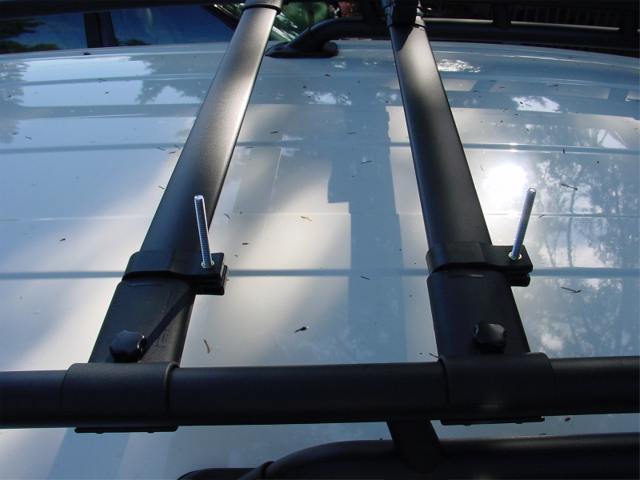
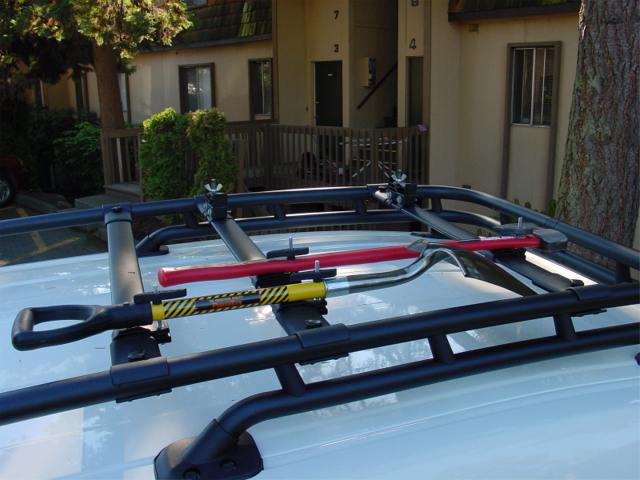
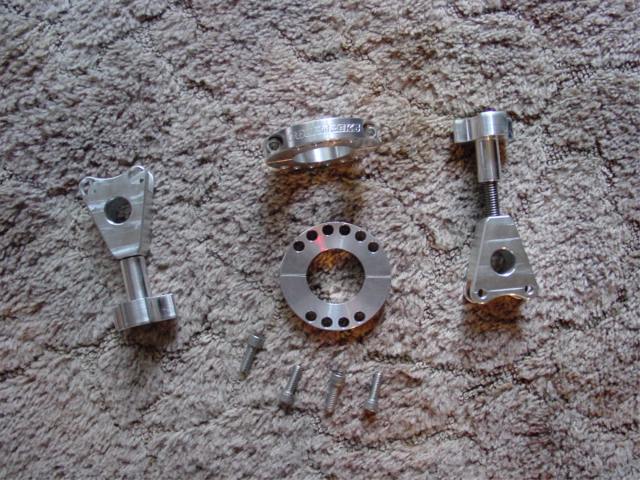
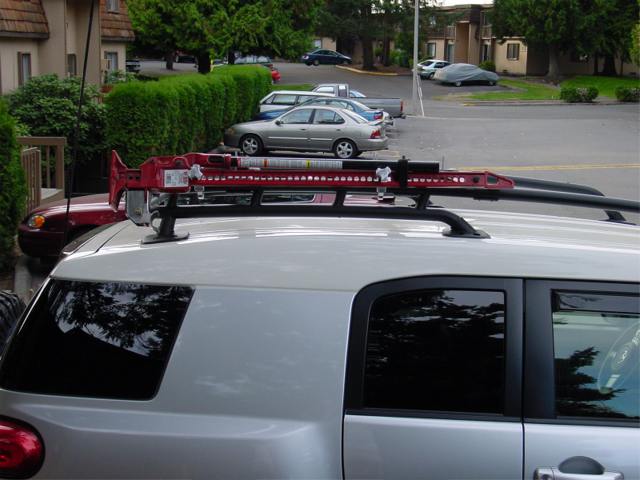
Slee's Hi-Lift Mount
Installed 8-13-2006 (no longer using)
Christo Slee's Hi-Lift mounts allow you to use the factory roof rack that comes
on most Toyotas, and also aftermarket roof racks, depending on which Yakima
mounts you purchase for it.
Christo told me to purchase the Yakima 10V Vertical MightyMounts which should
work with the FJ Cruisers slats on the roof rack.
Installation:
1. Sort out all of your parts, here are mine I bought a several years back for
the 4Runner, and also a set of padlocks.
You can drill the bolt near the top that the wingnut spins down on.
This way no one is taking your Hi-Lift from you.
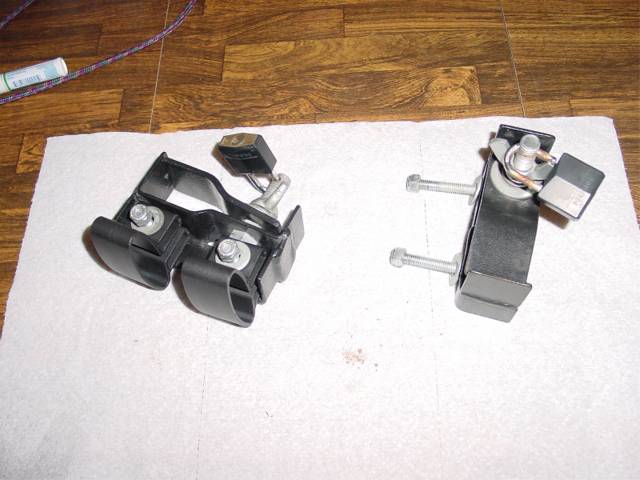
2. Attach the Yakima
Vertical MightyMounts to your roof racks slats.
I took off 2 of the rack slats, as 3 were in the lower position, and the forward
one was up on top.
I really do not need the other 2 up there.
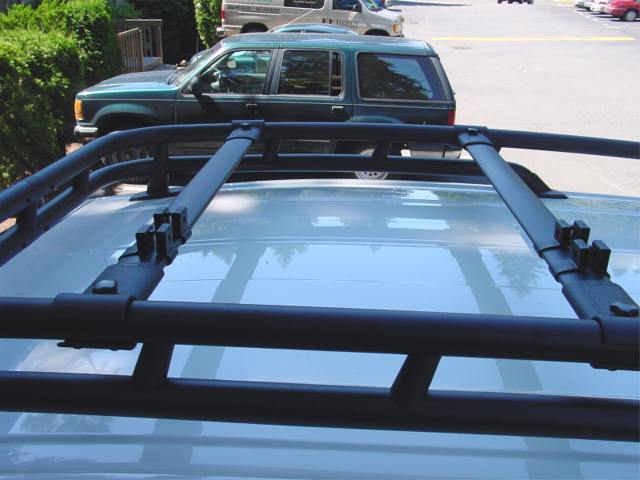
3. Then attach Slee's Hi-Lift mounts to the Yakima mounts.
This is what they look like after installing both of Slee's mounts.

4. The Hi-Lift jack in place on my roof rack.
Links to parts used:
Slee's Hi-Lift Mounts
Yakima 10V mounts from Rack Outfitters
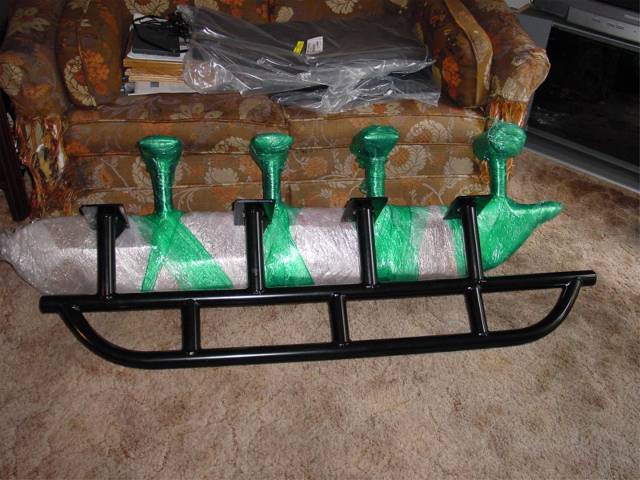
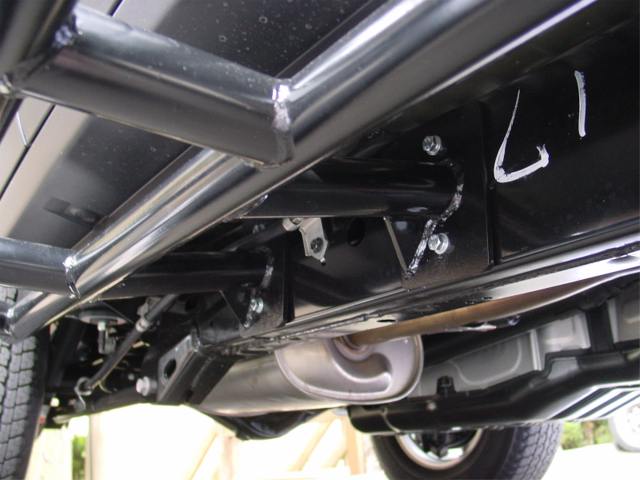
Bentup Rock Sliderz
Installed 7-29-2006
AJ @ Bentup does a great job when it comes to making trail gear for protection.
I saw his handiwork in the May/June edition of
4WD Toyota Owner magazine.
I got in touch with AJ and it was very easy to place my order using Paypal.
I also got these powder coated, and it was well worth the extra money to have it
done.
These sliderz bolt on to each side of the FJ Cruiser using 8 10.9 metric bolts
per slider using the same factory holes that were meant for the Toyota factory
Rock Rails.
The Toyota bars are nice, but they do not stick out enough for my tastes, and
you can not use them as a step like you can Bentups.
Installation:
1. When they arrived, they were packaged very well to protect them from the
wrath of the men/women in the brown suits/trucks from getting damaged.
Took me over 30 minutes each to get the wrapping off, but well worth it.
This really is important in case you are getting yours powder coated.
Please pay no attention to the couch, it has been abused over the years from my
critters.
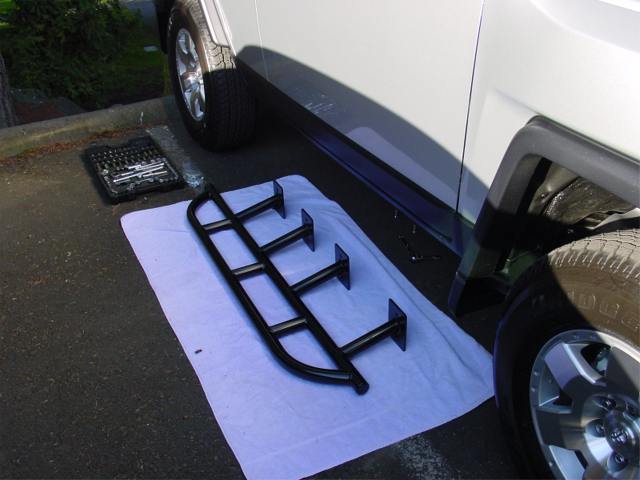
2. Here I am
installing the passenger side one.
You have to remove the emergency brake cable bracket on both the passenger and
drivers side of the rig.
The bracket for each side is the one that is closet to the front.
The sliderz take a 13mm wrench, and the brake brackets take a 14mm socket.
Using a socket on the sliderz bolts is to tight of a fit.I used my Craftsman
ratchet wrenches for this purpose.
Ratchet wrenches rock!
It makes it a lot easier to get into a tight space such as the bolt heads while
working around the legs of the sliderz.
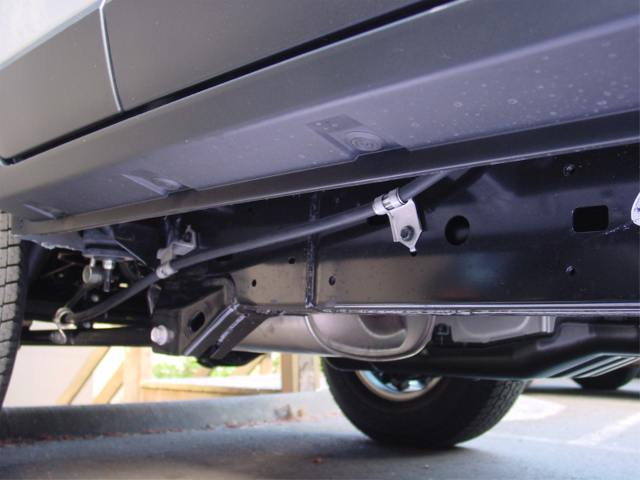
3. Here is the brake
cable bracket back in place on the passenger side after the slider was
installed.
It fits back perfectly.
However on the drivers side I left the bracket off, it is a pretty tight fit.
I will end up using a zip tie to hold it in place.
You can also see the additional; gusset that AJ welded onto the legs for more
beef to support the legs.
4. Passenger and drivers side close-up shots.
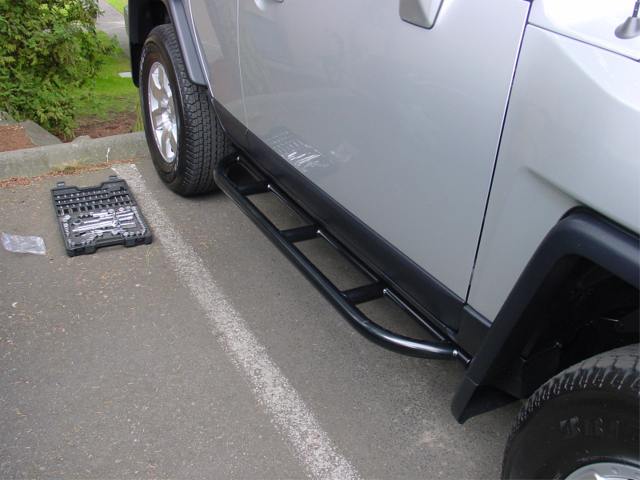
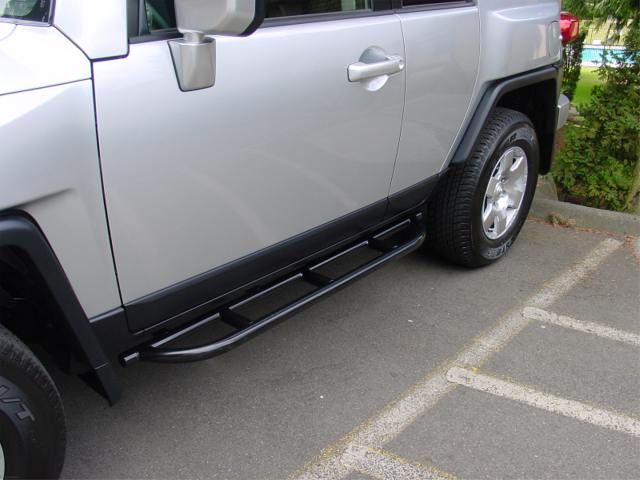
Full body shot.
Links to parts used:
Bentups
site
Rock slider info
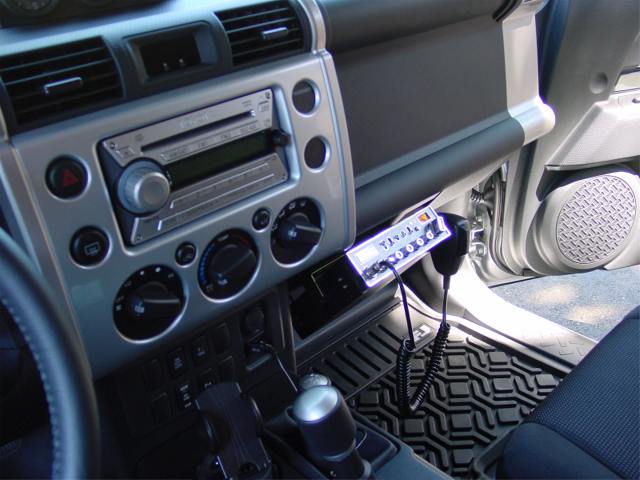
CB Radio
Installation And Bandi Antenna Mount
Installed Bandi Mount 7-25-2006
I am reusing a few
items from my 4Runner for the installation.
Cobra 29 Nightwatch CB, Firestik II 4' antenna, and a few other items such as my
quick disconnect and heavy duty spring.
Links to items for you to buy will be listed at the end.
Installation:
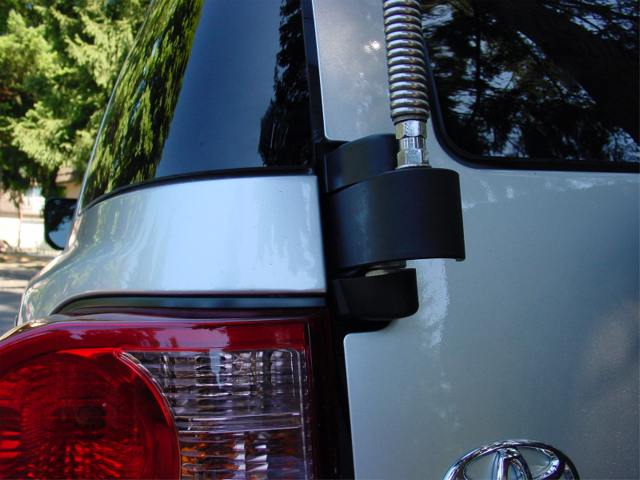
1. Mounting the Bandi antenna mount
This mount was designed by a member over on FJ Cruiser Forums site.
It allows you to run an antenna or flag pole at the end of the FJ Cruiser by
utilizing where the rear door hinge is.
Instead of me showing step by step instructions on how to install the Bandi
mount, Bandi had sent out an email to all of his buyers on how to install it,
and I turned his email into a webpage to show you how.
Click here to see the instructions.
Here is the bare mount with my heavy duty spring and quick disconnect attached to it.

Here is the Bandi mount mounted.
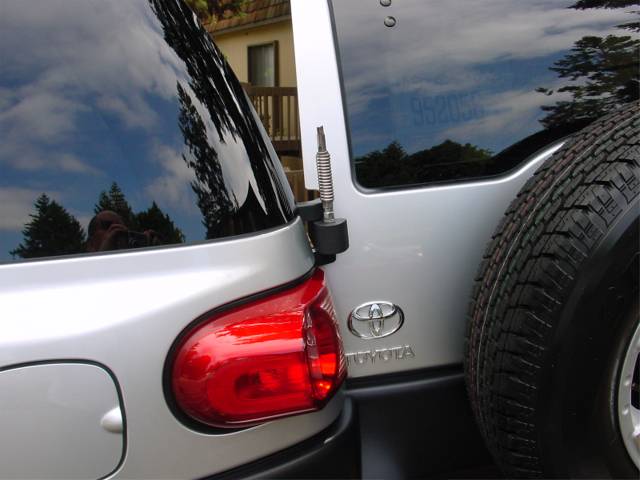
Here is a shot from further off with the Firestik II 4' antenna mounted to the Bandi mount.
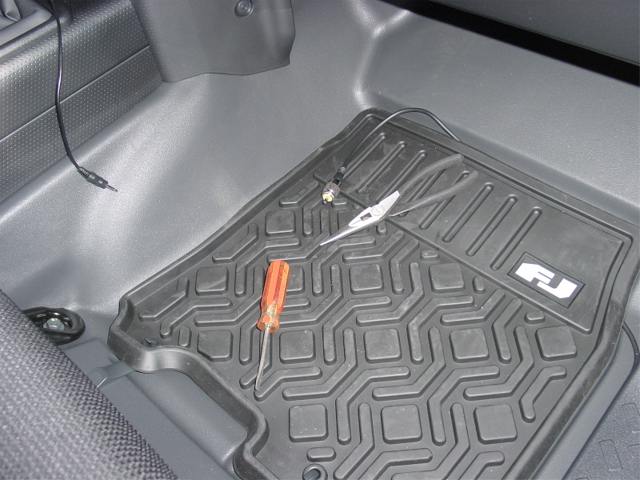
Installed Coax
8-05-2006
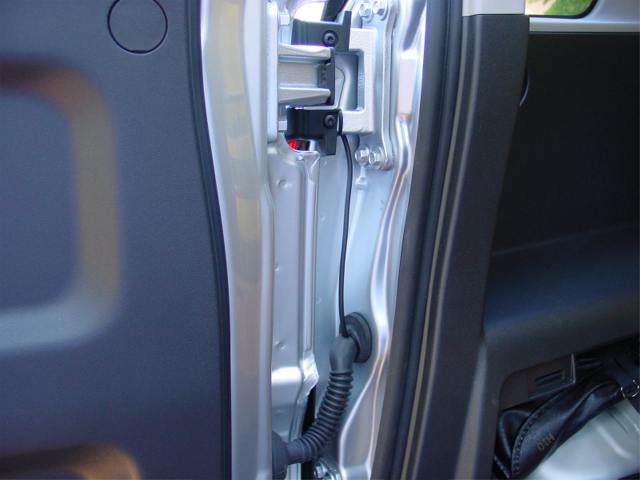
2. Coax installation
I was going to run the coax underneath the rig upto the front and in an access
hole, but it was to difficult not being on a lift.
I actually liked my way of doing this over a few other installs I have seen on
other forums.
Here you can see the coax coming off of the bandi mount.
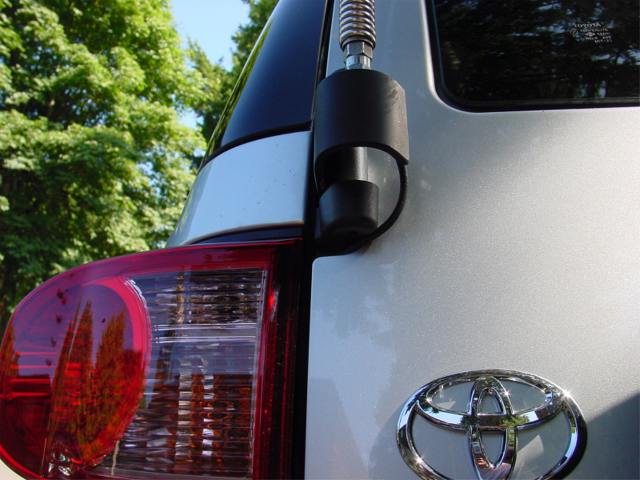
From there is follows down between the tail light and the door, then through the back of the bumper and underneath the bumper, then up through a grommet inside the access door to the jack.
I was thinking about
drilling a hole at the end of that compartment up front, but it would be awfully
hard to get the coax through, so I ended up just bringing the coax up near the
top of the access door and running it out where its hinge/handle is, and it
worked out very nicely.
In the future I may file down at the bottom of the door and run the coax out
from there.
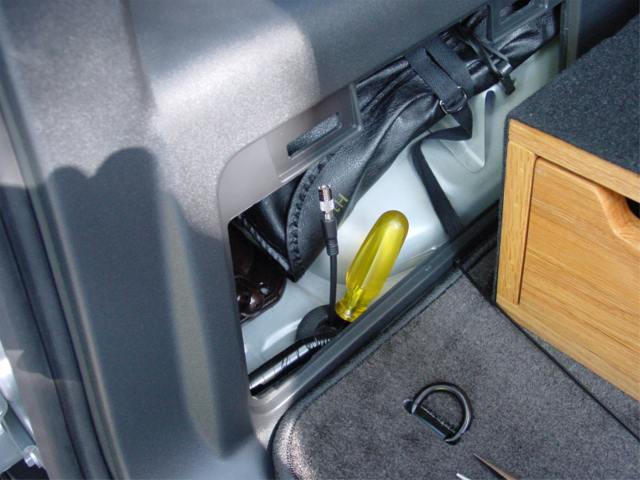
From there the coax
runs between the carpet and the plastic wall on the right side of the picture
and underneath the plastic this side of the D ring for tie downs back there.
You can see in the left side of the picture when the coax comes out, and it
continues all the way underneath hidden to the passenger side where it come out
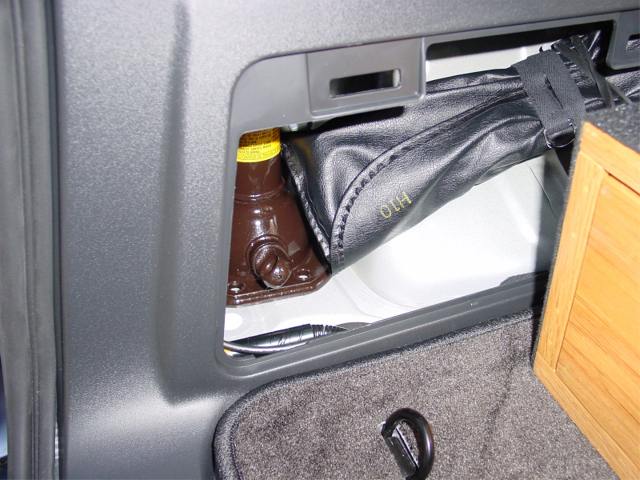
along the rear passenger door on the floor.
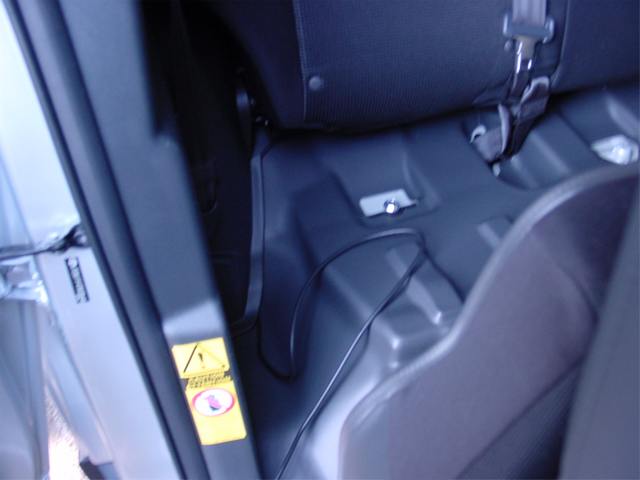
It continues hidden underneath the door sill protector...
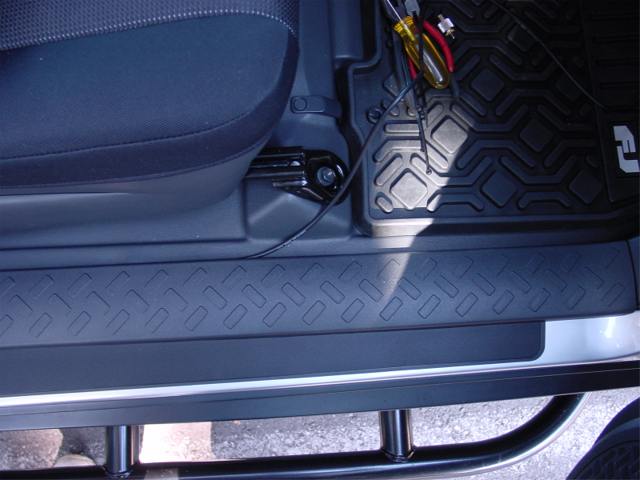
And finally exits
out front underneath the glove box where I will more than likely end up hanging
the CB.
Not to many places in this rig for this big of a CB radio, and I am partial to
it since it pumps out a healthy 25 watts compared to 4 watts for a stock CB.
Installed CB Radio 8-06-2006
3. CB radio location
This is the Cobra 29 Nightwatch radio I had in my 4Runner.
I have it modded to put out a very healthy 25 watts.
Yeah, it can punch through just abut anything.
Also, my coax install above, it has totally been redone.
Ahhhh, lets get to that now.
I woke up Sunday morning and was going to run my power wire out the firewall for
the CB.
I did not want to drill through the firewall on a brand new rig, and I could not
find a decent way to do it.
I said bag it, and later on when Cartoys opened up I called and asked them if
they could run the power for me.
They said sure, bring it on by.
They deal with this stuff daily, and they did an excellent job on my alarm a few
weeks earlier.
Once I got there, I also showed them the way I ran my coax, and the installer
said he could clean it up quite a bit by running it through a wire bundle for
the door instead of under the bumper and up through a grommet like I did.
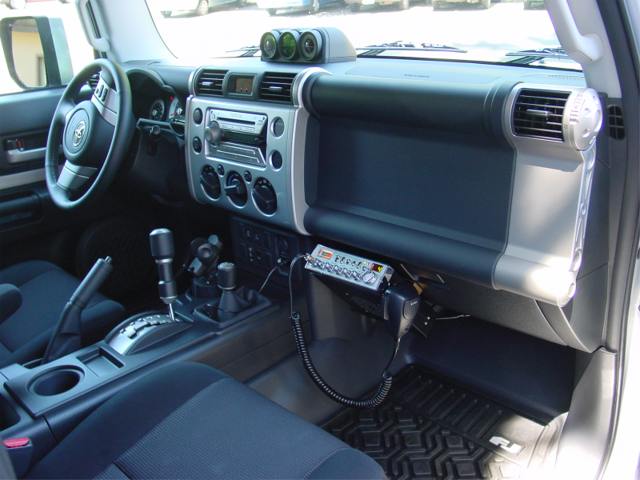
I also asked about the CB, and I told him I had installed it in my 4Runner on
the outside of the glove box.
He said he could do that.
I will tell you now I could not have done such a nice installation like he did.
It looks very good on the glove box, and the power wire under the hood for the
CB goes directly to the battery so I can turn the CB on at anytime.
He also put that wire in one of those black wire looms like they did with the
alarm.
Again, I could not have done such a fantastic job as this, and it was worth the
extra money to have this done right, especially on a brand new rig.
Here are some pictures.
The coax coming off the bandi mount is hidden better than when I did it, very
stealth.
The coax running into that wire bundle for the rear door.
Much cleaner looking than the way I ran it under the bumper.
It comes into the compartment again where the jack is stored like I had it, but
it does not exit out of the door like I had it.
He has it running underneath, and all hidden.
Here are two pictures of the CB installed on the outside of the glove box.
This does not get in the way of the passenger at all.
I will install another mic clip somewhere so I can get the mic cable up out of
the way of the passneger.
I will be installing the PA horn underneath the hood and also the external
speaker in the cab somewhere myself, stay tuned for that update...
That is a pretty straight forward job.
The CBs internal speaker is OK, but an external speaker is louder and clearer
sounding.
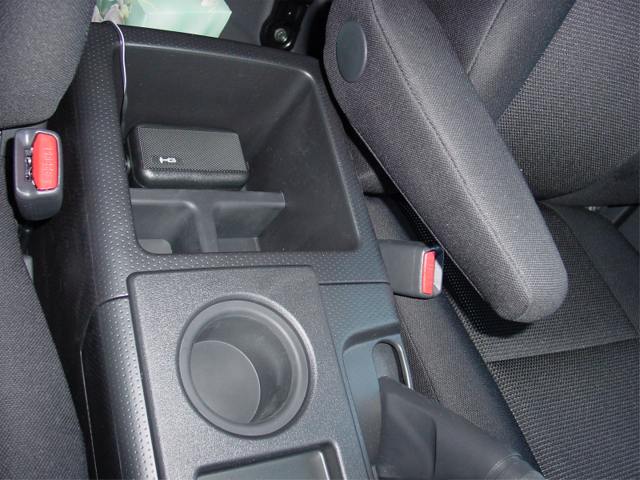
Installed External Speaker 8-20-2006
4. This is the "Trucker Speaker CB980.
I did not even have to screw or volt it down, it fits perfectly in the rear part
of the console.
I may at a later date drill a hole to run the speaker wire through to hide it
better, and I may even end up mounting it to the inside back of the console.
But for not it works great, and sounds much better than the CBs built in
speaker.
The color even matches the console pretty good.
Installed PA
Speaker ?-?-2007 (presently still not installed)
5. The PA speaker can be
very useful when you are outside of your rig and you want to monitor the CB for
any friends/groups who may be trying to contact you.
You can also use it as a "public address" system to broadcast your voice loud
when you need others in a group around you to hear what you are saying.
Insert pic here, not installed yet :)
Links to parts used:
Coax
heavy duty spring
quick disconnect
PA speaker
external speaker
all from
Walcott CB
The Bandi mount can be had by
looking up user Bandi over on
FJ Cruiser Forums
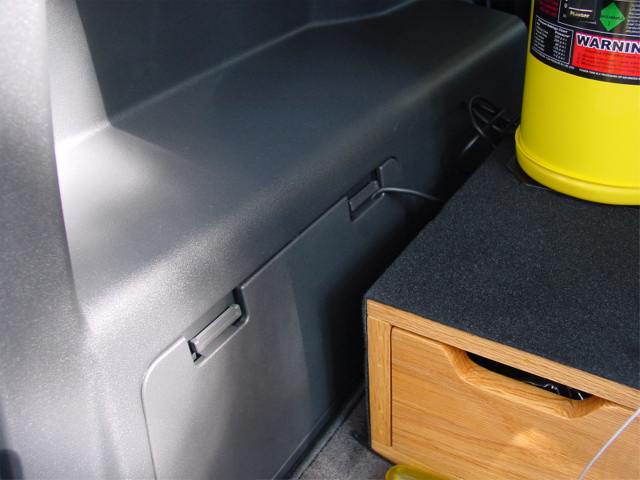
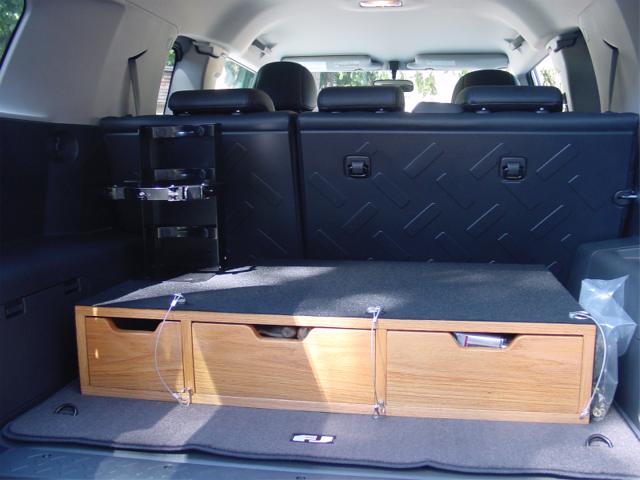
Cargo Box
Installed 7-25-2006
I had this cargo box
made summer of 2001 by a carpenter from the Boeing Renton plant.
Here are
some old pictures taken long ago, and with it
covered in blue carpet to match my '91 4Runner.
Shortly after placing my order for the FJ, I took the box to a local car stereo
shop and had them take off the old carpet and recover it in black.
It looks much better, and the carpet job is better too.
The guy who made the box did not do the best job at making the carpet stick.
This box holds a lot
of tools needed for an emergency on the highway, or on the trail.
With the air impact wrench and Powertank, I can change a tire if needed in
seconds flat.
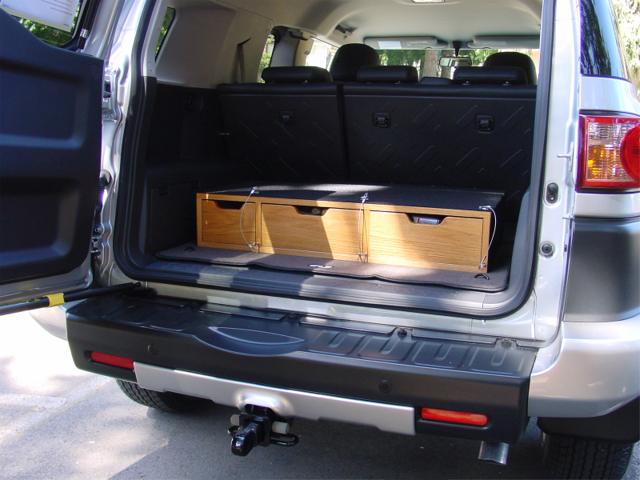
Here is a shot of
the "junk in 'da trunk" ;)
I just bought today (9-10-2006) two Rubbermaid kitchen drawer dividers for
silverware, accessories for the kitchen.
They work great for my middle drawer which contains mainly hand tools.
The plastic bin I was using in there before everything was just thrown into it.
Much easier now that it is well organized.
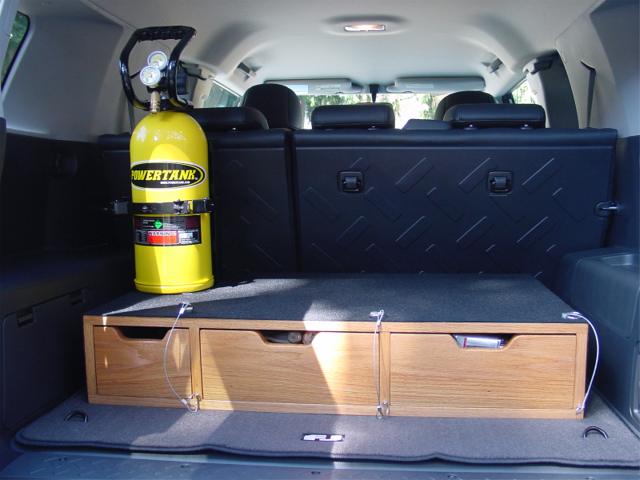
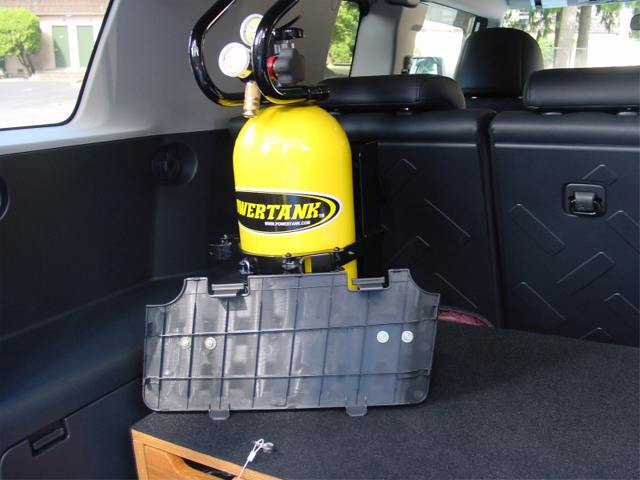
Powertank
Installed 7-28-2006
This is my second Powertank.
I had to sell the first one after my second layoff from Boeing.
Shortly after getting called back, I called up Steve Sasaki at Advanced Air
(Powertank) and ordered up the same 10 lb tank, but only in the new powder
coated yellow color.
I thought I would add a little pizzazz this time by going with a different
color.
I also had Steve install a quick female disconnect coupler at the end of the
hose so I could plug in my impact wrench and my Griot's Garage air inflator.
Otherwise I would have had to hunt down the coupler like I did the first time I
bought the tank.
There are many brands of C02 tanks out there now, but since I did business
before with Steve I thought I would buy from him again.
I like C02 as it is
very fast, faster than an air compressor.
One 10 lb tank will refill about 30 tires from 15 psi back to street pressure
after 4wheeling.
You can run air tools with it too.
Here is a
very old video of my taking off my lug nuts on
the 4Runner to put my winter tires on.
I bolted down the Powertank bracket with 4 bolts into the top of my cargo box.
It is rock solid, and is not going anywhere.
Powertank mounted to the bracket.
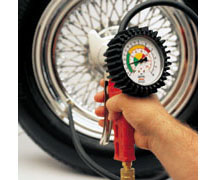
Here is the Griot's
tire inflator that I use to air up and down.
That is right, you squeeze the trigger half way to bleed air out, and squeeze it
all the way to inflate.
Very nice gauge, and it is a one hand operation as the chuck has a clip on it to
keep it on the tires valve.
Links to parts used:
Powertank setup
Griot's Garage tire inflator
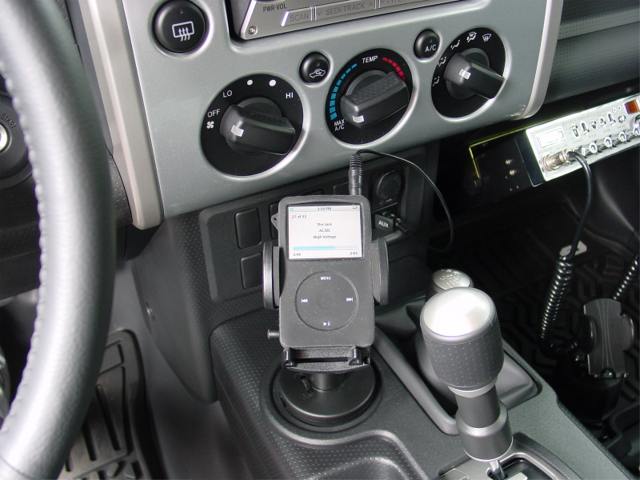
iPod Cup Holder
Mount (Homemade)
Installed 8-04-2006
So I am watching TV after
getting cleaned up from a day at work and an idea comes to me.
Several years ago I bought a squeeze mount at Radio Shack to hold my
Garmin GPS.
It itself hooks to another mount that mounted it to the heater faceplate
controls.
I unbolted it from
the Pro-Fit mount and took out the inner cup holder at the front of the console.
The console has two cup holders forward and aft, and inside of each cup holder
is a smaller one.
I then took the
inner cup holder and flipped it upside down.
The squeeze mount is then bolted to it with some scrap sheet metal to act as an
inner washer to strengthen it with the mount mounted to the top of the inner cup
holder.
You then take the setup and squeeze the sides of the inner cup holder and push
it back inside of the main cup holder.
Shazam! Instant iPod mount, and it is rock solid.
Here are a few pictures of the parts and the finished product.
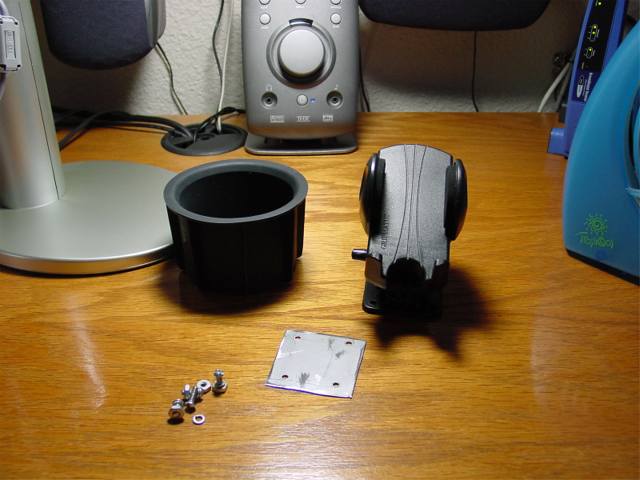
The base of my
squeeze mount is cracked, so later down the road I may end up buying a really
cool mount from a company called
Arkon.
They have a few mounts that will work inside of the cup holder.
A
PDA mount with part # CM923, and an
iPod mount with part # CM330.
I will probably end up with the latter one.
But for now my idea here works out pretty well to hold my iPod very securely.
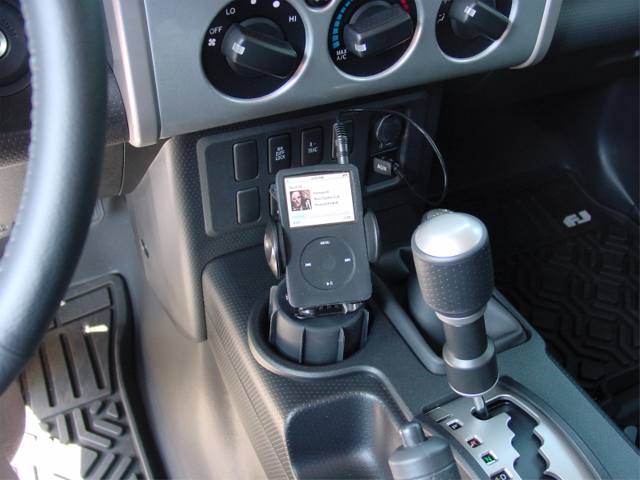
iPod Cup Holder
Mount (Store Bought)
Installed 8-11-2006
Well that did not
take long now did it?
I ordered the
Arkon CM330 mount.
The mount I made was OK, but kind of hard to reach the iPod to select tunes when
driving.
The Arkon CM330 lets the iPod sit up higher, and you can also adjust the angle of
the bracket letting you get the iPod or whatever MP3 player you use at the angle
that is best for you.
Installed really easy.
You will want to use the inner cup holder and insert the Arkon base into it.
Then take the whole assembly and push it into the bigger cup holder.
Works great, and I am glad my other one was cracked, enough to warrant buying
this unit.
Please note how much higher the holder sits up than the one I made, much easier
to control the Apples "Touch Wheel" on the iPod.

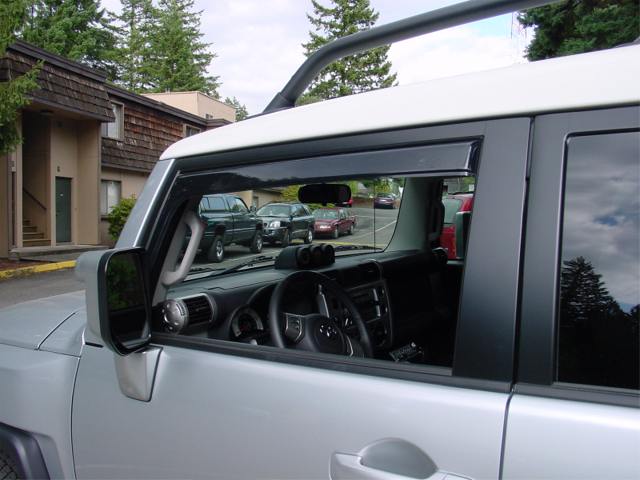
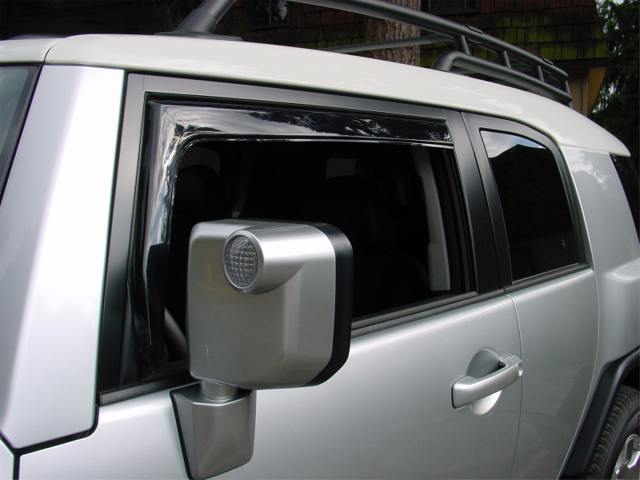
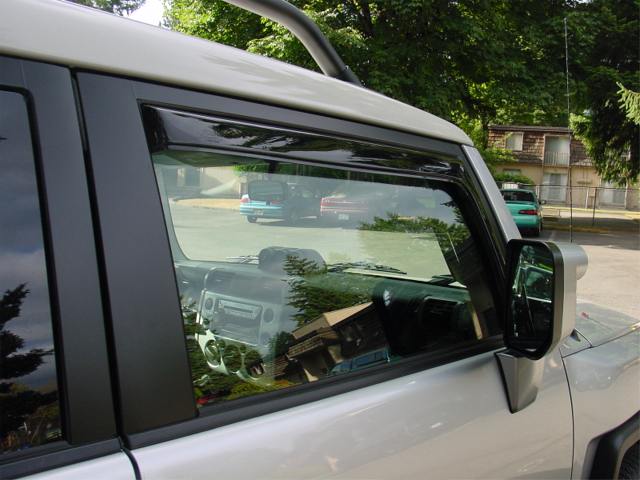
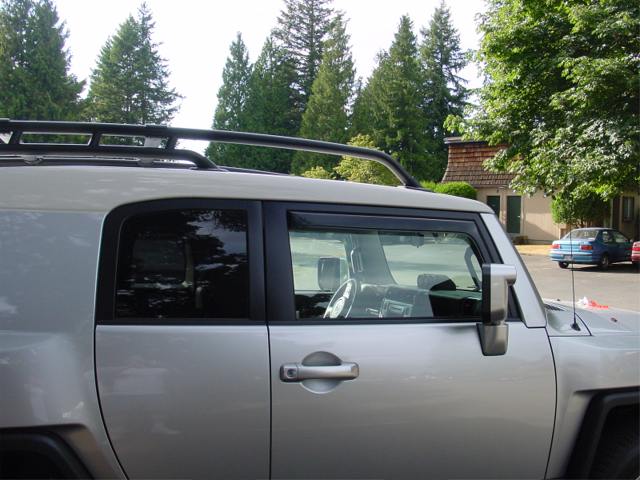
Lund Vent Visors
(In Channel)
Installed 8-11-2006
On my '91 4Runner I had
some Lund Vent Visors, and once again Lund to the rescue for the FJ Cruiser.
These are in channel ones, my first experience with this type.
I am use to the tape on ones, and these are nicer and give a much cleaner
appearance for the install since they are not taped onto the outside of the
window.
They fit up into the inside of the window tracks.
Mine are held on with 2 way 3M tape, but the that is only to help hold it to the
inside of the window track.
You can order these vent visors from
Deflectors4less.
It was so easy to
install these, total time was around 10 minutes including the prep work outlined
below.
Roll down your windows all the way.
Take a small scrub pad and clean the window channels, then swipe it down with
some alcohol pads.
Scrub pad and alcohol pads are included.
Peel back the sticky tape a bit, then insert into the channels.
Once in the channels, push the visors up into position, then peel the three
pieces of tape per vent visor off all the way.
Reposition the vent visor up into the channels again once all of the tape is off
exposing the 3M sticky tape.
Roll up your window to hold them in place while the sticky tape cures.
DICE iPod
Integration Kit
Installed 8-24-2006
The iPod or any MP3
player for that matter hooks up very easily to the FJ Cruisers head unit via
auxiliary receptacle on the lower dash.
However one can not control the MP3 player this way via your head unit or your
steering wheel controls.
Hence why I purchased the DICE iPod Integration kit from iCarKits.
I will not go into to much detail here, as I have a write-up on YotaTechs Tech
article section.
Click here to see the article complete with
links on where to buy it.
With the DICE device, you can control an iPod only via your steering wheel
buttons, the head unit, and still the iPod itself.
The DICE only works with an iPod.
What is cool too is that when you turn off the head unit or shut the vehicle
off, the iPod also turns off.
The DICE unit also charges the iPod when in use, very slick.
Below is a picture of all the parts of the device.
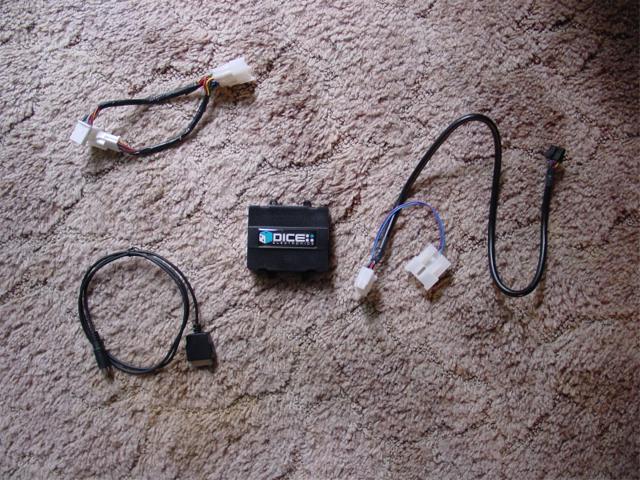
Only one
drawback at the time of this writing, and that is it does not display the text
of the song on the head unit.
Only displayed if the title track, and the number of seconds/minutes into the
song.
That will be rectified down the road via firmware patch.
I still give this a high thumbs up, as you have control over the iPod.
9-22-2006
Received a brand new unit
with a firmware upgrade.
This new unit will work on the new Toyotas and display the song text like it
should.
If you want one of these units, get a hold of DICE directly.
The links are in my write-up in the link above on YotaTech.
Maglite
Installation
Installed 9-10-2006
In the 4Runner I had the
Maglite mounted with C clips to the front passenger Husky floormat.
If interested, visit my 4Runner section linked off of my table of contents here,
then hit the 4Runner mods link.
The FJ Cruisers
floormats do not allow me to mount the Maglite like I did in the 4Runner.
I looked up front, but I really did not want to drill holes into the side of the
console.
I found a good place in the back, the right side door that covers the cubby hole
back there.
Owners of the FJC with the factory subwoofer option do not have the door there
like I do.
I drilled holes into the door (if I goof, I am sure a new door is not much money
from Toyota) to mount the C clips.
The Maglite has the head facing backwards, as this way if I ever have to stop
real fast, the head of the light will keep it from shooting forward and out of
the bracket.
Below are a few pics
of the C clips mounted to the door, and also showing the back of the door using
oversized washers.
Using a bigger washer along with a lock washer on top will keep the bolts from
backing out while off road, and the bigger washers will help keep the plastic
from caving in when tightening the bolts down.
I used #6 machine bolts at 1/2" long.
These fit the small holes perfectly in the C clip mounts.
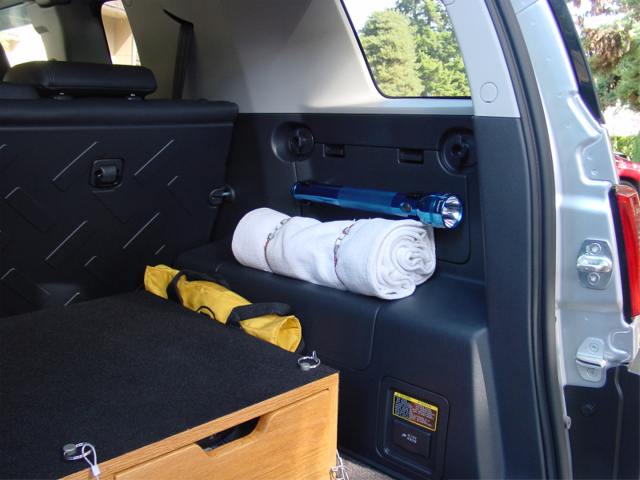
Below is the Maglite mounted to the door panel.
As you can see, the head of the light will keep it from flying forward.
This mod took less than an hour to do getting all the parts out, measuring
twice, (always measure twice, cut once) drilling, then bolting it all together.
Turned out pretty darn good if I do say so myself.
A black Maglite would look better with the FJ Cruisers colors, but I am not
going to run out and get one, this blue one has been a trusted friend since '99.
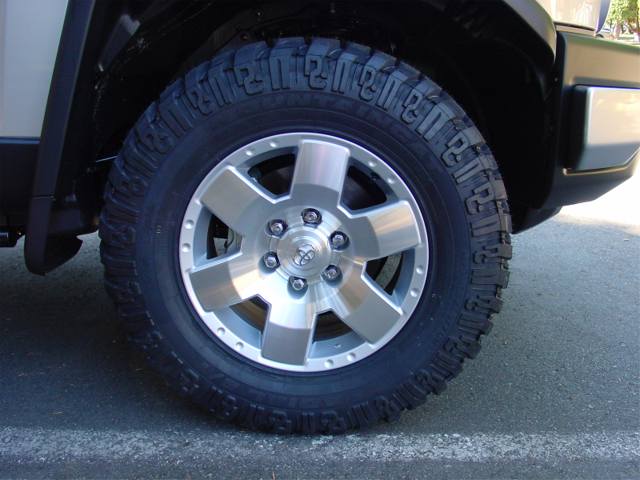
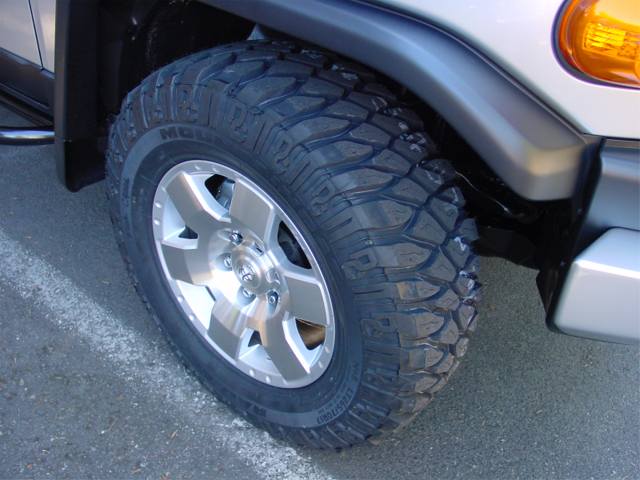
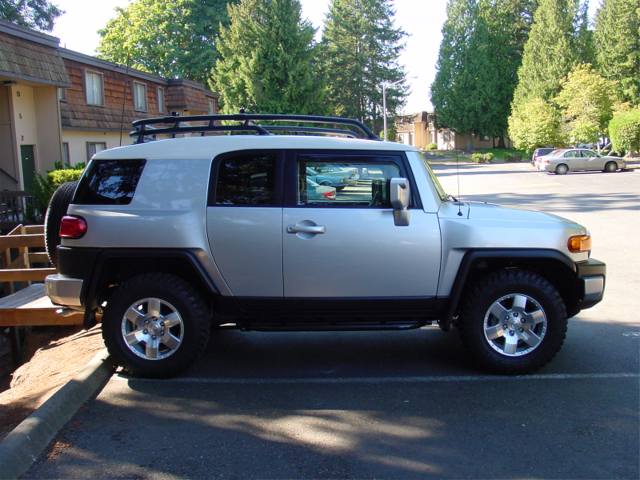
Dick Cepek
Mountaincat MT Tires
Installed 9-11-2006
I have been wanting
to get rid of the cheap Bridgestone Duelers that Toyota puts on the FJ Cruiser
from the factory.
I did a ton of research on
YotaTech and got it narrowed down to the
Cooper Discoverer STTs.
They are suppose to be the tire to get.
Great in mud, sand, rocks, you name it.
Jason Demello runs them on his FJ Cruiser.
However, no one
around my area has these tires right now in my size.
My local
Les Schwab dealer the day I bought my new tires
had a set he found coming to him from Pennsylvania.
I called up to cancel them after talking to him on the phone a bit about these
new Dick Cepek tires.
He told me on the phone that they are identical to the Cooper STTs.
In fact they are made in the same mold where the Coopers are, and these are
specially made for Les Schwab Tires and branded with the Dick Cepek name.
I called up Cepek and they had not even seen them.
Go figure!
When I got to Les
Schwab we put a Cooper STT up next to the DC Mountaincat and they are identical
except for the design on the sides.
Where as the Cooper has some fancy scrolling design, the Mountaincats had DC
sculpted on the sides with DC being short for Dick Cepek.
If you look on
Cepeks site, you will see their other tires
have the DC on them too.
I went ahead and had
Les Schwab mount up four of them for now, I will do the spare before to long.
They were quite impressed that these big lugged tires took less weight to
balance them than the factory tires.
So little weight over other tires they carry too.
I also got these in the stock size of 265x70x17 which is a 32".
I am going to go ahead and get 5 more of these come spring sized at 285x70x17
(33") and new wheels.
I will be able to run the bigger size with no problems once the OME lift is
installed.
They have a nice low
hum to them, and they ride as smooth as the tires that came off, I am very
impressed with them.
Can not wait to try these puppies off road.
They also gave me $200 trade in on the four stock tires, not bad considering
they had 1,200 miles on them already.
For anyone in the
Pacific Northwest looking for a great off road tire, head on down to Les Schwab
Tires and check these out.
I think you will like them amidst all the other brands out there.
Everyone runs Goodyear or BF Goodrich.
Dare to be different :)
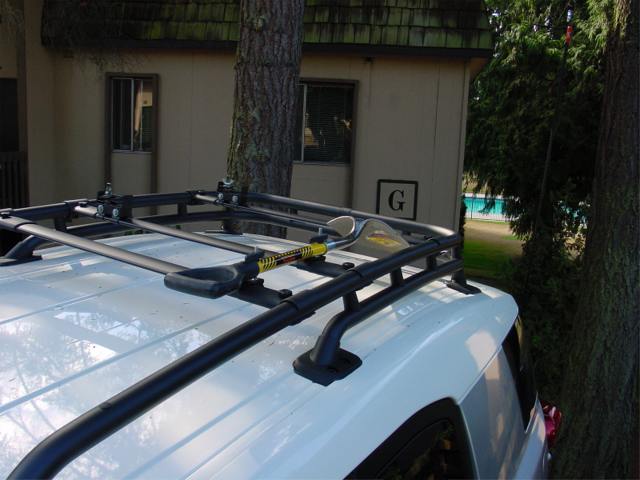
Home Brewed
Shovel Mount For Stock FJ Cruiser Rack
Installed 9-16-2006 (no longer using, see page two)
On my '91 4Runner I had
made a
home brewed shovel mount using the Yakima Snap
Arounds, some long bolts, and some Yakima plastic wingnuts.
The shovel I had bought at Lowes hardware.
Since Yakima has the 10V Mighty Mounts that let me mount the Slee Hi-Lift
mounts, I knew Yakima would have the equivalent of a mount that would let the
bolt go vertically, but the mount would be horizontal.
With the bolt vertically, this would allow the same shovel I used before to be
able to sit on top of the FJ Cruisers rack slats.
After much debating with the clueless tech dude at Yakima, he thought the 23H
horizontal Mighty Mounts would work.
I ordered up a set from RackOutfitters.com, and sure enough, they fit perfectly.
However my old bolts I had used on the 4Runner were a little bent, so I had to
buy new ones.
The size you want is 5/16-18-4, and they are called hex tap bolts.
Also since I took off two of my racks slats when installing the Hi-Lift mounts,
the two slats left were to far apart to make the shovel work with its two holes
that are drilled in it.
I had to add back a slat and move it in front of the most forward slat, and that
worked out perfectly.
Below are some pics
showing just the 23H mounts, and finally a few shots showing the shovel mounted,
and across the roof you can see the Slee Hi-Lift mounts.
The Hi-Lift is to heavy for me to heft it up there, so I am still looking at an
alternative to as how to mount it.
Parts used:
Yakima 23H Mighty Mount Horizontal Mounts
New 5/16-18x4 hex tap bolts
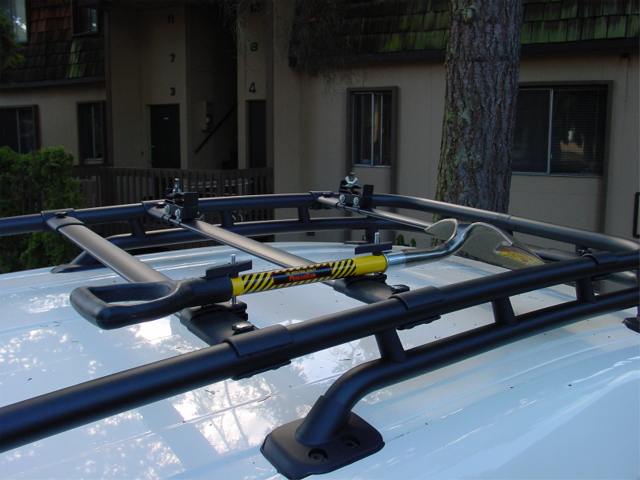
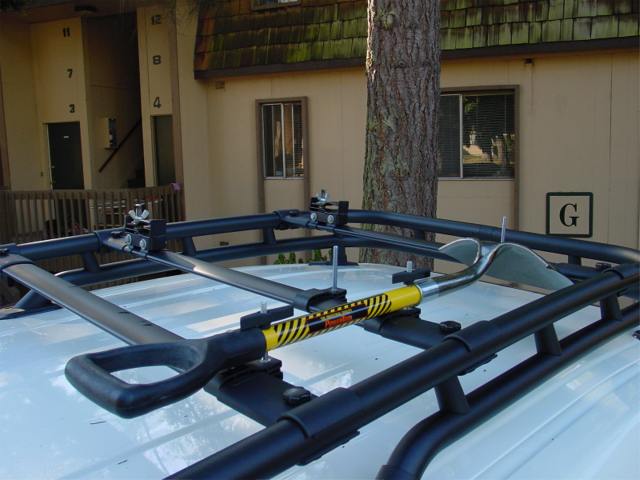
Home Brewed Axe Mount For Stock FJ Cruiser Rack
Installed 9-24-2006
(No Longer Using, See Page
Two)
Once again the Yakima 23H
horizontal Mighty Mounts come to the rescue. (See entry above)
Since I had two of the 23H mounts left over from a box of four, I used these to
mount an axe up on the roof rack just like I did the shovel.
Picked up a fiberglass handled True Temper 36" Premium Michigan axe, part number
118590 from Lowes hardware.
Drilled two holes in the handle (like the shovel) 21.75" apart after measuring
the distance between the two bolts once they were mounted.
Used the same 5/16-18x4 hex tap bolts too since I had some left over from the
shovel project.
The axe fits neatly besides the shovel as you can see in the pictures below.
The first picture just shows the hex bolts coming up out of the 23H mounts.
I am loving these Yakima Mighty Mounts.
It would be very easy to get another set and more hex bolts and mount a jerry
can holder up there.
I may do that, but I would carry water instead of fuel.
I also do not see
why some are so fast to get rid of the factory FJ Cruisers rack.
With a little imagination, this rack rocks, and I actually like the look of it
better than the Gobi racks.
FourTreks Modular
Hi-Lift Mounts
Installed 10-05-2006
FourTreks Precision Off-Road Products uses the circular rings that can attach to
any round bar type surface.
Owner Luke Clark offers the rings as a stand alone item, or with additional
mounts to mount up anything from a camera, fire extinguisher, Hi-Lift jack, you
name it, the possibilities are endless.
They are constructed out of billet aluminum.
I found his site one
day while surfing for some Hi-Lift mounts, and I liked what I saw.
I did have the Slee Hi-Lift mounts as seen near the top of my page here, but I
can not heft the jack up inside of the basket part of the roof rack, not even
with a ladder.
It sucks getting old ;)
The Slee mounts will be coming off shortly...
Luke's mounts hook
to the outside of the rack on the round support tubes, and I can reach that
without any difficulty, at least for a few more years.
No need for a ladder or step stool, it will be easy to load up and remove the Hi-Lift jack.
The whole kit attaches very easily, and Luke provides very well detailed
instructions, but I really did not need them at all.
You simply take out the two 1/4" hex head allen bolts and separate the rings,
then put them around your round bar.
Put the bolts back in and tighten.
Then you take the accessory mount and bolt it up with the same type of bolts.
TIP:
When you separate the rings to install them, make sure you put them back the
same way, do not reverse one.
Reason is they are cut out of the same block of aluminum, and they will mate
better if you put them back the same way you took them apart.
Below are some
pictures of the Hi-Lift mounted on the rack.
You just place the jacks holes over the studs of the mounts, then put on the
billet aluminum spin off nuts, and tighten them down to secure the Hi-Lift jack
to the rack.
You can see in the pictures I have the mounts angled up.
This way the jack leans in towards the rig and its own weight helps to hold it
in place.
Also on the Hi-Lift
is WabFabs Hi-Lift adaptor.
The Wabbit makes them in many sizes to fit various diameters of sliderz.
His device will allow you to use the Hi-Lift with your sliderz and not worry
about the jack slipping off of them.
If you are using your Hi-Lift with your rock sliderz, the Wabbit's adapter is a
must have!

Parts used:
FourTreks
homepage
FourTreks Hi-Lift mounts for the FJ Cruiser
WabFab
Off-Roads homepage
Many More Mods On The Next Pages
Please click here to go to page 2
Please click here to go to page 3