Welcome To
Corey's FJ Cruiser Page Of Mods
Page Three
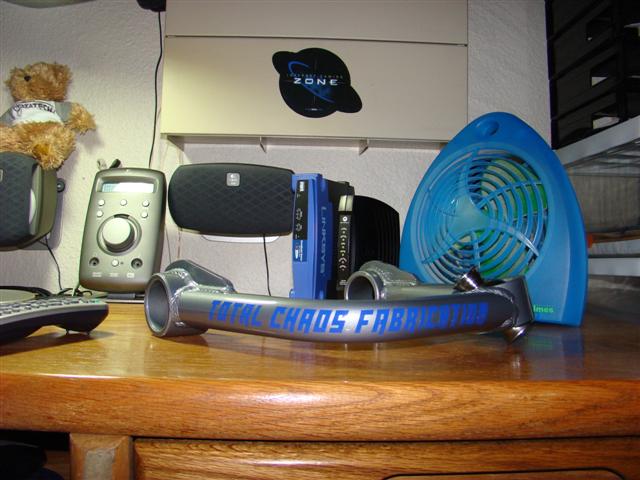
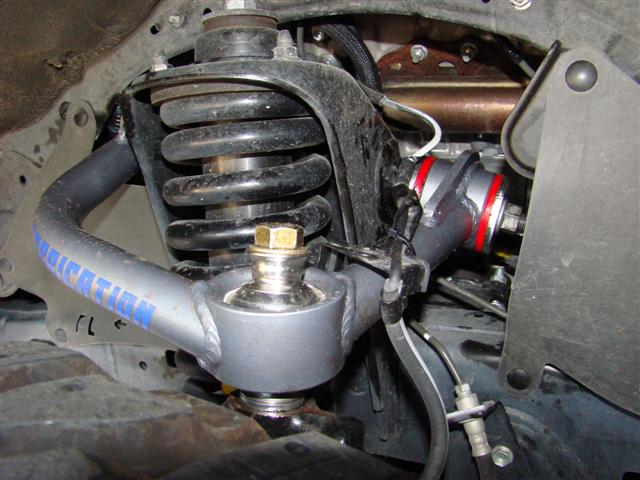
Total Chaos Fab
Upper Control Arms
Installed 10-2-2007
Upon having the FJ
Cruiser lifted late last year, I noticed a bit of wandering at highway speeds.
This happens to 2005 + Tacoma users too, not just FJ Cruisers.
Upon researching the Internet (wonderful thing that thing be) I learned problem
can often be traced to the caster being to high for the alignment.
The stock upper control arms often do not give enough adjustment when dialing in
the caster.
I checked on Total Chaos Fabs website, and saw that is what they say:
"When aftermarket
lifts are installed on these model vehicles the OEM suspension design looses
caster.
By altering the factory caster, the vehicle will lose on road handling &
performance and has a tendency to wander when driving down the road.
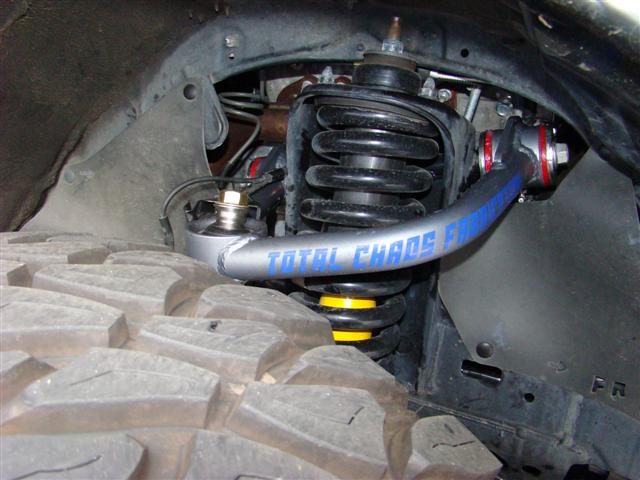
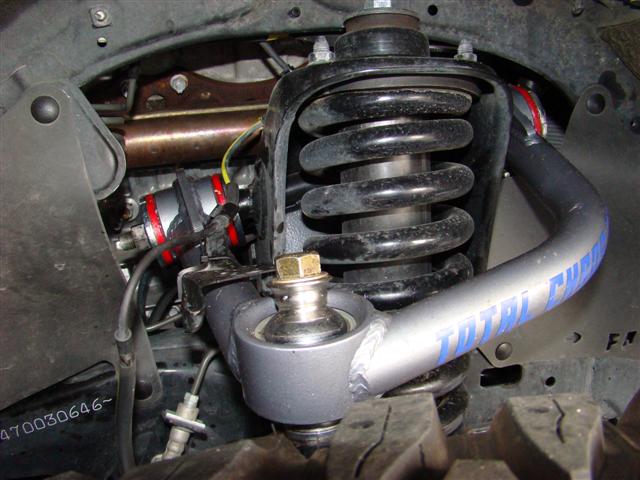
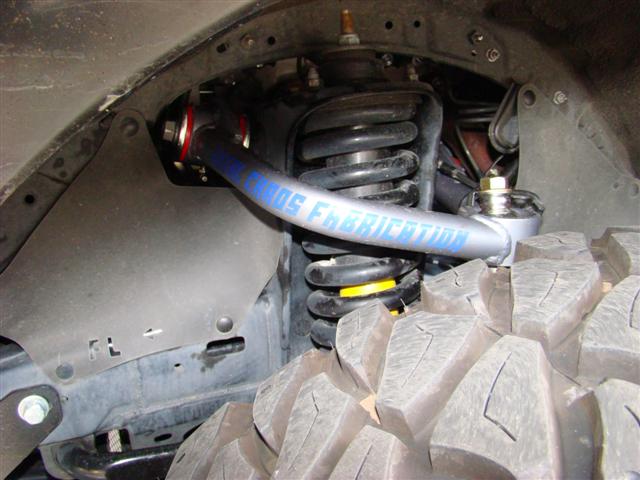
TC developed the UCAs to add caster to the suspension when aftermarket coil over
shocks and other lifts are installed.
This will increases overall handling and aids in the alignment of the vehicle."
These new arms also
eliminate the ball joints as they utilize what is known as uniball technology.
You can see
in my alignment chart from the other day that
the caster was to high, not within specs.
With the addition of the new control arms, the alignment is now within specs.
I had my local Toyota dealer install these while I was at work.
They were happy to do it, as they realize they may be getting more requests from
lifted FJ Cruiser owners.
I really wanted to see how they improved the ride on the freeway coming home
from work today, but alas I was bucking high winds, and the FJ was getting
tossed around a bit.
I will have to wait for a much calmer day to get a feel how much the ride has
improved with the addition of these.
They sure do look nice though.
Parts used:
Total
Chaos Fabs website
Total Chaos upper control arms for the FJ Cruiser
Dual Battery Kit
Installed 10-6-2007
Dual battery kits
are cool, and high on many an off roaders list of modifications to do.
With it you can safely start your vehicle should you accidentally run down your
main battery.
This mod also goes towards the "Expedition" type of rig I am building.
A few more mods such as the Safari snorkel and perhaps a roof top tent, and a
new rear bumper will round out my rig for the look/setup I am trying to achieve
here.
I had my local Cartoys do the install on this, as the Clifford battery backup
alarm was in the way, and I needed them to move it to keep it under my warranty
with them.
I had asked them a few weeks back if they have installed dual battery kits
before, and indeed they had.
They had one of their best installers on this today.
He ran into one snag which was not his fault.
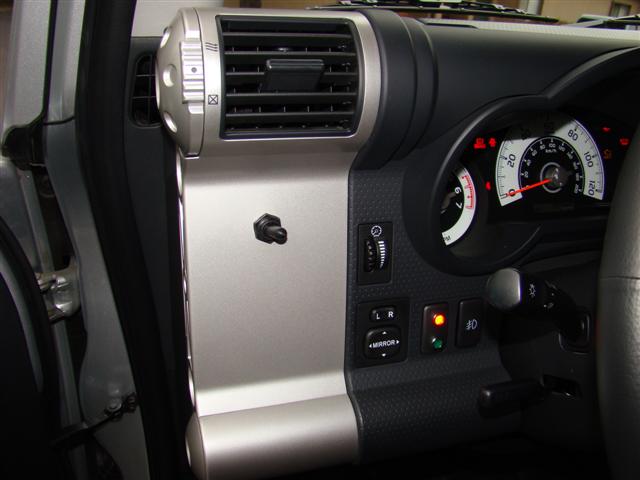
The Painless provided switch is to big to fit into the dash switch blanks.
I had forgotten that Wayne had procured a smaller three way switch to go into
the switch blank in the lower console.
I suggested to the installer that he could drill a hole in my drivers side air
vent panel.
He was able to do that, but had to turn the switch sideways.
There was not enough room with the shape of the switch in the back to have the
handle operate in the up/down position, so it now operate back and forth,
left/right.
For kicks I called up my local Toyota dealer to see how much one of these vent
panels go for, and it is a shocking $149 or so.
I may in the future buy a new one, and then get a switch like Wayne's and mount
the switch and LEDs down below in the lower console like he did.
But it really does not look to shabby where it is now.
I just may decide that it is not worth the $150 to move the switch.
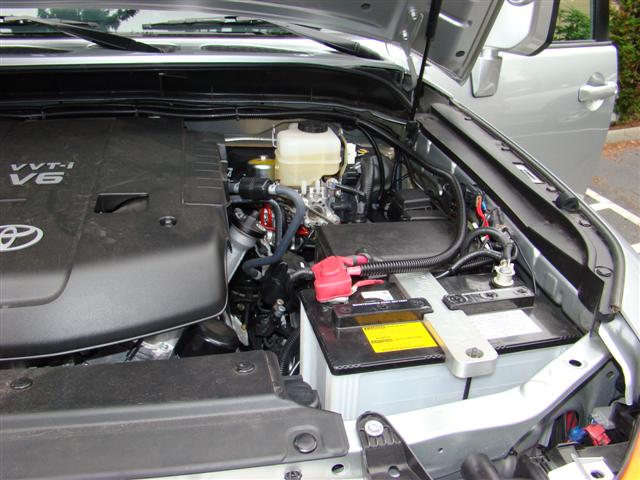
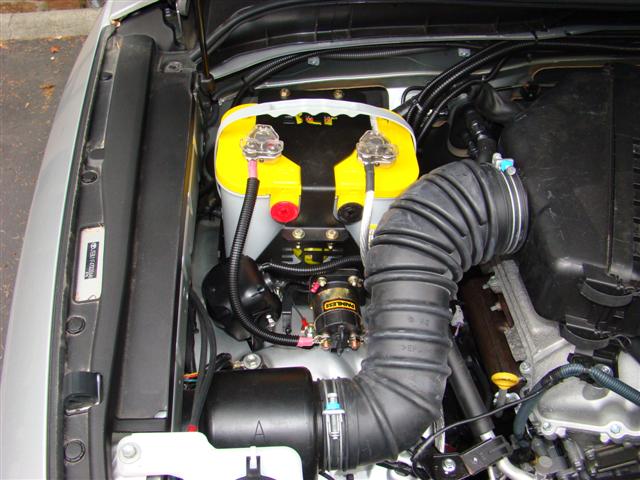
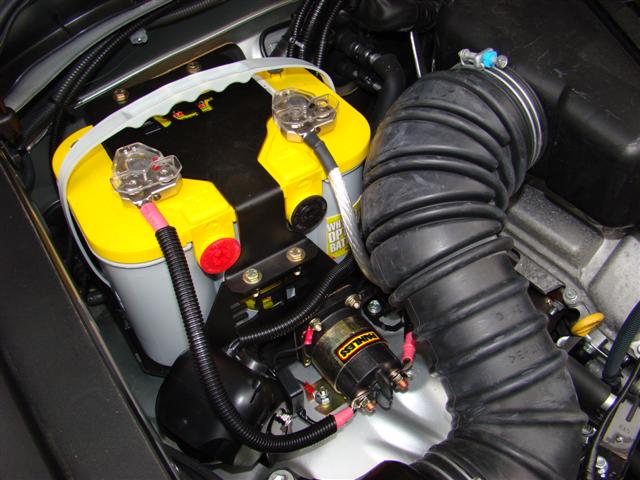
Pictures one, two, and three show the stock battery with the new positive wire
coming off it and the other two pictures show the new Optima battery, the
Painless solenoid, and the Bluetorch Fabworks battery tray.
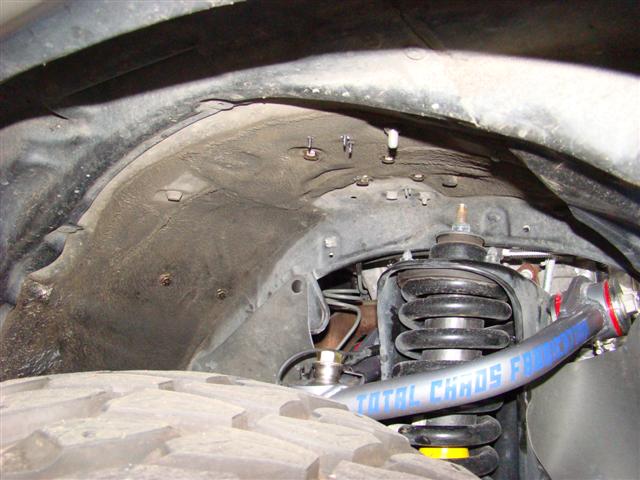
Picture four shows the six bolts with the heads in the fenderwell with the
threads pointing up.
The two at the rear of the tire and the two in front of them about one foot are
the 5/16th bolts holding the battery box down.
The two up front above the Old Man Emu coil assembly are 1/4" bolts used to hold
the solenoid to the fenderwell.
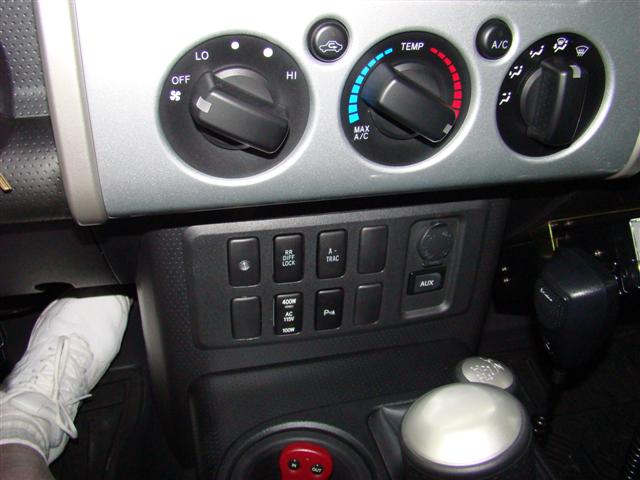
Picture five shows my alarm LED moved to the new location to the left of the
rear diff lock switch.
Previously the LED was up on the dash between the mirror adjusters and the fog
lamp switch.
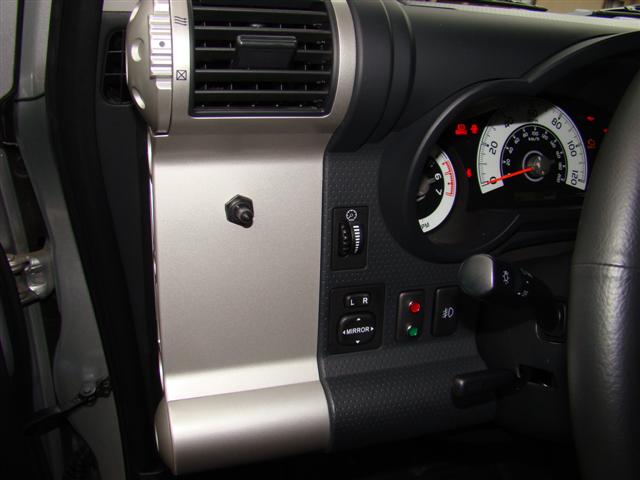
Picture six shows the red and green LEDs now mounted where the alarm LED use to
be.
Picture six also shows the switch in its centered position.
This manes the main battery is only used for vehicle operation.
The solenoid is not activated, and the auxiliary battery is not being charged.
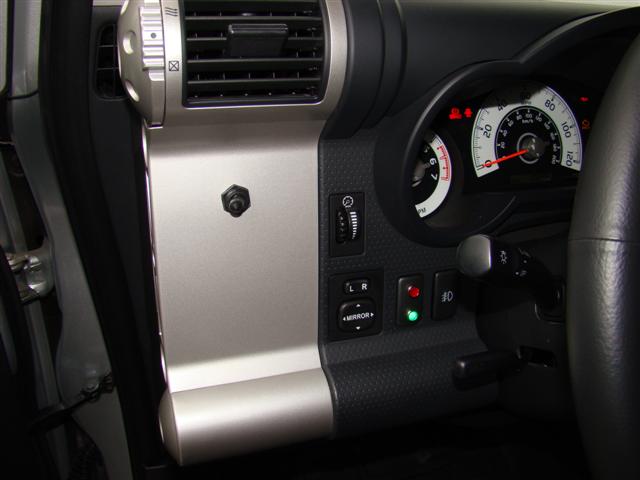
Picture seven shows the switch in the green light position.
The main and auxiliary batteries are connected for charging and starting, and
the green light is illuminated when the key is in the on position.
The green light will not activate when the key is in the off position.
You would use this position to start your vehicle if you drained the main
battery.
For example, winching with your engine off, running your stereo to serenade your
friends with the engine off, or using a fridge/freezer such as like the ARB one
I have, and you drained your main battery.
If that happens, you would flip the switch from the center position (main
battery only connected) to the green light or the red light position, and you
would then be able to crank over your engine to start the vehicle and charge the
main battery.
Picture eight shows the switch in the red light position.
The main and auxiliary batteries are connected together and the red light is
illuminated at all times regardless of the ignition switch position.
This will come in so handy when I am out camping running the ARB fridge for a
few days.
If I accidentally drain the main battery, I will be able to have a way to start
the vehicle and then charge back up the main battery.
Here are some additional pictures I grabbed off the websites below.
The box before being modified by Wayne, and a Yellow Top battery by Optima.

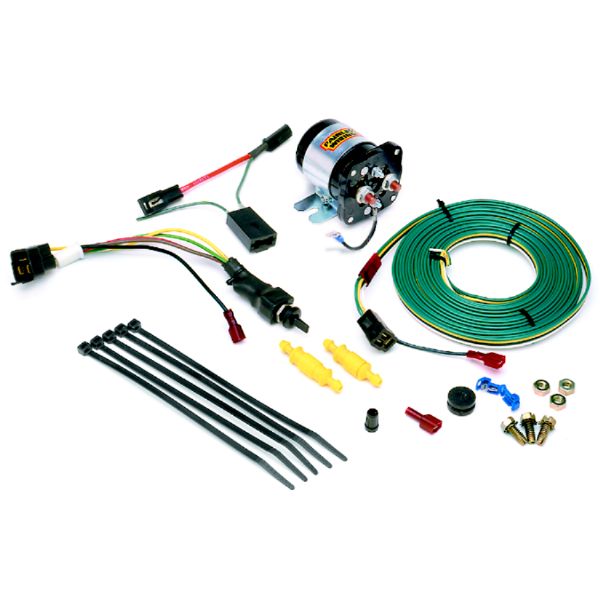
The Painless dual battery kit showing all of the parts laid out.
Parts used:
Bluetorch Fabworks battery tray
The box has been modified by member KD7NAC_07FJ (Wayne) by welding on a plate in
the rear that follows the contour of the FJ Cruisers fenderwell, and thus giving
it a more secure mounting by running those bolts above the rear of the tire as
seen in picture four.
Painless 250 Amp Dual Battery Current Control System
Bought from Jegs
Optima Yellow Top model D34_78
Do an Internet search to find the best price on the battery.
I got an excellent deal on mine at my local Cartoys stereo shop.
Springtail
M-Packs
Installed 11-10-2007
The M-Packs and rack
are from the group buy I got in on awhile back.
Anyone interested in installing these into other rigs besides FJ Cruisers and
Jeeps should contact Springtail Solutions.
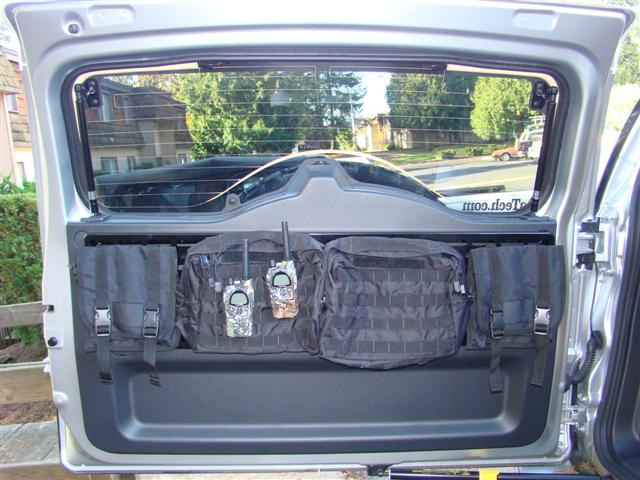
The kit allows you to mount a rack on the rear of the FJs door, and that rack
will then let you mount bags of different sizes and configurations to it.
They use the military Molle strap system, something I was not really familiar
with until I saw the thread put up by the vendor on fjcruiserforums.com's site.
Here are the parts laid out, the rack with the packs.
The bag at the very top of the pictures goes into the compartment in the right
rear.
Those with the factory subwoofer would not be able to put that bag there, as the
subwoofer occupies that space.
The two big bags and the smaller ones with the two straps mount to the M-Pack
rack.
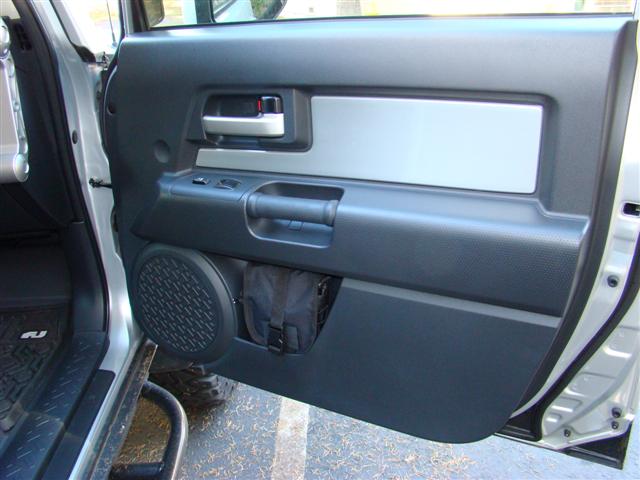
The smaller one strap packs go into the front door pockets for a perfect fit.

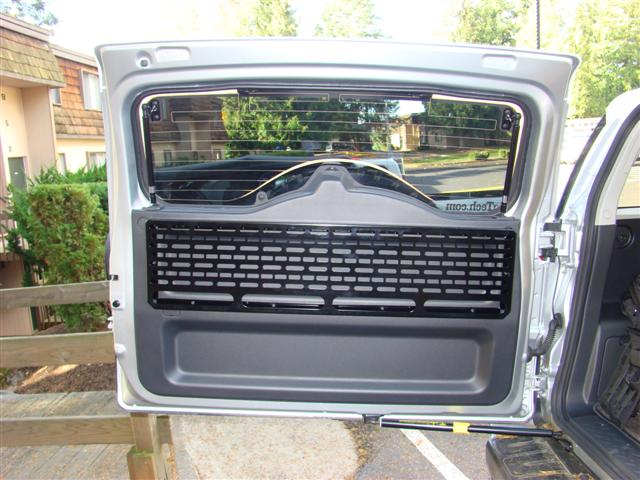
The next four pictures shows:
Rack mounted to the rear door
Pack in the rear right hand side compartment
Packs in the front door
Packs mounted to the rack
I have a lot of filling to do on these packs still.
The front two packs in the doors each house a Boeing first aid kit I received at
work as an award for something I did :D
Before the first aid kits sat in the front pockets and shifted around a lot.
With them stuffed into the Molle packs there is no movement now, it is a nice
tight fit.
The mounting of the packs and what you carry possibilities are endless, and
using your imagination I am sure you might find a way to bring along the kitchen
sink on your next overland travel, camping trip, or 4wheeling trip.
Parts used:
Springtail Solutions/M-Pack
Installation instructions for the rack
Installing the Molle packs onto the rack
Safari Snorkel
Installed 11-14-2007
I had been wanting a
Safari snorkel ever since I heard they were going to make one for the FJ
Cruiser.
I contacted ARB to inquire more about them, and they would get in a few before
the huge shipment that would be distributed to other dealers.
Safari air freighted in three of them to ARB headquarters not to far from where
I work, and one of them had my name on it.
The others went to ARB for their FJ Cruiser just in time for the SEMA show in
November of 2007, and Micrad, a member on a few FJ Cruiser forums.
So that makes me the third FJ Cruiser in the USA to have the snorkel installed.
On the same day mine was installed, the ocean container arrived at ARB with 80
on it to be distributed to various vendors.
As I write this, there are now about three other snorkel installations
completed.
So why did I get a
snorkel?
Not really for water crossings, although we did opt for the extra sealing with
RTV sealant of the holes in the stock air filter box and the assembly between
the fenderwells, but mainly I wanted the snorkel for dust control up where I do
most of my 4wheeling.
When following other rigs up there during the summer months, you can not see
more than about 15 feet in front of you.
The snorkel will really help on keeping the air filter cleaner, and giving it
cooler air to breath.
We also test fitted
one of those 7" pre-cleaners, but it is the same size as the snorkel tubing on
top.
All one would have to do is get a slightly bigger tube and slip it over the top
of the snorkel tube after the head is taken off, then slip the pre-cleaner into
the top of the adapter tube.
Finish it off with a few black hose clamps, and it will look good.
However using one of these pre-cleaners will cut down on the flow of air getting
to your engine.
I think they are best used if you are going to be constantly out in dusty
situations for an extended period of time.
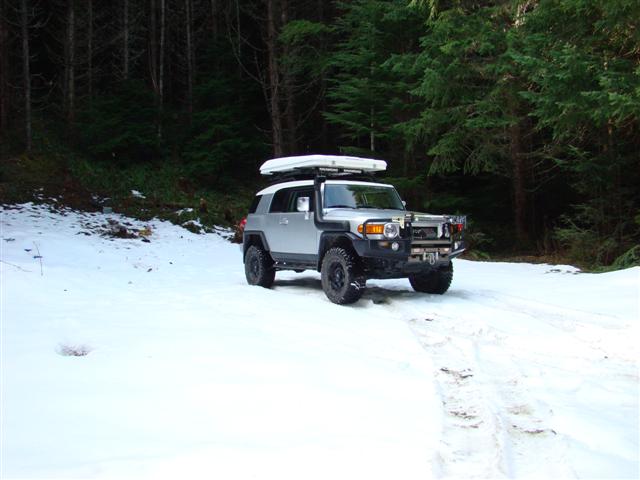
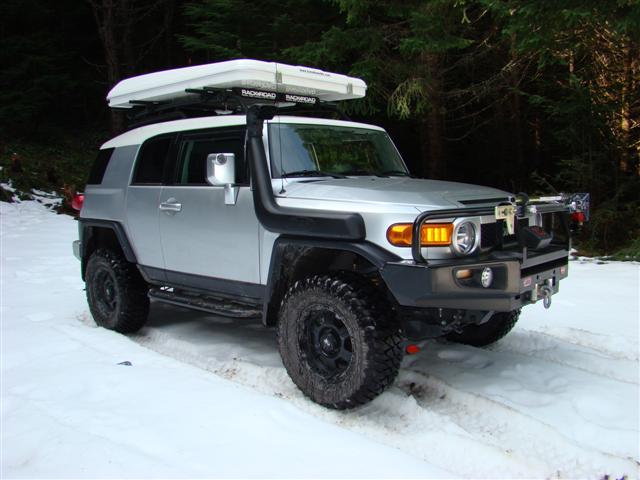
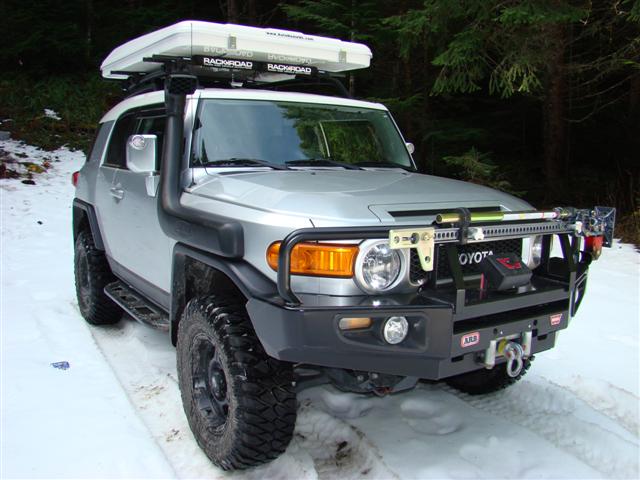
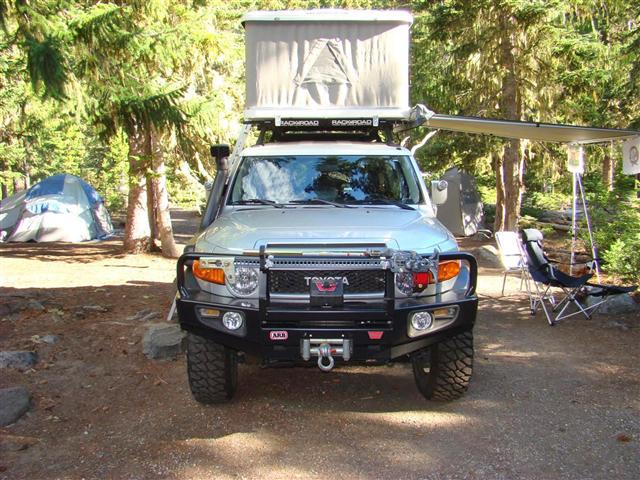
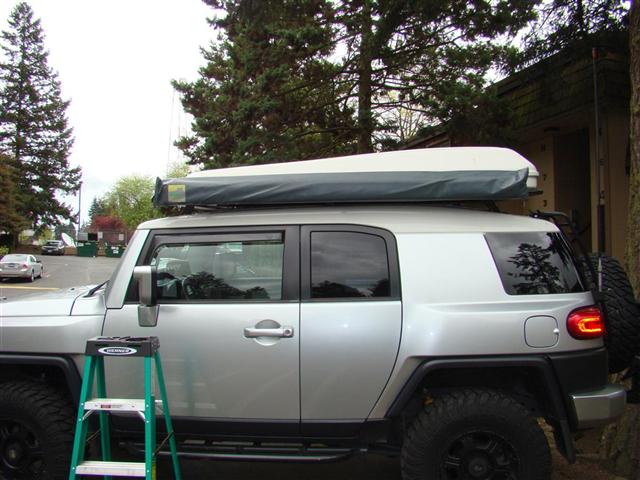
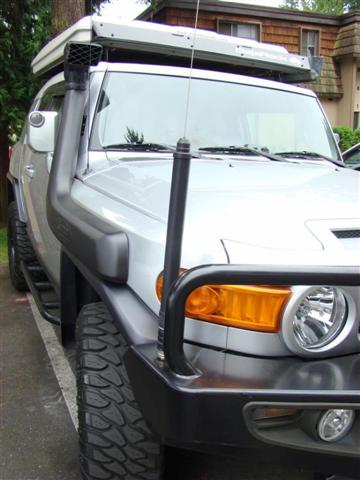
Below are a few
pictures taken out in my driveway.
I will replace these pictures with much better ones at a later date.
No underhood pictures, as it looks the same as it did before.
Also when sitting in the drivers sear, you can not even see the snorkel, and you
can only see a portion of it from the passenger seat.
The stares though I am getting now shows that not many are familiar with seeing
these.
There are not really to many vehicles running around here with a snorkel on.
Parts used:
Safari snorkel part number SS410HF
Installation instructions from Safari's website
Focal 165V2
Component Speaker Front Door, Infinity Kappa 3.27CF Rear Speakers For The Rear Cargo
Area, And An Alpine
PDX-4.100 Amp To Power The Speakers
(Phase II)
Installed
11-17-2007
The first phase was
to remove the factory headunit detailed earlier in this thread back at the end
of March 2007.
The second phase consists of getting rid of the junk factory speakers and going
with better ones that let the real music come through, and also an amplifier to
power the speakers in all their glory.
The following components were installed stealth, you can not tell they are
there.
1. Focal 165V2 6.5" component speakers with tweeters.
The Focals replaced the factory 6x9s in the doors, and the tweeters replaced the
factory speakers up in the dash.
The shop made custom plates that matched the factory ones to hold them in the
cavity of the door.
2. Infinity Kappa 3.27KF 3.5" speakers for the very rear in the cargo bay.
We were going to do Focal 4" speakers, but they were to deep to fit in there.
Plus the Kappas were close to $100 cheaper.
3. Alpine PDX-4.100 amp which is a four channel amp pushing out 100 watts each
channel.
This is powering both sets of speakers.
4. Dynamat Xtreme two door kit to make the Focals sound even better.
Below are some pictures I pulled off the web of the components since all my gear
you can not really see.
The sound is great after I took a few days to dial in the EQ settings and more
on the headunit.
Phase III will consist of a JL Audio W6 10" subwoofer housed in a custom shop
built fiberglass enclosure covered in black carpet, and another Alpine PDX amp,
the 1.600 which pumps out 600 watts mono.
Parts used:
Focal 6.5" component speakers for the doors, 165V2
Infinity Kappa 3.27CF rear speakers in the cargo area at
the rear
Alpine PDX-4.100 amplifier
Dynamat Xtreme two door kit
Miscellaneous stuff including
four gauge wire for the amp, cable ends, underhood fuse.
RCA wires and four gauge wire kits are made by
StreetWires.
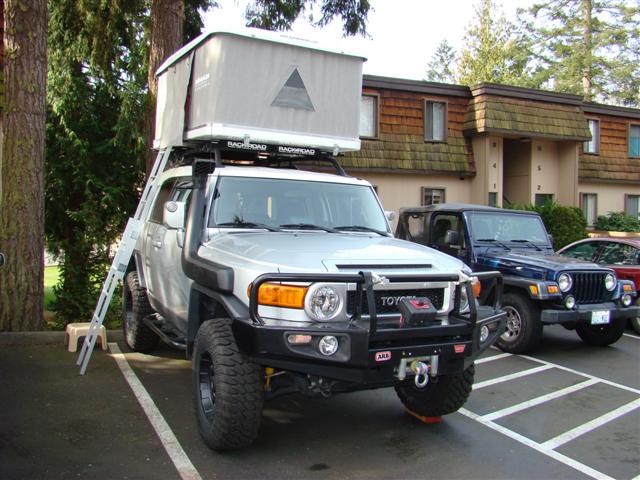
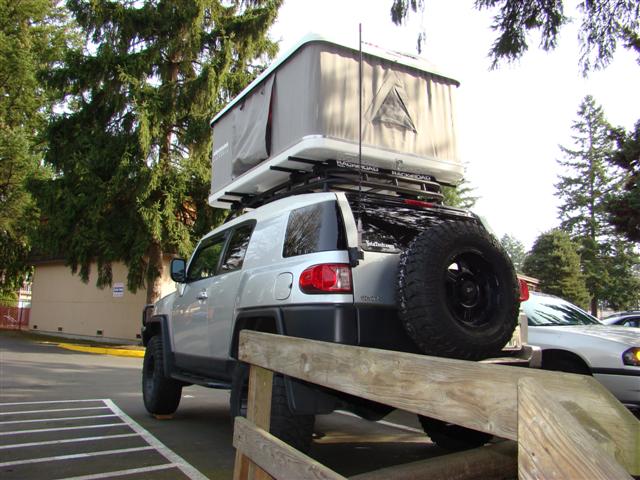
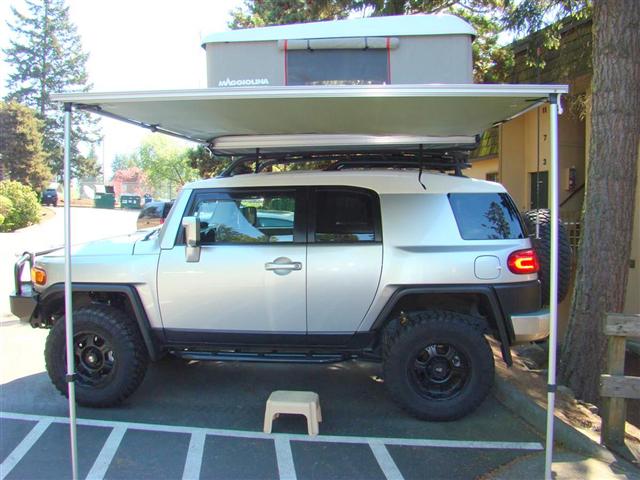
Maggiolina
AirLand Roof Top Tent
Installed 3-21-2008
Spring has sprung,
thus a new year of mods having been dormant over this past winter.
There is a constant joke on a few FJ Cruiser forums that goes around in threads
asking "Can you sleep in it."
Of course you can, member LandCruiserSteve (a moderator over on
fjcruiserforums.com) has proven that by building a nice bed system in the back
of his rig that accommodates him very well.
With the way I have my
rig setup in the back, that will not work out
for me.
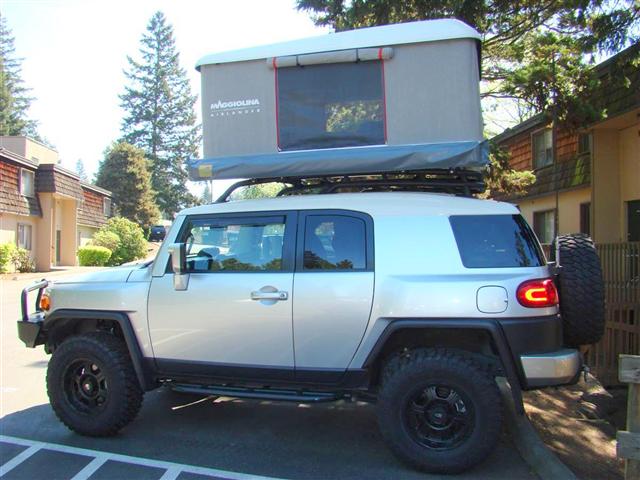
I have been looking
at roof top tents as of late, and finally settled on a fiberglass one made in
Italy like Wayne has.
Many thanks to Wayne (member KD7NAC_07FJ) for helping me make a selection on
this model, it is the same one he has on his FJ Cruiser, the medium model.
Wayne used Yakima Lowrider clamps on the stock FJ rack, and then 58" crossbars
held in place via the Lowriders.
The AirLand mounts to the crossbars.
I went to the shop Friday the 21st of March to get it installed, and they
recommended I use four crossbars instead of two to distribute the weight, as
that is the way they have been doing them.
I just got done opening it up for the first time since I left the shop after the
install (Saturday 3-22), and I am really impressed with the quality of the
AirLand unit.
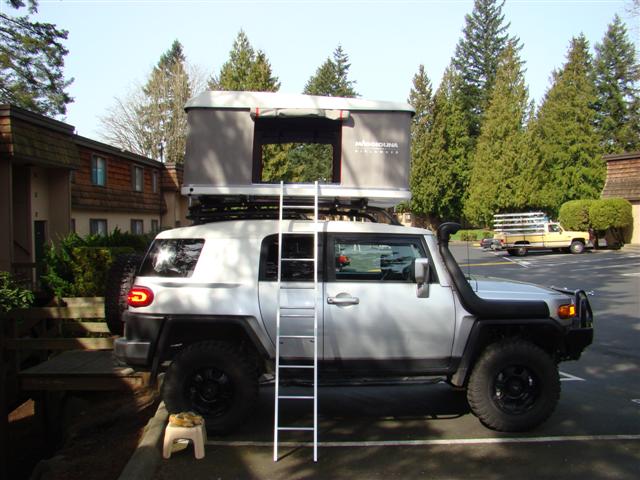
It cranks up just like a tent trailer (I have owned two of them in the past)
after undoing two latches up front, and one latch back aft.
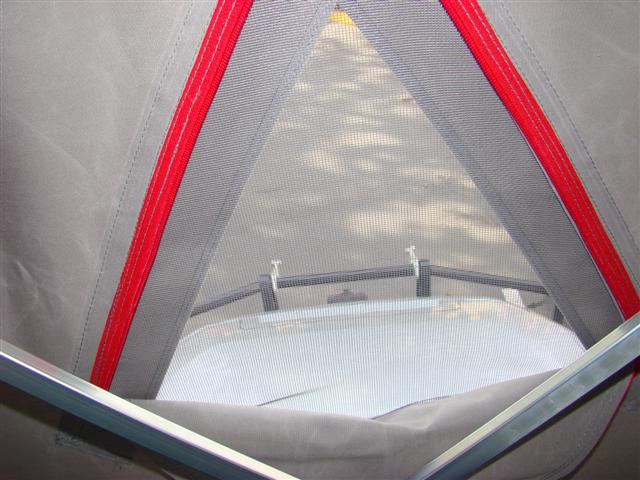
After cranking it up you grab the aluminum ladder from inside and extend it.
It is fully adjustable to accommodate any vehicle.
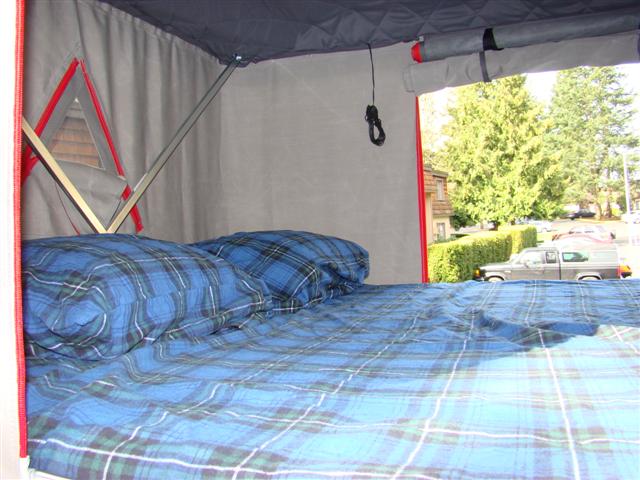
Once I had the ladder up I climbed inside and took out the three pillows it came
with and put the flannel pillow cases on two of them.
For the medium AirLand tent, full size sheets are a perfect fit.
The bottom sheet is a fitted one, with the top sheet being the normal tuck in
type.
I bought a very warn goose down comforter in Ultra Warmth weight with 35 oz. of
down.
That should keep me very warm should the summer nights cool off very fast.
Getting up and down
the ladder for me was not that difficult at all.
Now when exiting the tent and coming down backwards, you want to use caution
since you can not see the rungs as well, you feel for them with your feet.
If I can do it, anyone can.
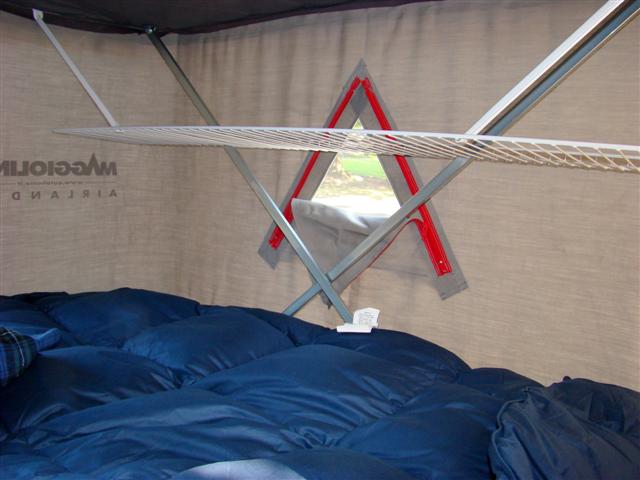
After getting the sheets on and the pillows in place, I climbed up inside for a
few pictures of the interior, then I laid out like I was going to sleep in it.
There is plenty of room, and my feet do not even touch the ends of the tent
wall.
I am about 5'10", and I did not feel cramped at all.
There is plenty of room for a second person too, and possibly a child if you
have one.
It would be better with just two people though.
And not once did it feel rickety to me.
It was very stable, and a very cool feeling being up in the air like that.
I have a feeling I am going to sleep very well in this tent.
The best thing of all is being able to pull into a site whether in a regular
campground, or when you are out 4wheeling, overlanding/exploring, and just whip
out the hand crank and crank up the tent and have your bed all setup in less
than one minute.
This is the real advantage to a unit like this.
The Rack n Road store I visited (official reseller of these for WA. state as
seen on AutoHome's website) has a team of top notch installers and manager
working there.
Evan (store manager) and Colin were the two installers who installed it.
Shortly before I left too YotaTech member nickr9287 showed up.
He also works for the Bellevue store and is an installer.
If looking for a system like this or any Yakima or Thule type of gear for your
rig around our area, give these guy's a call.
Great team to work with.
Probably around
sometime in May/June I will have some camping pictures from up at Greenwater
with the tent all setup in the outdoors, and some other new camping gear I have
been hoarding up on for a good time out in the woods.
Be sure to stay tuned to
YotaTech in the
Trail/Trip Report section for some photos of the tent and all the
other gear I will be evaluating.
Also be sure to stay tuned to the
Product-Gear Review section for write-ups on the AirLand and other
camping gear.
With this I think my rig is nearing completion.
Still have to settle on a rear bumper, there are still a few in works.
The selection is getting bigger all the time.
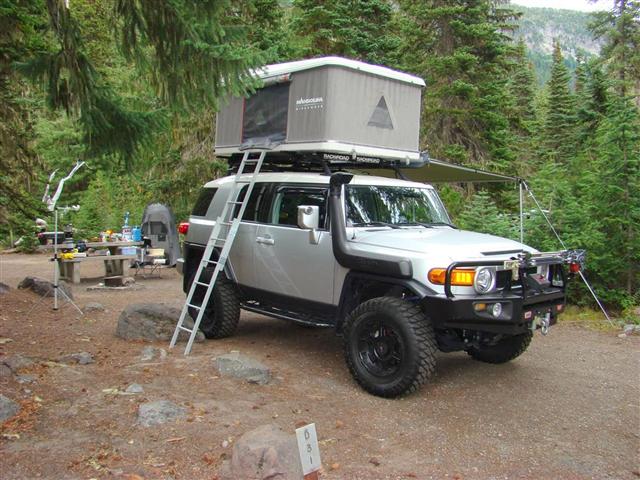
Here are a few pictures of the Maggiolina AirLand roof top tent.


Parts used and links:
Maggiolina AirLand tent (check it out, my rig
is on that page, the gallery page, and the Toyota page in the gallery)
Autohome's main site in Italy
Lowrider clamps
58" crossbars
Rack n Road Bellevue, WA. store
Full size flannel sheets
Twin size down comforter from The Company Store - Ultra
Warmth weight with 35 oz. of goose down
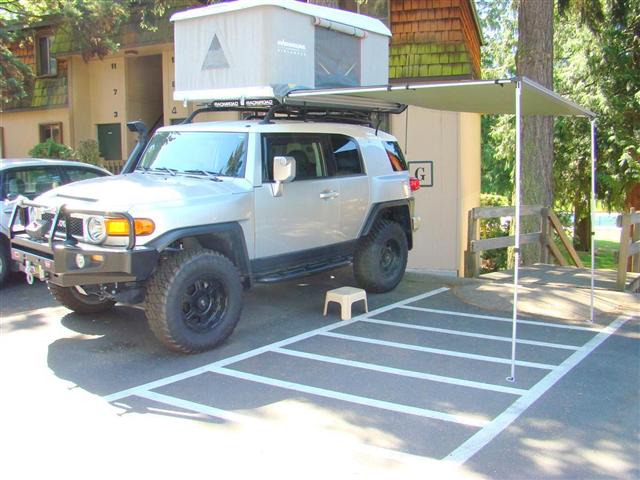
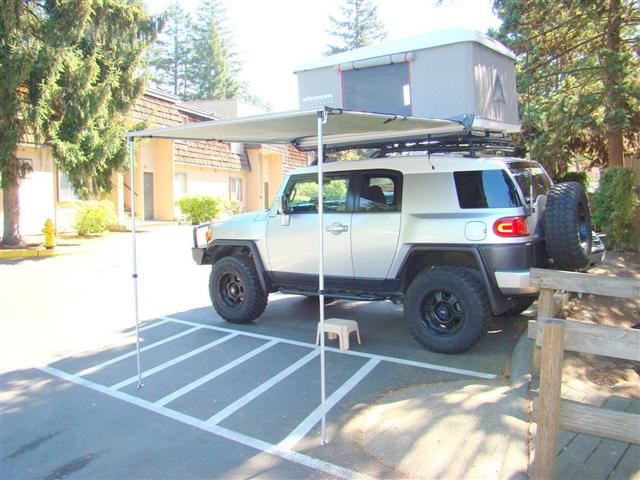
Camping Lab
Awning
Installed 5-16-2008
I had two different
type of awnings on my last tent trailer I had, and they are nice for shade to
sit under, or to get out of the rain.
I saw this brand mentioned in a few threads on a few Toyota forums, so I decided
to give it a try.
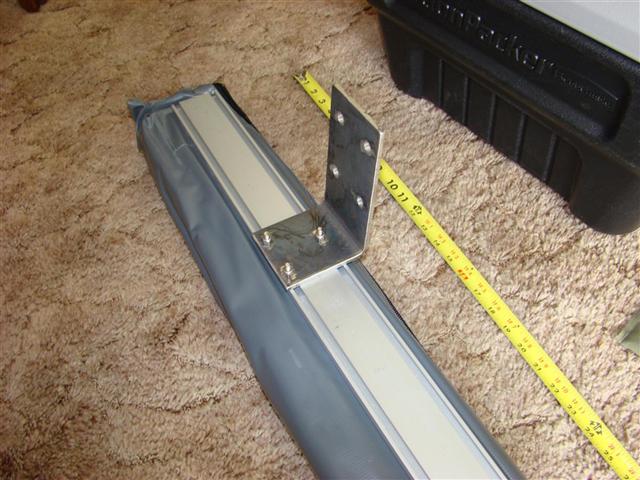
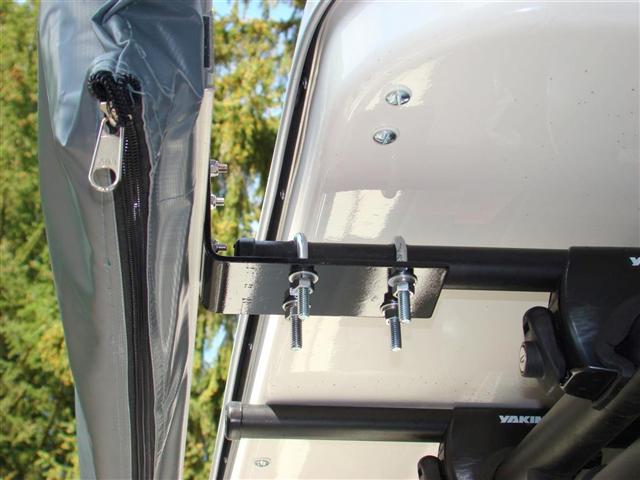
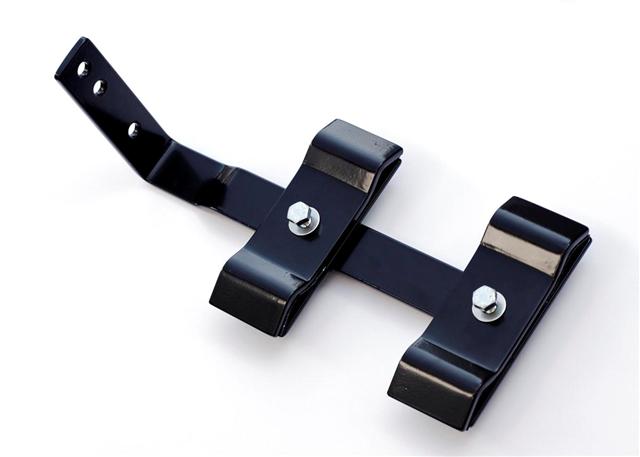
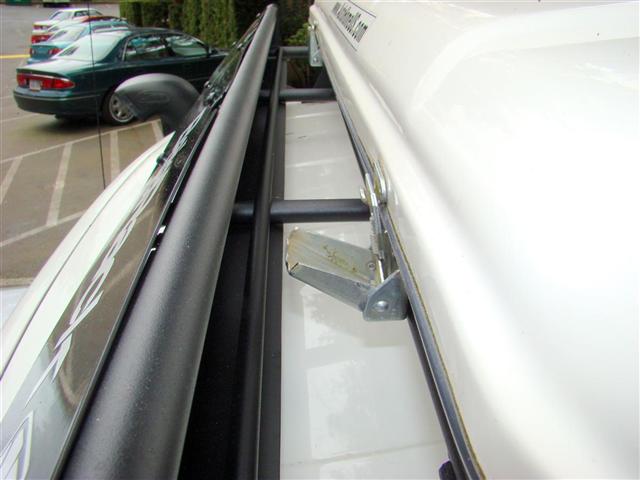
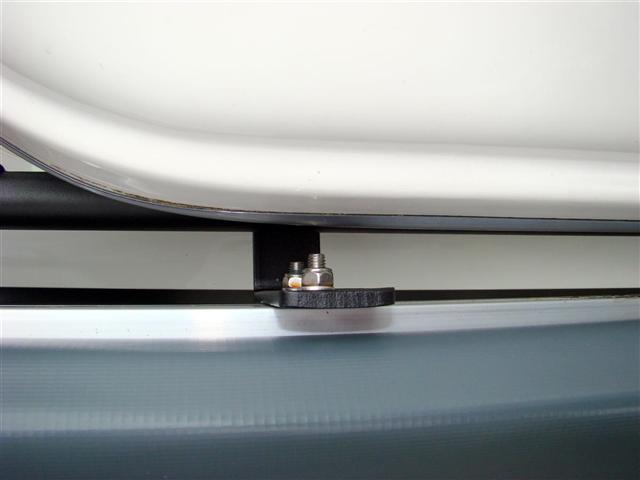
Owner Fernando was a
great guy to work with, and also made me some custom mounts to attach to the
awning so it would attach to my Yakima crossbars.
You can see how the mount attaches to the two channels on the rear of the
awning, and also how it attaches to the crossbars in the first two pictures
below.
Setup is a little easier than take down, same as with my tent.
But one person can do this easily.
It is also free standing since it has two supporting horizontal tubes, but you
will want to use the enclosed stakes to stake down the white rope loops you see
at the bottoms of the vertical tubes, and also
attach the two rope guy lines to the white rope loops at the top of the vertical
tubes and stake them out.
This will be better for any wind that will kick up.
But I had it setup with a light hot breeze outside and it was very stable
without staking it.
The first two pictures you can see the mount he made up for me how it mounts to the awning case, and then on the Yakima crossbars.
I am also enclosing a video that shows just how fast you can deploy the
Maggiolina AirLand roof top tent.
It is easy, in fact too easy.
Parts used:
Camping Labs website
The awning
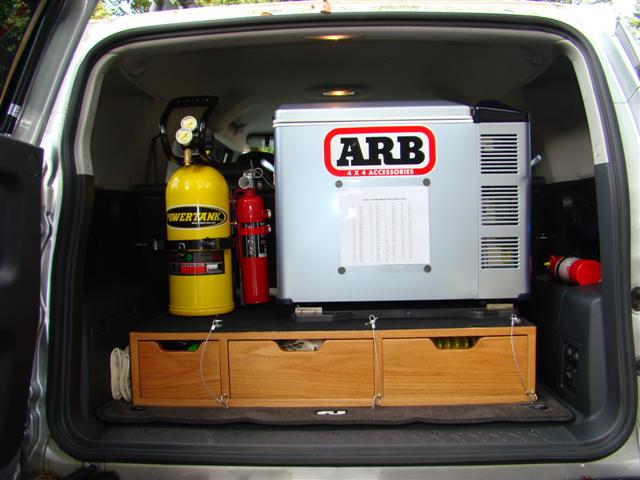
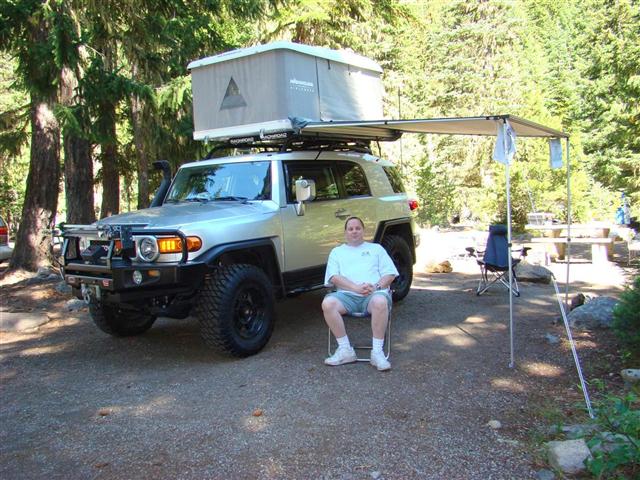
ARB Fridge
Relocated 5-31-2008
I was not really
happy with the ARB fridge mounted in the rear of the FJ.
I could not lift up the lid very far due to the fridge sitting up high on my
cargobox.
The lid would hit the ceiling.
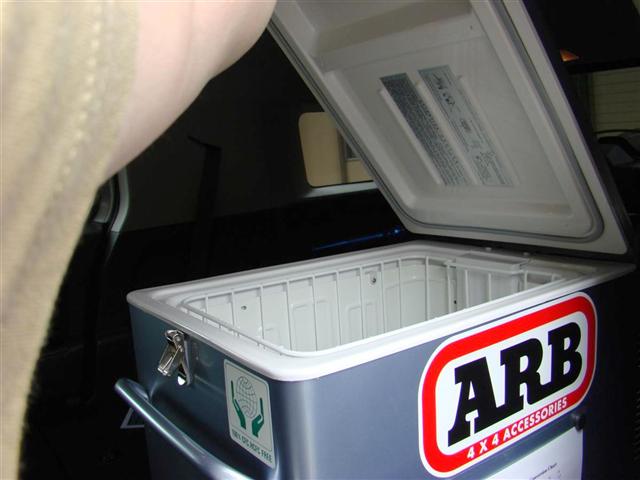
I can now access the lid to load/unload vittles, and actually see what is in there.
I still can not raise the lid all the way up to the ceiling, but I can raise it
far enough to see very well inside.
There is a guy on IH8MUDs forum who has put together all the hardware for the
hinge relocation kit to make the lid lift up from either side instead of from
the end, and after I order that from him, I will be
able to raise the lid all the way up and let it stay open.
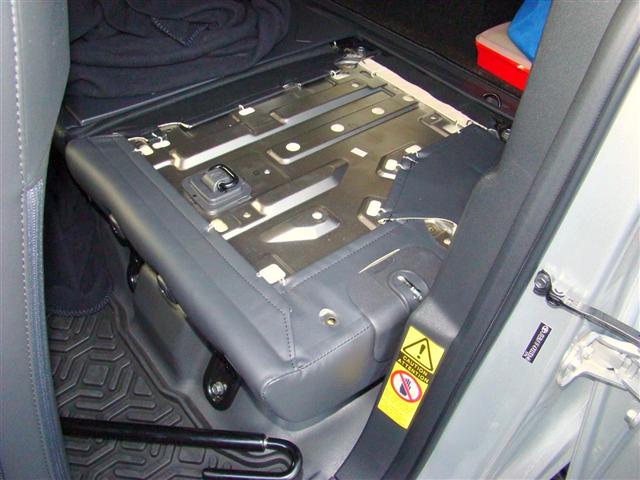
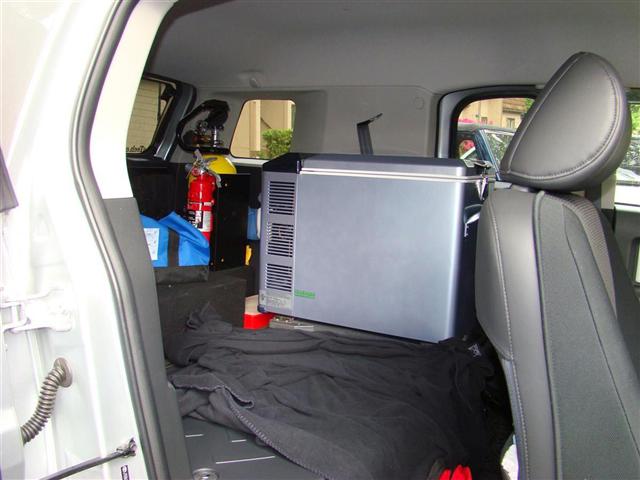
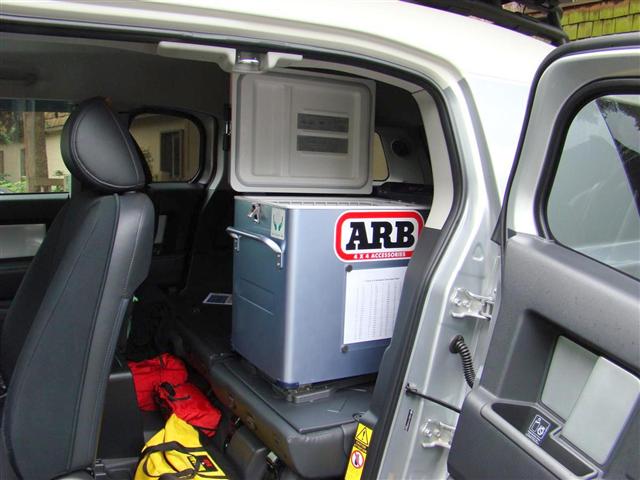
Here is a comparison when it was mounted in the rear.
The first two pics show the seat back cover in place and then removed.
Picture three shows the Engel Slide Loc screwed down to the plastic cover for
the back of the seat.
I had to move the plate around some so it would avoid the D ring and raised hump
it resides in so the plate would sit flush.
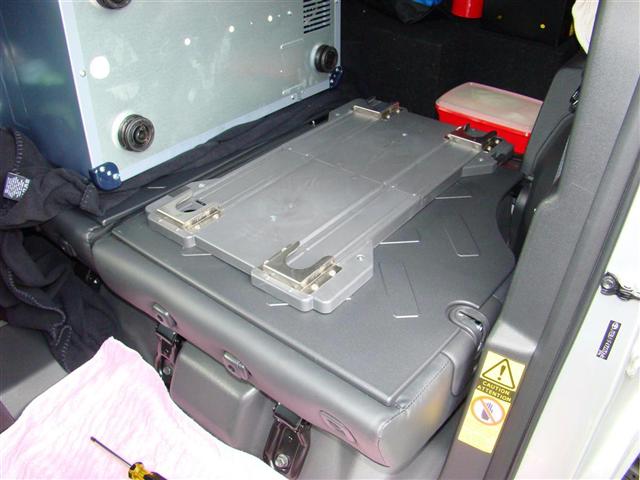
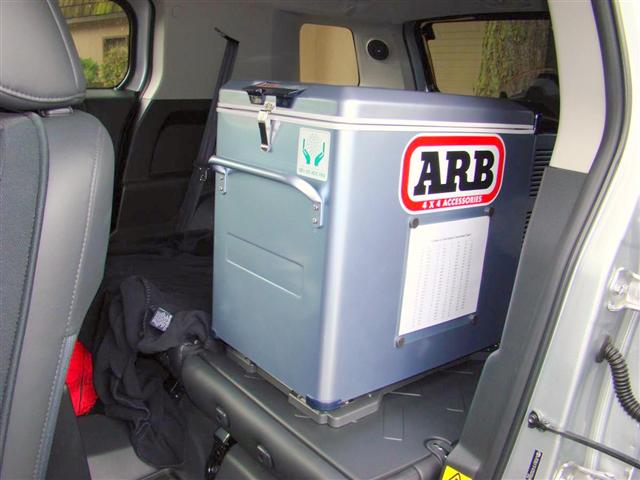
Pictures four, five and six show the fridge mounted to the Slide Loc.
Picture seven shows a rear view shot showing how much room I gained in the rear
by moving the fridge.
I drilled small pilot holes into the plastic, and after tightening the screws
down, they do not contact the metal underneath.
If I was worried about needing more strength, I can get longer screws and drill
the holes deeper and into the sheet metal underneath.
I also used two extra screws this time instead of four like I did when it was
mounted on top of the cargo box.
This will give me more room to load my camping gear now.
For the long stuff like the Cabela's picnic table and Camp Kitchen, I will load
them in from the rear door and shove it towards the passenger seat.
This should speed up the loading process quite a bit.
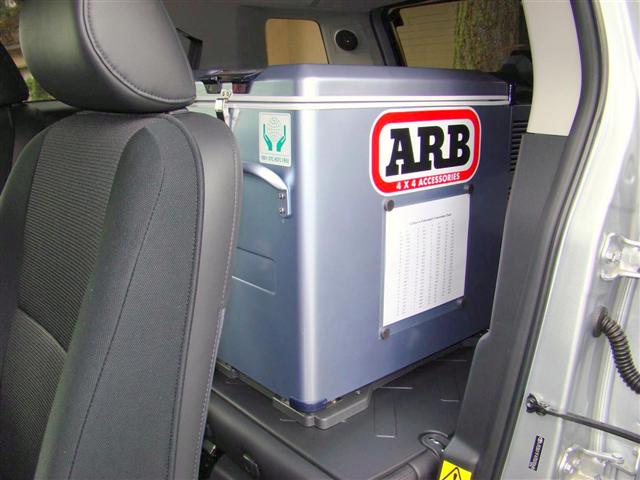
The best part though is being able to access my fridge much easier and see what
is inside of it.
If you do not mind giving up your rear drivers side seat, this is a good way to
mount your fridge.
I can still put up the passenger side rear seat with the fridge in place.
I may even put the bottom seat cushion back in too for the rear passenger side,
as it is currently out right now.
But the drivers side will stay this way indefinitely.

Just An Update To The Maggiolina AirLand Roof Top Tent And The Camping Lab Awning
I took my summer 2008 vacation up at Mt. Rainiers White River campground, and got some much better pictures of the above mentioned items in their natural habitat ;)

Here is a link to my
vacation pictures, and a link to the new camping products I have been stocking
up on.
Mt. Rainier vacation
Camping gear review
ARB Fridge
Rehinged 9-25-2008
On my trip to Mt.
Rainier in August, it was a PITA to have to hold the lid open with one hand, and
move the contents with the other hand.
Reason is that the lid lifts up the long way on this model ARB fridge and the
equivalent made by Engel.
Even with the fridge moved from the top of the cargobox to its new location
behind the drivers seat, the lid would not lift up all the way.
Awhile back I came upon a thread on IH8MUDs forum about relocating the hinges so
the lid will open from the side.
The creator of the thread ended up putting together a kit so one does not have
to hunt around for the parts.
The kit arrived September the 25th, and I could not wait to dig in on another
project.
I took the fridge out of the rig almost right after coming in with the days mail
;)
Total time was around a half hour or so to install the kit.
While the instructions do not call for drilling a pilot hole for the self
tapping screws supplied, I did drill a small 7/64th pilot hole.
I was careful to not drill to far into the fridge.
I first put the hinge in place, and I went back in 1.5" from each end of the
fridge to center the hinges.
I marked one hole with a felt pen, then drilled it.
I then put the hinge in place and used the 18v drill to put in the new screw.
Once it was in and tight, I then drilled one hole at a time and repeated with
the self tapping screws.
So in other words, I did not drill all four pilot holes at once.
I find it more accurate this way in drilling most things.
Once the hinges were in place, I then took out the top screws I had just put in
and took the lid all the way off.
You then have to remove the stock hardware from the lid and the fridge for the
stock hinges.
Once you have done that, you reuse the stock bolts (these are not screws) to
fill in the holes.
I put the lid back on again and put back in the upper screws for the new hinges.
I then snapped close the stock latch, and all is very tight.
I did not opt to install the new clasp/lock supplied in Kevin's kit, as the
stock hinge worked out fine in its original position.
Plus I will not have to modify the thermal bag by cutting a hole in it for a new
clasp/lock.
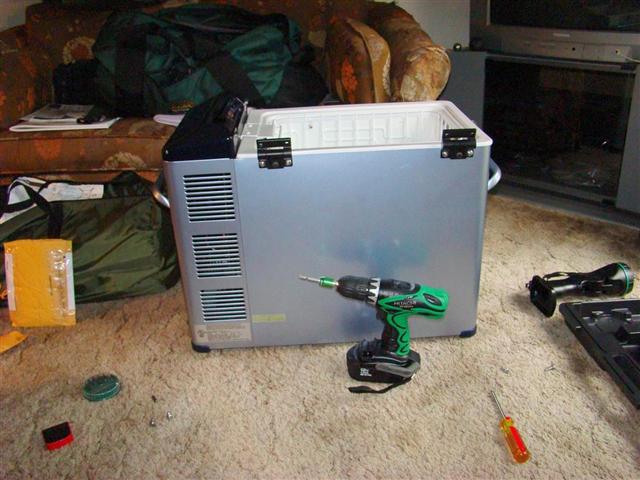
Picture one below shows me holding the lid open with the fridge in the rig.
The lid hits the ceiling and will not raise up all the way, again a royal PITA.
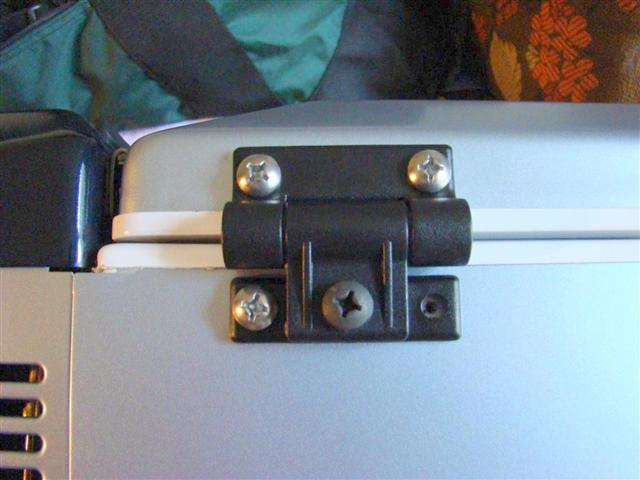
Picture two shows the hinge on with three screws in place and a pilot hole ready
for the fourth screw.
Picture three shows the new hinges in place and the lid open.
Note that the lid stays open too, and will do so in any position.
It has an adjustment screw you tighten to cause friction in the hinge, thus
allowing the lid to stay open in any position.
Way cool man ;)
Picture four shows the new hinges in place and the lid off ready for me to take
off its hardware and the fridges hardware for the stock hinges.
Picture five shows the fridge back in its native environment, and the lid open
as if I was going to access it for grub.
The lid clears the ceiling just fine too.
This retrofit will make an ARB or Engel fridge that more enjoyable to access the
interior of it.
It gets the two thumbs up award
![]()
Parts used:
Wagon Gear - Fridge Hinge Flip Kit
Link on IH8MUD to the thread that started the kit
ARB Fridge
Baskets Installed 10-21-2008
First off I really
dig my ARB fridge/freezer.
No ice to mess with, low battery draw, and you can pack enough food for a week
or more into it.
When I took my vacation to Mt. Rainier in August of 2008 I ate really good.
Problem is you still have to move around a lot of the grub as it is just one big
deep carnivorous well that swallows whatever you can throw at it.
One problem I solved keeping the lid open on the fridge by itself, and not
having the lid hit the roof of the FJ was solved in the last entry above.
So once again the fridge is undergoing another mod, it is being transformed into
a basket case...
I saw a thread on Expedition Portal that led me to the TwoZone Basket Set sold
by Sierra Expeditions.
They are two different sized baskets that hook onto the stock basket in an ARB
or Engel 42 qt fridge.
Here is a little info from Sierra's website:
"The TwoZone Suspended
Basket Set is compatible with most ARB, Engel, Norcold, and Waeco
fridge/freezers.
The larger basket measures 11.5" from suspension tab to tab, and the basket is
10.4 wide, 9.5" long and 4" deep.
The smaller basket measures 11.5" from suspension tab to tab, and the basket is
10.4 wide, 5" long and 4" deep."
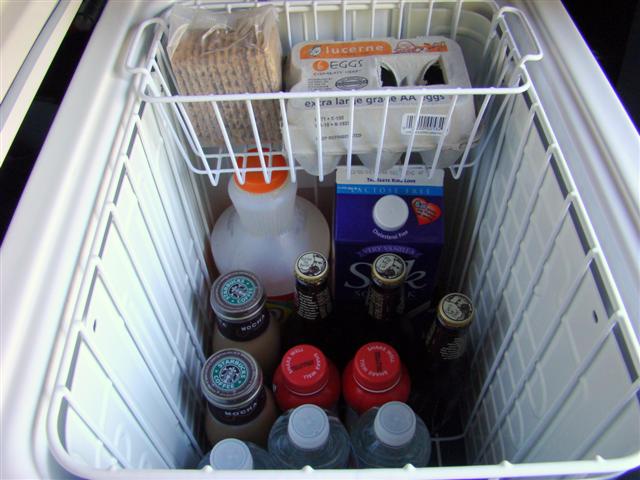
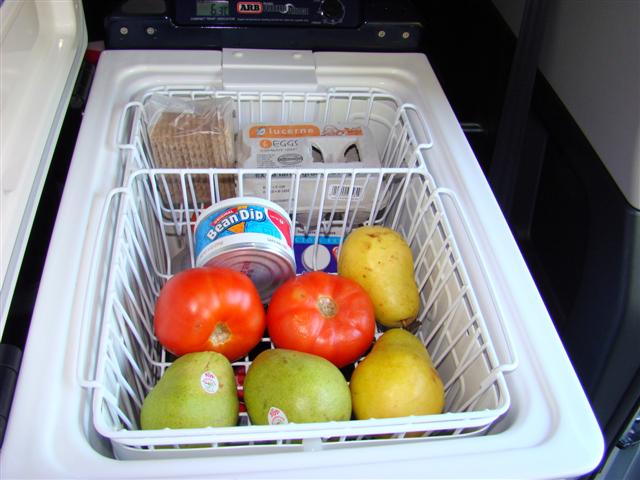
This will allow you to pack your vegetables and fruits on top without the worry
of them getting bruised and turned into mush by heavier items that may bump up
against them.
You can also load up a basket with your snacks, eggs, dip, whatever you do not
want buried.
Below the two baskets you still have room to store stuff you might want to keep
a little colder such as meats, frozen burritos, milk, orange juice, whatever
beverages you are into
So if you are looking for a great solution to keeping your trail/overlanding
grub well organized, look no further, these baskets are a great addition to your
fridge.
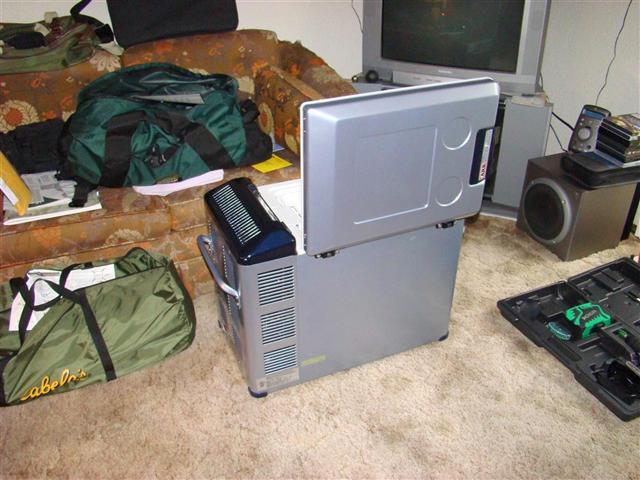
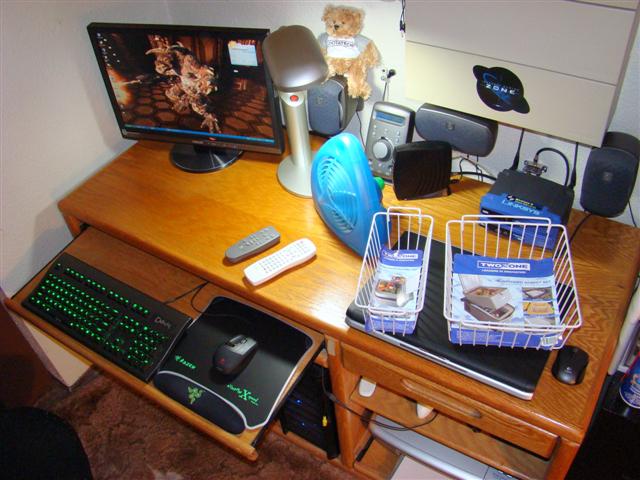
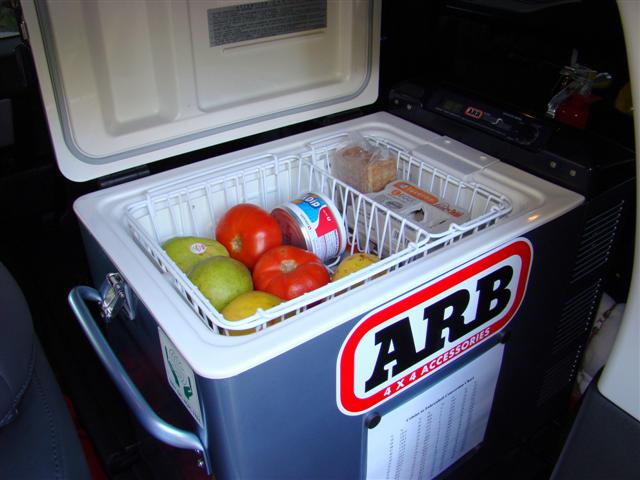
Here are a few pictures showing the size on my laptop for comparison, and some
out in the fridge loaded up.
You can easily access the food below by taking out one basket.
A tip:
The lid does not fit flush when you put it all the way down unlatched.
However it will make a tight seal when you close the latch.
Some have bent the wire tabs down, but I may end up cutting mine off all the
way.
It looks like they will still stay in position even if the tabs are eliminated.
I guess I will find out ;)
Parts used:
TwoZone Basket Set
Yaesu 857D Ham
Radio Setup (Done In Phases, To Detailed To Install It In One Day)
Phase One , Antenna Installed 10-29-2008
Phase Two, Remote Faceplate kit Installed 11-15-2008
Ever since a little
tyke, I was interested in shortwave radio and staying up late at night to tune
in the foreign broadcasts, and also to listen to the ham operators on the
various frequencies my Halicrafters S129 could pick up.
I have wanted to get into being a ham radio for quite awhile, but shied away
from it since you had to do Morse code too.
Not anymore they dropped Morse code from all three license classes now.
I am currently studying for my Technician class license which will allow me to
operate on the 2 meter and 70 cm bands.
The Yaesu 857D radio I bought is awesome, as it can do much more than I can with
the entry license, so the radio will grow with me as I later upgrade to a
General class license.
I got a remote faceplate mounting kit for the radio, so the unit can be stuffed
elsewhere, and the only thing you see if the faceplate which you will see in the
pictures below.
I will also be upgrading to a Yaesu ATAS-120a all band antenna later on, so I will not have to use dual antennas since this radio can operate over a very wide band range.
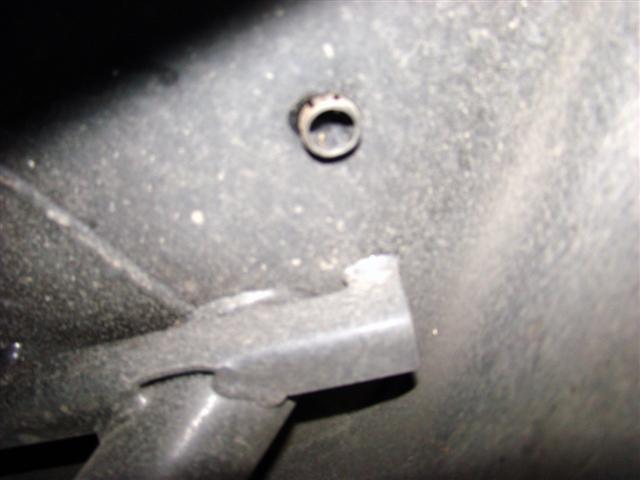
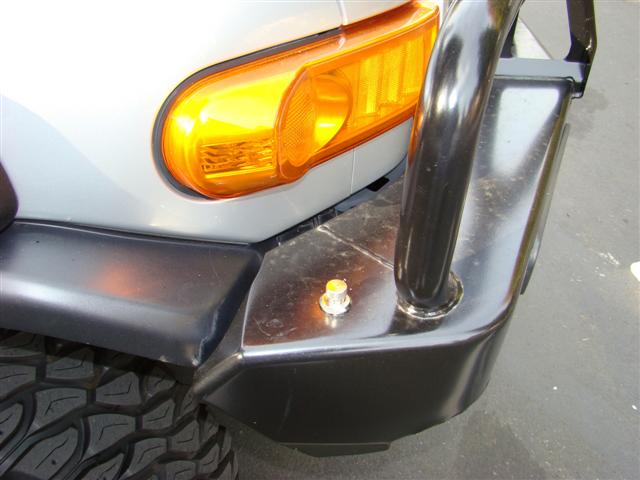
Pictures one and two
show the plug on the ARB bumper that must be tapped out from below with a
hammer.
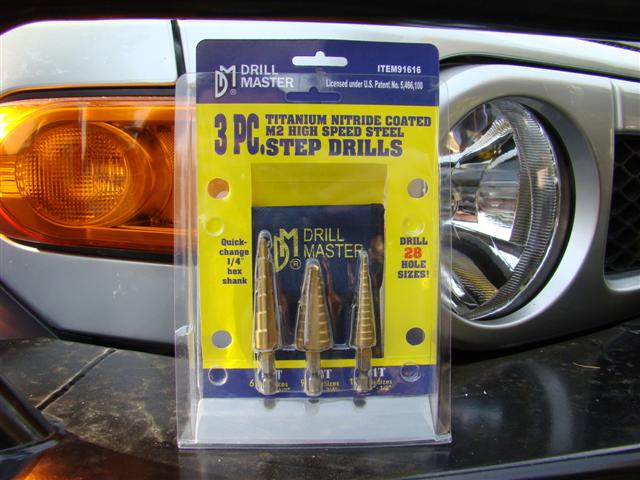
Pictures three and four show the step drills I bought from Harbor Freight to
enlarge the hole, as it is drilled to accept a CB antenna mount.
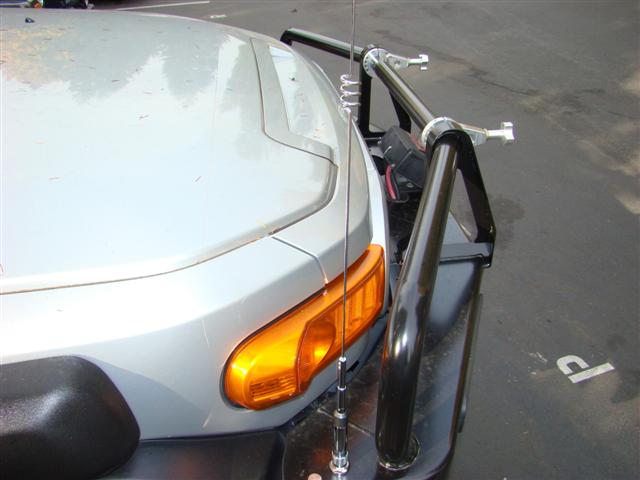
Pictures five and six show the Diamond antenna on the ARB bumper.
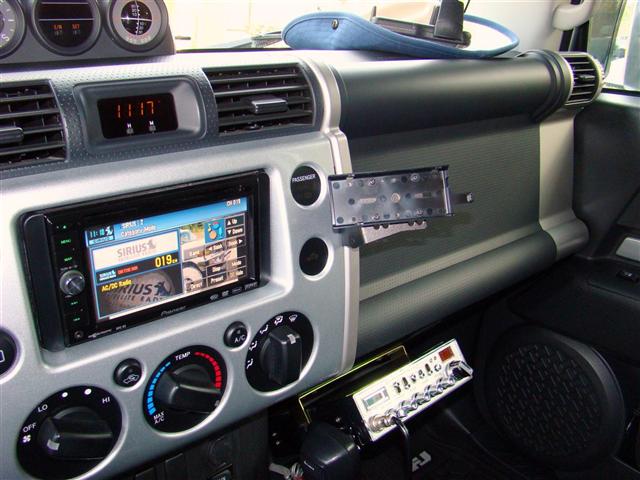
Pictures seven, eight, and nine show the
Panavice mount I installed long ago, but the
picture shows it without the Grip which is for cell phones, iPods, GPS, ect.
And mounted to the Panavice mount is the Yaesu remote mounting plate, then the
Yaesu 857D faceplate.
It is a perfect reach for me to reach out and adjust any of the settings on it.

Parts used:
Yaesu 857D HF/VHF/UHF mobile transceiver
YSK-857 Separation Kit to remote mount the faceplate of
the radio by itself
Diamond NR770HA antenna
Diamond GLP58 mount for the bumper and base for the
antenna
Diamond MX62M duplexer
Valor VS4 Big Mouth external speakers: bought one for the
Yaesu radio, and replacing the bigger one that I was using for the Cobra 29 CB
Future all in one antenna for all bands, the Yaesu
ASAT-120a (Will get this at a future date)
BajaRack's FJ
Ladder
Installed 3-21-2009
BajaRack introduced
their new ladder for the FJ Cruiser on fjcruiserforums.com earlier in the year.
I jumped in on the early group buy out of about five of us.
I am on my second ladder too, as the top holes were misaligned, but the
new ladder fits perfect.
With much feedback from us early testers, they perfected a great alternative to
the Gobi ladder that was already available.
Baja redesigned the lower clamps a few times with our input.
Even the top part of the ladder on the drivers side for the wrench was changed,
as before I could not get the wrench over the unless I used the open end of the
ratchet wrench.
The end result was worth it, as the ladder looks great.
The installation is
very easy, and you only need to remove the spare tire if you are using one that
is bigger than the factory one.
I got very good at removing the spare tire during the process of ironing out
that bottom bracket issue ;)
Onto the
installation.
Tools needed:
13 mm Gear wrench and open end wrench on one end for the top bracket.
14 mm Gear wrench and open end wrench for the bottom bracket.
Assortment of Allen wrenches.
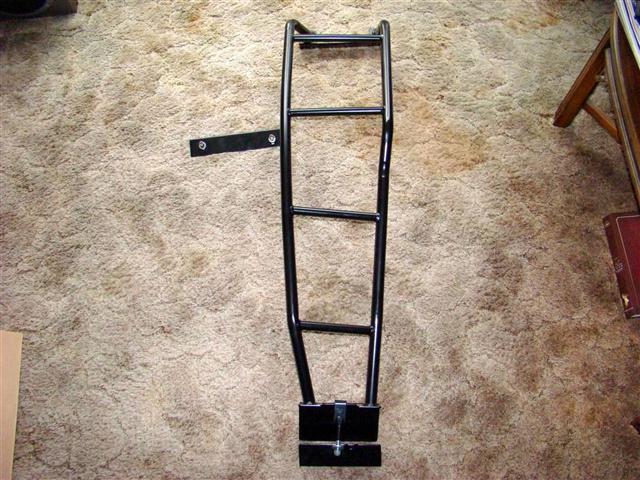
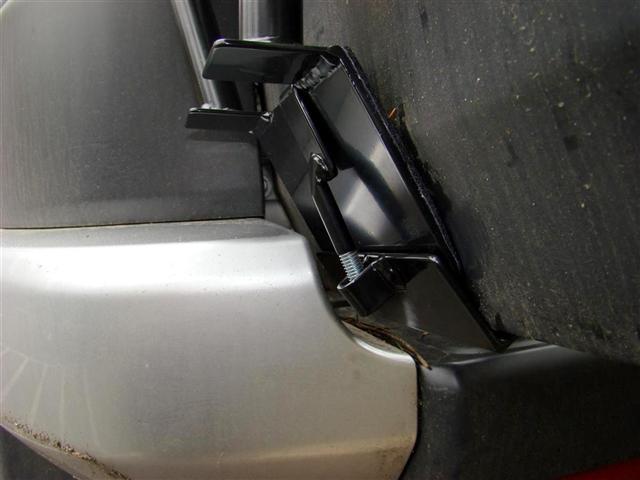
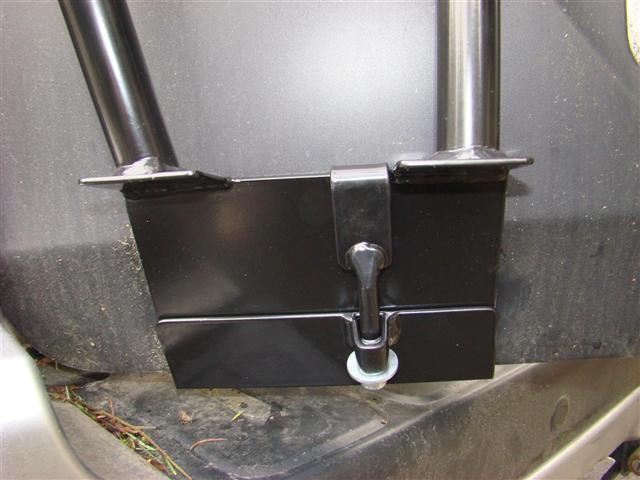
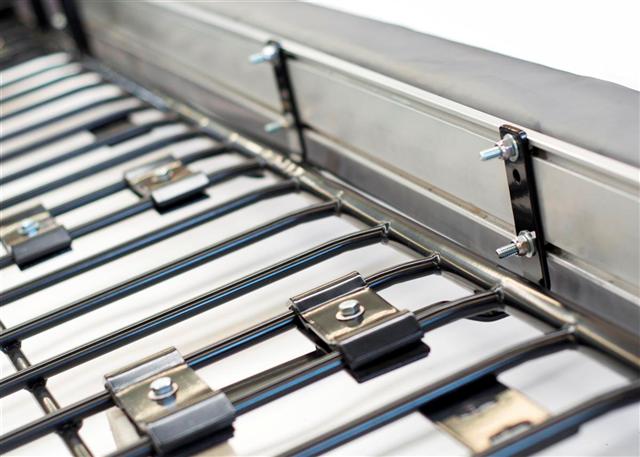
Pictures one and two show the ladder fresh out of the box and the brackets.
Note the new bolt that ties in the bottom bracket and the bottom of the ladder
flange.
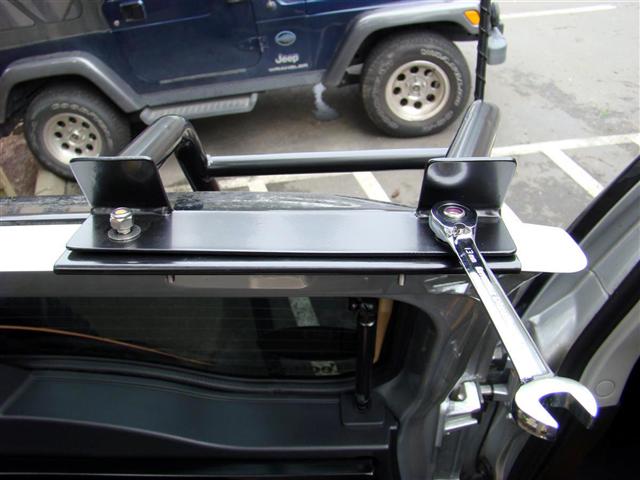
Picture three shows the new and improved ear above the wrench that now lets you
get a ratchet wrench on.
Before for just that bolt I had to use the open end of the wrench.
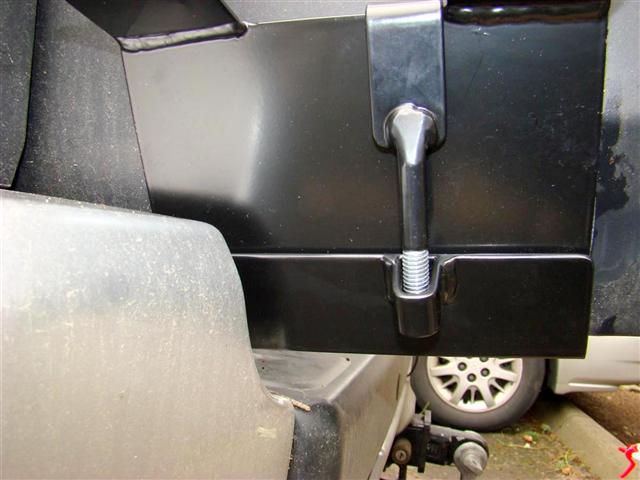
Picture four shows the bottom bracket and the new bolt that ties it and the
ladder together.

Picture five shows a
different angle of the bottom bracket bolt.
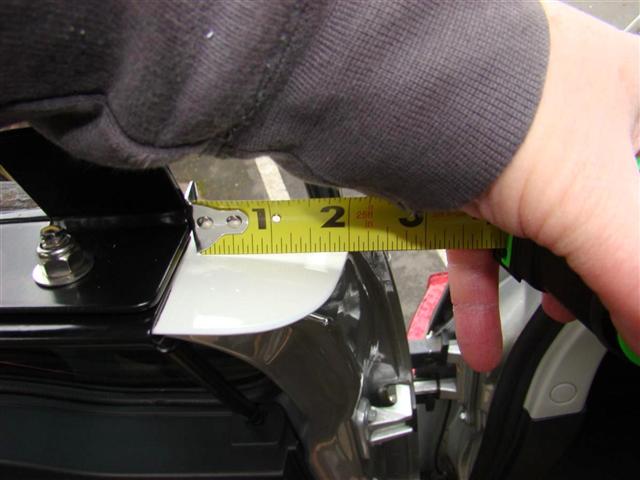
Picture six shows where I lined up my top bracket in relation to the top of the
door.
Picture seven shows indeed the holes are aligned correctly, not out of alignment
like my first ladder was.
Picture eight shows the bottom bracket from the inside view with it tightened
down.

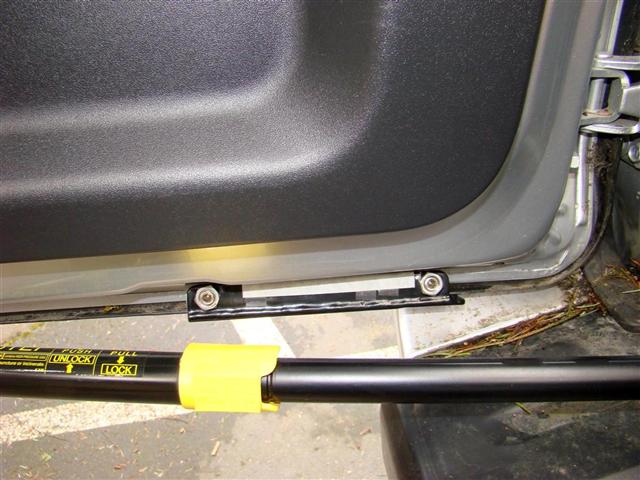
Picture nine shows
an outside view of the bottom bracket and ladder now tied in with that new bolt
flange system that was revised for the new ladder I received.
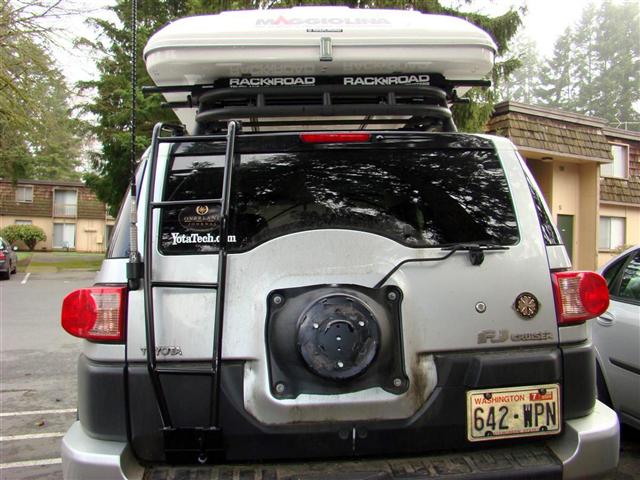
Picture ten a view of the ladder in place without the spare tire.
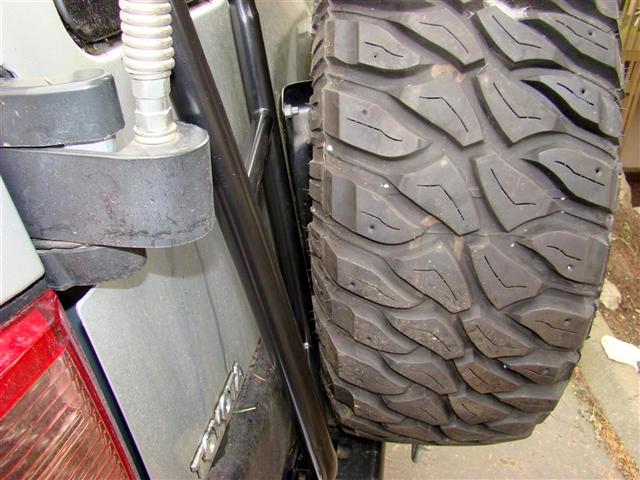
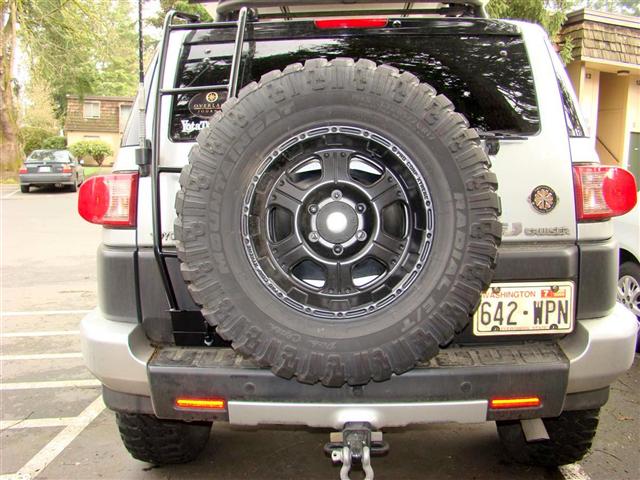
Picture eleven shows the clearance with the spare tire on.
It is barely up against the 285x70x17 tire.
Picture twelve shows the spare tire back in place.
Links:
BajaRack
The FJ Cruiser ladder
Solar Power For
Camping/Overlanding/Expedition Trips
Installed 6-27-2009
I have been doing a
lot of research as of late, and Martyn from Adventure Trailers has been very
helpful in answering my many questions on the subject.
I put together this solar setup mainly for keeping both of my dual batteries
charged to full capacity in the FJ Cruiser when out camping.
The ARB fridge, Maggiolina AirLand roof top tents 12v interior light, and
occasionally recharging cell phone or laptop batteries can put a drain on the
battery.
Not so much just running the fridge for a few days, but you factor in the other
voltage requirements and the battery can take a beating if not recharged.
Running the rig for a few minutes a day is not really going to keep it topped
off, hence where solar power comes in.
Here is the setup I have gone with:
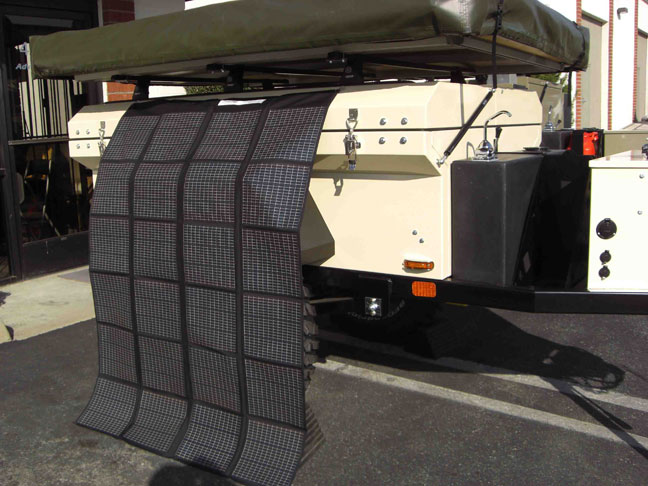
1. PowerFilm F15-3600 60 watt solar panel purchased from Adventure Trailer via
Martyn and Mario.
Pictures from Adventure Trailers on one of their Chaser trailers (one of those
is in my future plans too when I move and have a garage) and from PowerFilm
Solar.

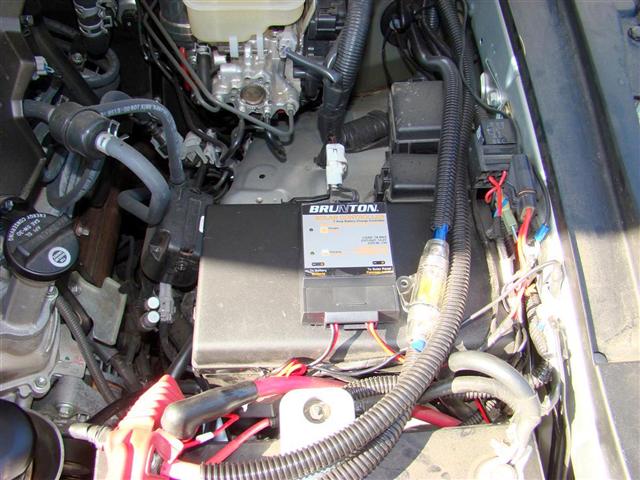
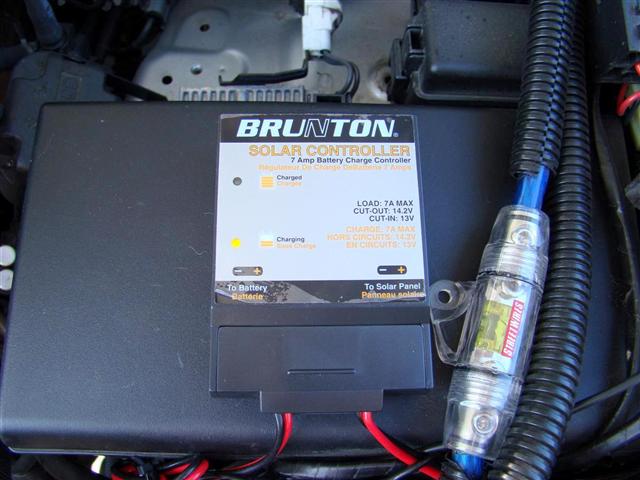
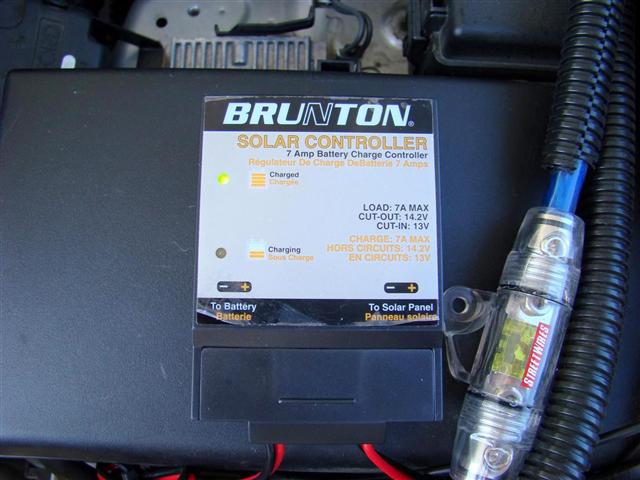
2. Brunton charge
controller.
This required unit (if charging your vehicles battery) keeps the solar panel
from overcharging your battery/batteries on your rig.
It has LED lights that tell you when it is charging, and when the charge cycle
is over.
It can handle up to 100 watts and 7 amps of power.
My solar panel put out 60 watts and 3.6 amps, so it is perfect for my
application.
3. 15' PowerFilm extension cable (bought from AT)
part # RA-7 from the solar panel to an Adventure Trailer trailer type plug that
is mounted to the grille.
4. Solar RV exterior plug, female with 12 gauge wire (bought from AT)
part # 055-01109
5. Solar RV plug male with 12 gauge wire (bought from AT)
Part # 055-01110
6. Weather pack connector kit (bought from AT)
Adventure Trailer has a way on their website to calculate your wattage
requirements when building your solar setup.
Text taken from their site:
Tips for Evaluating 12
Volt Power Requirements
In the same way that we plan our trips revolving around our MPG and miles per
tank, we need to do the same for calculating our auxiliary electrical needs.
It’s really quite simple:
The key is Ohms law.
It is a basic equation that can be read a few different ways depending upon what
number you need to crunch:
Volts x Amps = Watts
Watts ÷ Amps = Volts
Watts ÷ Volts = Amps
Let’s say you want to know how many Amps an ARB 13Watt, 12V fluorescent light is
going to consume per hour.
Your answer is 13 Watts ÷ 12 Volts = 1.08 Amps per hour of usage.
I mentioned Martyn has helped me a great deal in understanding what size solar
panel to go with, and here was his suggestion:
A 60 watt panel will help you stay ahead of the game for longer. The older
ARB fridges pulled around 1.2 amps per hour or 28.8 amps in a 24 hour period.
The 60 watt panel produces 3.6 amp and hour during daylight, to at 8 hour of sun
it's also producing 28.8 amp.
The foldable or roll up type of solar panels do cost more, but if you are tight
on space like I am and want to keep the weight down or simply like them better
than the stationary panels, these are pretty trick.
Also there are many more types of charge controllers out there that you can
mount under the hood or inside of your rigs cabin if you have the space.
Some have digital readouts too of how much voltage the battery has and how much
it is putting out, and how much voltage is coming from that big shiny yellow
thing up in the sky.
I saw that Dave (adventureduo) from Expedition Portals forum had used a Sunsei
charge controller, but I could not locate one as most places were out of stock.
Scott Brady (expeditionswest) from Expedition Portal had gone with the Brunton
charge controller, and I did some research on it and found some good reviews of
it at Amazon, the vendor I bought it through.
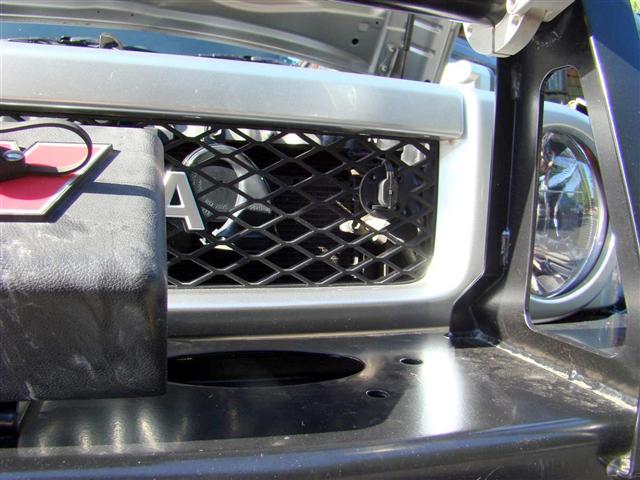
Dave had gone with the before mentioned trailer type plug from Adventure
Trailers and did a cool installation of the plug being in the "O" of Toyota on
the grille of his 1993 Toyota Landcruiser.
Very trick.
And it will work on mine too, I put the plug through the second "O" on the
Toyota emblem, but I installed it another way which you will see in the
pictures.
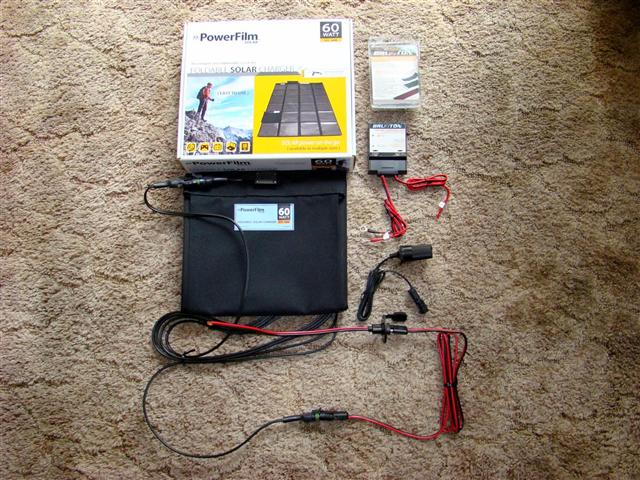
All parts laid out:
You can see the solar panel connected to the 15' extension cable that then goes
to the short adapter cable that goes to the plug with the cap on it that you can
mount to a bumper or other part of your vehicle.
The wires coming off of the plug/cap goes to the charge controller.
Also seen is the PowerFilm 12v female accessory plug they include with the solar
panels.
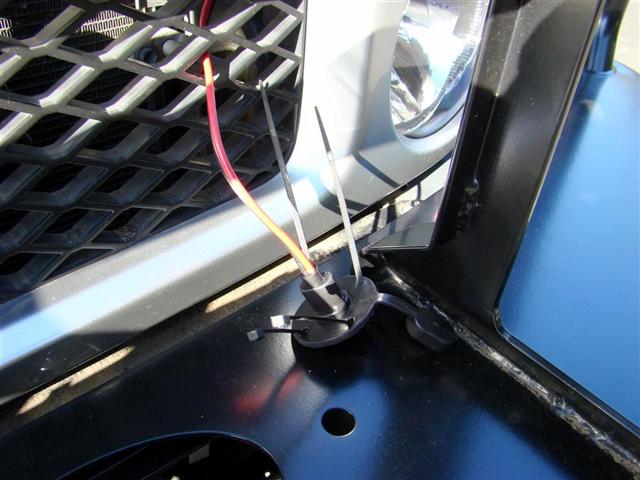
Installation:
1. Find a suitable location for the trailer plug to hard mount it.
I pushed the wires through the grille, and the plate for the plug matched up
very well with the grille.
I secured it with two zip ties.
2. Mount the charge controller under the hood near the battery.
I used heavy duty Velcro to mount it to the top of the main fuse box behind the
stock battery location.
It has positive/negative wires with battery stud rings to put on your battery.
For the ground wire I ran it off to the side on the fender well where there was
another wire grounded from a previous project.
The other red and black wire will be wired to Adventure Trailers "quick plug
port" (trailer type connector) which I mounted to the grille.
Run the 15' extension cable from the port on the grille with the AT adapter
cable to the solar panel and you are in business.
The solar panel also came with a female 12v socket with a plug on the other end
that plugs right into the solar panel so you can use it not hooked up to the
vehicles battery.
This way you can plug in a 12v male plug that goes to accessories like cell
phones, laptop batteries, two way communication equipment, anything that you
would normally plug into the 12v receptacle inside of a vehicle.
Way cool 'huh?
Here are a few pictures of the installation.
I will get better pictures and a complete field review at a later date during a
camping trip or when I am on my vacation.
Look for those pictures in my camping gear reviews on the forums.
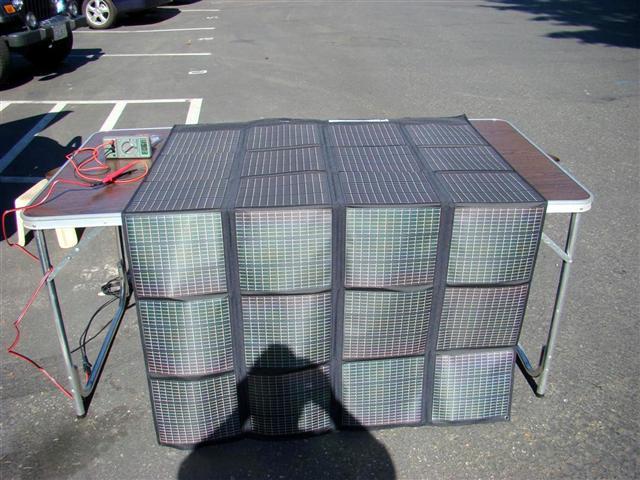
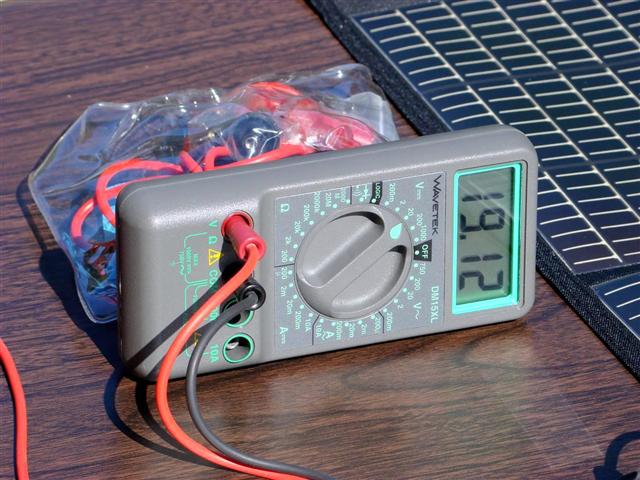
In picture five above I connected my volt meter to the solar panel and it was
putting out a healthy 19.03 volts.
I played around by blocking more of the sun with my shadow that what the picture
shows above, and I got it down to 18 volts.
In picture six above I was not blocking the sun at all and it was putting out
19.12 volts, I was impressed.
This was around 9:45 am, the sun was not even at its full strength yet.
It can put out more as the panel gets more saturated with sunlight.
Also the panel would have put out maybe more if it was all angled at the sun
instead of having the top half laying flat on my old camping table.
In pictures seven and eight you can see the battery charging and then fully
charged.
When you unplug the cable from the front trailer plug on the grille, the LED
lights shut off on the charge controller, so no worries about having extra draw.
Not that I am worried about that anyways, as my alarm system always has a big
blue LED flashing all the time.
Well there you have it, this puts out enough volts/watts/amperage to run an
ARB/Engel type fridge on its own if you use the included female receptacle and
plugged in your fridge directly to it.
I will just leave my fridge hooked up to the 12v outlets in the rear, and have
the solar panel hooked up while camping and never worry about the battery
running down.
This will also keep the second battery in my dual setup charged too.
If you have 12v needs like I do when out camping and do not want to run your
battery(s) down, take a look into going with a solar panel.
Parts used:
Adventure Trailers solar page
PowerFilm Solar
F15-3600 60 watt model, also comes with female 12v
(cigarette lighter) adapter that plugs into the solar panel, and you plug your
12v devices to it to charge them
Brunton Solar Controller 12-Volt Battery Charge Monitor
Bought Brunton Solar Controller at Amazon
Total investment (prices should come down on the panels when the technology
catches on):
$48.96 charge controller
$55.75 cables, plugs
$961.86 solar panel
______________
$1066.57 total
Engel Wireless
Thermometer For My ARB Fridge/Freezer
Installed 7-10-2009
The stock
temperature gauge on the ARB fridge is way at the back and kind of hard to read.
Plus it is only in Celsius, but not a big deal since I have a conversion chart
on the side of my fridge.
But what I really wanted this for was to keep and eye on the temps remotely,
such as having the receiver on my dash while driving, or in my roof top tent
while camping so I can check on it during the night.
The transmitter and receiver are suppose to work up to eighty feet apart, but I
found that they will not work if more than three feet apart.
Could be the batteries in the transmitter that came with it are not up to snuff,
I do not know.
It is off by a few degrees (higher on the Engel unit) compared to the readout
that comes stock on the ARB fridge.
Not sure which is the more accurate, I guess I could get one of these dial gauge
thermometers and set it inside to check it out.
What inspired me to buy this was a thread I read on Expedition Portals forum.
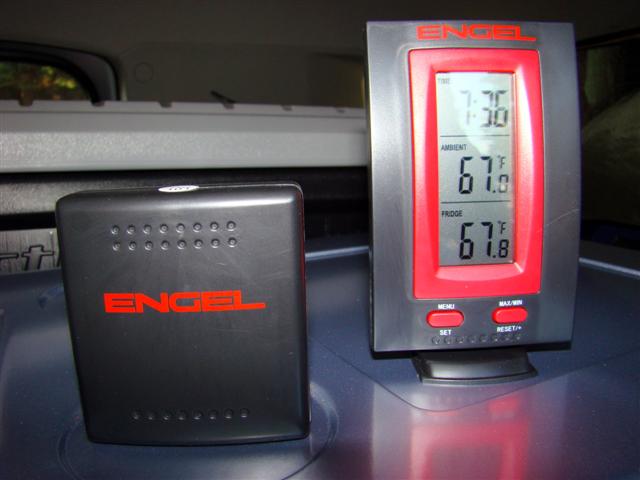
First pictures shows
the transmitter next to the receiver for size comparison.
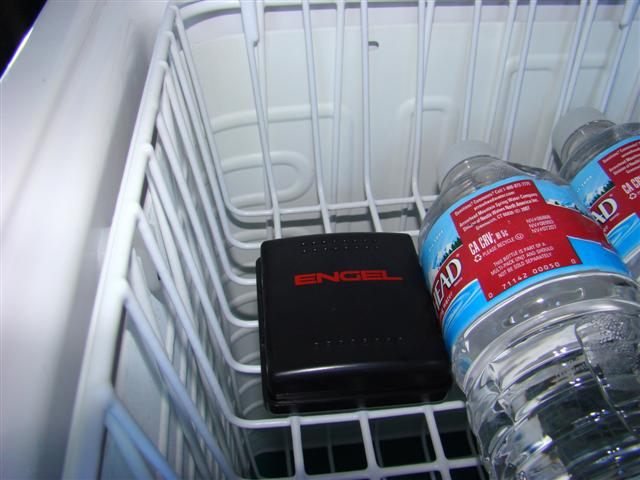
Second picture shows the transmitter sitting in the fridge.
I did not use the supplied Velcro to attach it anywhere, as I want the option of
putting it where I want once the grub is packed inside the fridge.
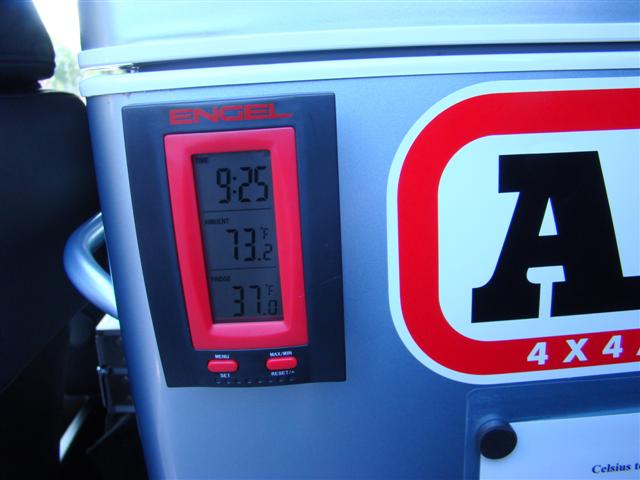
Third picture shows the receiver that can display the time, outside temperature,
and the fridge temperature.
Parts used:
Engel Wireless Thermometer
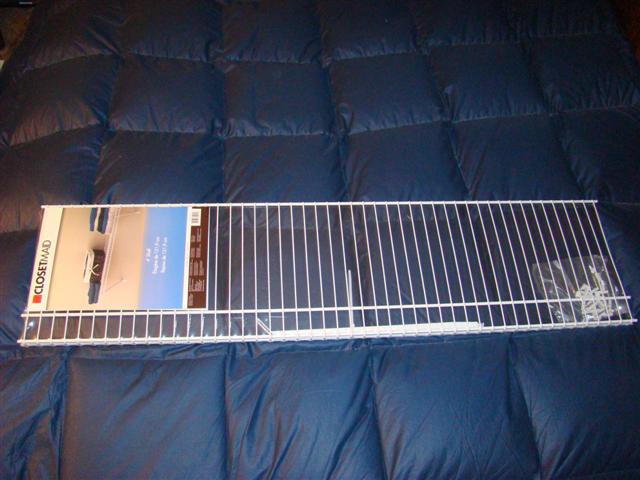
The "Bjorno" Roof
Top Tent Shelf For Maggiolina Style Tents
Installed 7-10-2009
I saw a thread over
on fjcruiserforums.com by Bjorno who has the exact same tent model I do, the
AutoHome Maggiolina AirLand medium.
I found camping in mine last year there is no storage space in the tent, and
having a shelf like this is nice to put your shows up on.
The shelf is to small to put my BadBags duffel on, and way to heavy too.
But it can be used to store other stuff besides shoes/boots.
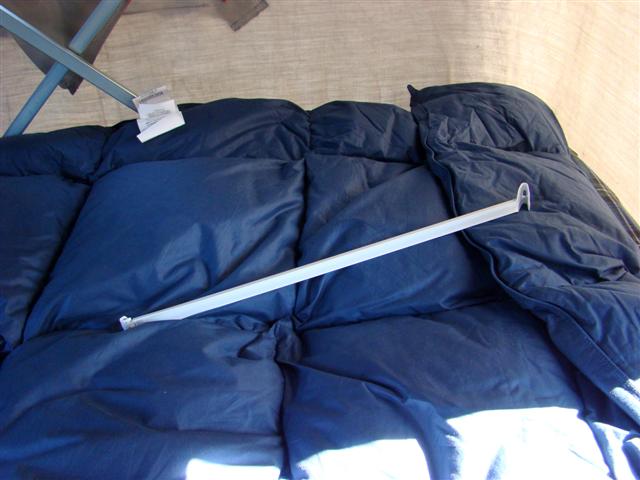
I was gong to try and install mine without cutting out the thirteen ribs like he
did, but I would have had to tie the shelf with something to the lifting
mechanism of the tent, and that would be kind of a pain.
His method worked out pretty good.
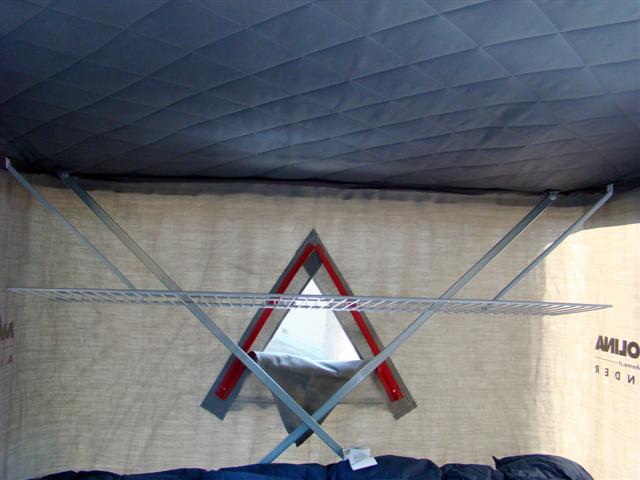
I cut the thirteen ribs out, and set the 16" arms along the tenth inward support
rib.
This puts it at an almost level position.
Pretty simple to do, you just bend the tabs over with some adjustable pliers so
they will anchor into the top of the roof top tents area which is made that way
to hold the custom pockets that AutoHome sells (comes stock on the higher priced
Maggiolina models) to put up there to use as pockets to hold stuff in.
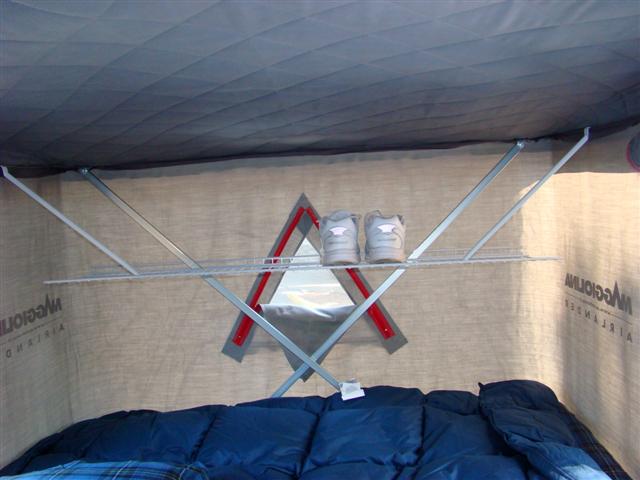
Before I put my dirty shoes into a dishpan and stored it on the bed.
Kind of in the way while I slept, this will be nicer not bumping into it during
the night.
I can put my Cabelas LED lantern up there, a box of nosewipes, flashlight, or
other stuff up there that normally lays on the bed and gets kicked around.
Here are a few pictures of the installation.

Links:
Bjorno's thread on how he made the shelf
ClosetMaid 4' shelf model 51041 from Lowe's
Bjorno's was a different part number, but it appears to be the exact same one as
his.
BajaRack Model MG
(For Maggiolina Roof Top Tents)
Installed 4-28-2010
I have been running
my Maggiolina AirLand roof top tent for a little over two years on the stock FJ
Cruisers rack.
While it works, it is not the best as in the COG is very high, and I get
buffeted around on the freeway at speeds over 50 miles per hour when there is
any amount of wind.
Last year we had a discussion at fjcruiserforums.com about a possible rack made
just for the Maggiolina and Columbus style tents from Autohome.
Others have come up with ideas to get the tent lowered, but I wanted a specific
off the shelf rack you could buy instead of fabbing one up to do this.
BajaRacks out of California stepped up last year and came up with a design.
It is all flat with no basket setup to contain any cargo on top, its sole
purpose is to carry an AutoHome fiberglass shell tent which takes up most of the
length and width of the rack.
In March of this year I decided it was time to jump on a new rack to make my rig
safer while driving, and also to have the tent look more streamlined on the rig.
The new rack fulfills both criteria for me.
I ordered the new rack through Mike at AutoHome tents who is a reseller for
BajaRacks.
The rack and awning brackets were shipped directly from BajaRacks though.
Mike will be stocking these new "MG" (Maggiolina) style racks shortly for both
FJ Cruiser owners, and also for Land Cruiser 80 series owners.
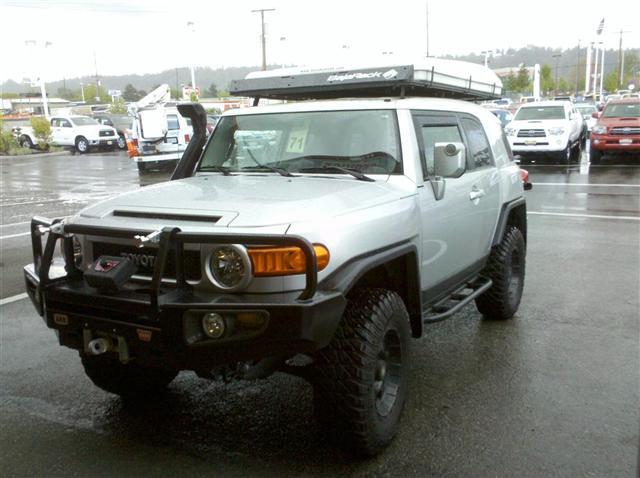
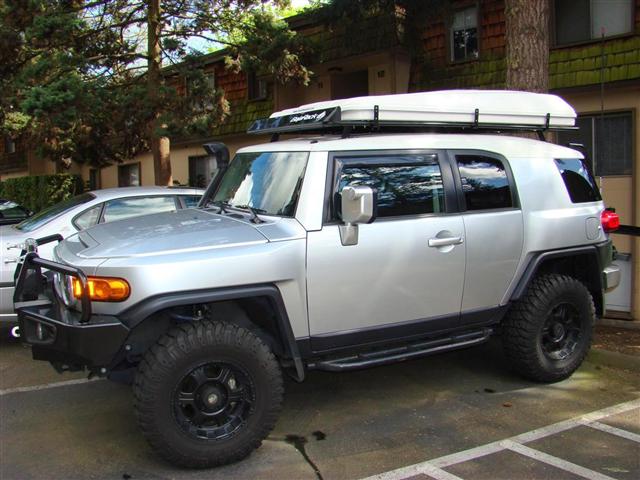
I am happy to report
that my gas mileage has gone up from 15.5 MPG to around 17 MPG.
This is with 50% freeway and 50% in town driving.
I am near the 30K mark and about due for new sparkplugs, so I am confident my
MPG will go up even more with them and perhaps a new cap/rotor if required.
Also my handling in the wind at freeway speeds has improved quite a bit.
I still get tossed around a little though in the wind, but that is to be
expected when you drive a lifted heavy SUV sitting on mud tires and with a
penthouse on the roof.
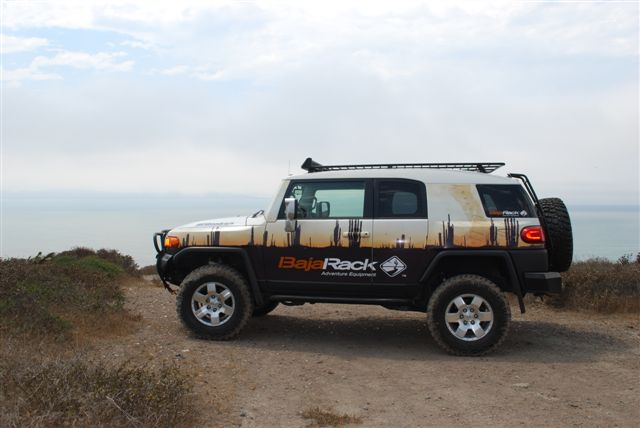
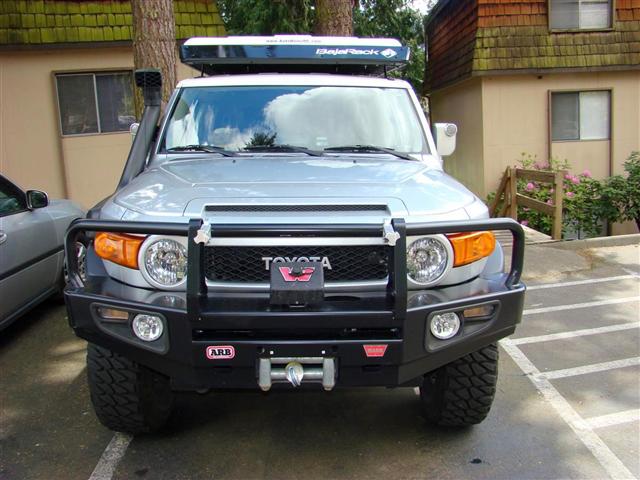
The first four pictures here are of BajaRack owner Sergio's FJ Cruiser.
He test fitted a borrowed Maggiolina Extreme tent from XJFrenchie, a member over
at Expedition Portals forum.
The pictures show the rack with no tent, the tent, and a few close-ups of the
awning bracket system used to mount awnings to it.

I had the rack and
awning brackets shipped to my dealer, Doxon Toyota of Auburn, WA.
If I had a home with a garage I would have attempted the installation myself,
but since I live in an apartment complex, I am somewhat limited on what I can
accomplish here.
I dropped my rig off at Toyota on Tuesday and they provided me with a free
loaner car.
The next day I called around 11 am to inquire how the installation was going,
and the tech had hit a snag.
They wanted me to come down, so I left work a few hours early, and I just caught
the tech as he was going to lunch.
The service manager and I walked over to their new service bay (talk about
nice!) and Scott the tech who was working on my rig showed me the front two
hinges for the lid were hitting a front horizontal bar right behind the wind
deflector when you tried to release the hinges.
He went to lunch and I called up BajaRack's who suggested we try moving the tent
back some.
The service manager and I went back to the service area and slid it back some.
No good, as they just hit the other bar one position back.
A tech in the next bay said they already tried that.
Of course they did, I would have done the same.
Another call to BajaRacks and they asked me to snap a picture for them from my
Droid.
As soon as they saw it they knew what was going on.
My latches are more than an inch longer than Frenchie's latches.
A call into Mike at AutoHome's US distributor here in the US resulted in me
learning that some latches are different lengths for various models.
No way BajaRacks could have known this.
After lunch Scott and I discussed a plan.
We did not want to cut out that horizontal bar, so he suggested grinding down
the latches.
This would solve the problem and the latches would still work, even without the
little curved area which you would normally grab to swing the latch down to
unlock it.
A little over an hour later my rig pulled up to the service waiting area where I
was, and it looked great!
The only thing I had to redo later was the rear awning bracket mount.
It was up against the rear foot pad mount for the rack, thus not letting its
vertical tab to stick out like the other two, so it was very close to the
fiberglass shell of the tent, and would have thrown off the alignment of the
three mounts when the awning was attached by me later.
I was able to on Sunday to unbolt the bottom half of the bracket and move it out
of the way, then twist the upper part sideways with the bolt in it still to
remove it from between the racks tubing.
It was a good thing I could get it out this way.
The only other alternative would have been to loosen the tent mounts in their
tracks and jack the tent up a few inches so I could pull the bolts out.
The way I did it was a timesaver for sure.
Once I repositioned the awning bracket, I used the old 10mm bolts and nuts from
the Campinglab awning brackets to insert into the awnings tracks.
I did pick up six new stainless steel flat washers to go behind the nut.
This way the nut would not grind off any of the brackets powdercoating.
I hope the info here can provide FJ Cruiser owners a good design now to mount a
roof top tent lower to their roof.
I see no reason why this would not work with other tents too, although if you
wanted to carry other cargo on top of the rack, you would need sides on it
somewhere.
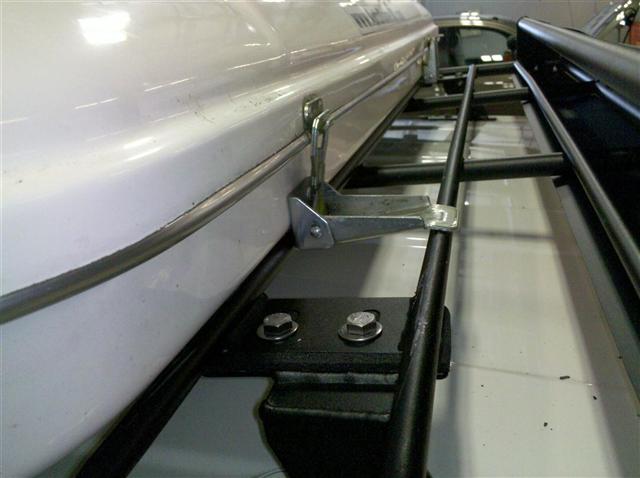
Below are some pictures from the time it rolled out of the shop at Toyota, and
also at my home.
First up is showing the unmodified latch hitting the bar.
In the sixth picture below you can see the latch after it had been shortened.

Links:
BajaRack
AutoHome
US site
Doxon
Toyota
Yaesu 857D Ham
Radio Setup Continued
Phase Three, Yaesu 857D, External Speakers, ATAS 120 Antenna, And Power Wire
Installed 9-13-2011
Been a long time
since I have done a mod to the rig.
Actually this is an old mod from fall of 2008 that was just completed in
September of 2011.
My ham radio setup:
Yaesu 857D
ATAS-120 antenna
Diamond Duplexer MX62M for the antenna
Diamond GLP58 mount for the antenna
I had the faceplate for the 857D mounted long ago, and the antenna mount, but
not the rest.
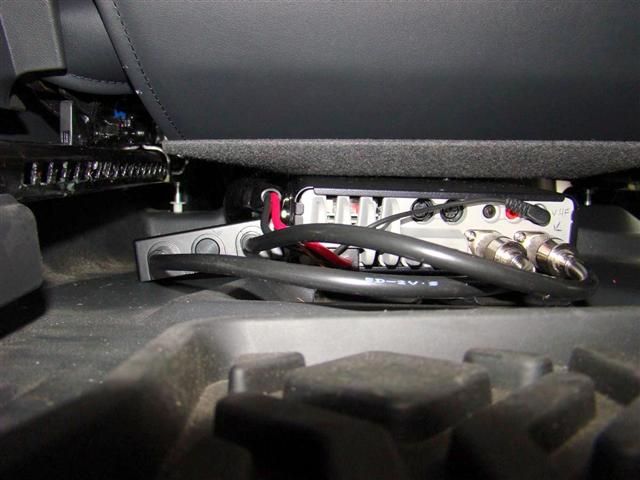
On vacation in September and I took the time to have Cartoys put the main
unit and duplexer underneath the passenger seat, wire up the power, run the coax
for the antenna, and solder the ends of the coax to their connections.
I do not solder well, and after watching some YouTube vids on how to solder up
the coax ends, I gave up, so I had the pros do this.
Now its time to get back to studying again for my Technician Class ham license,
and then onto my General Class license as well.
This Yaesu radio has more features than I would ever use for quite awhile, but
the same guy who talked me into spending the extra bucks on my roof top tent
also talked me into getting the radio.
His motto?
Do it right, buy it once.
This radio will grow with me as I get higher up in license classification.
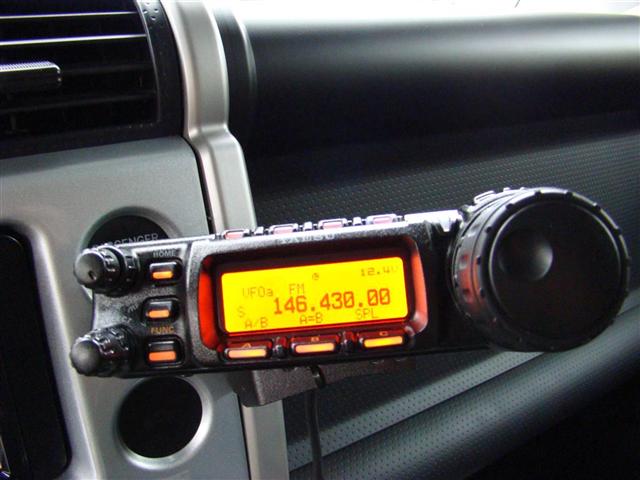
A few pictures:
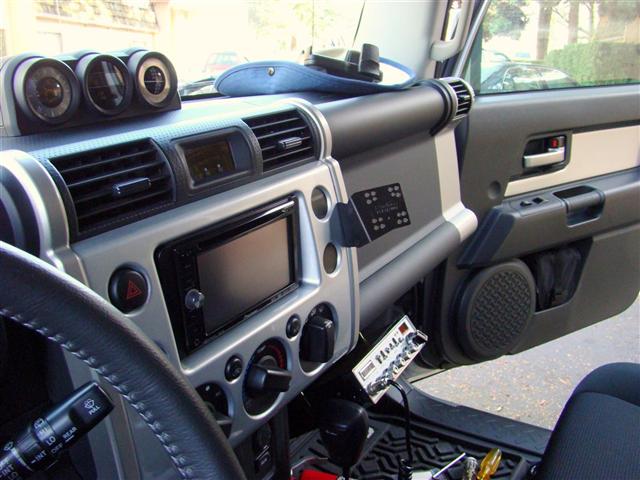
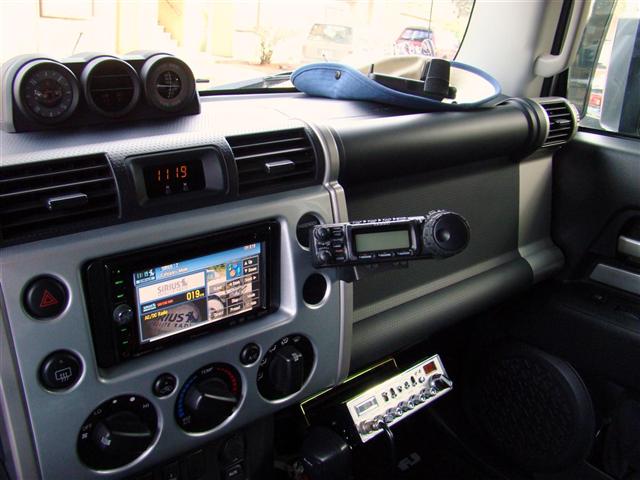
In picture one is the faceplate mounted on dash, looks better than the old photos posted earlier in
this thread since there is now power.
In picture two I did not have to drill for the mic mount, as I just used the left side of my Cobra 29 CB to mount the mic, and I added the mic mount that came with the Yaesu to the right side of the CB to hang the CBs mic from.
In picture three is
a shot of the ATAS-120 antenna.
This antenna is made specifically for the Yaesu 857D, and it raises/lowers the
whip automatically when you change frequencies on the radio, pretty trick.
You need to run the duplexer though and takes its two ends and put them in the
radio for the VHF and UHF sides, and then the ATAS-120 plugs into the end of the
duplexer.
This way one antenna does the job of two antennas.
In picture four is a
rear view of the radio and duplexer.
Both are mounted with heavy duty Velcro to the floor.
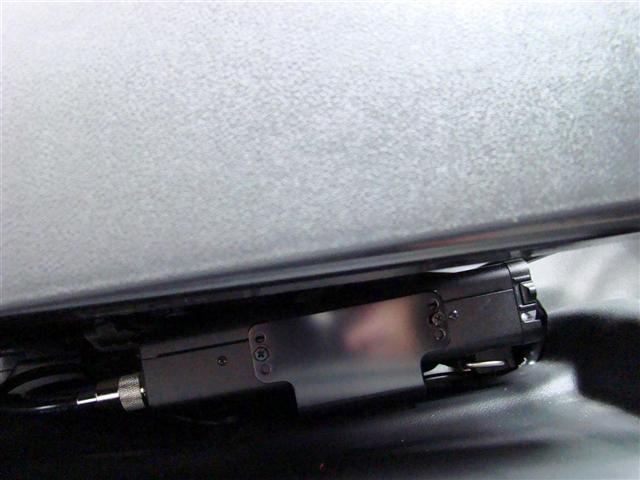
In picture five is a
side view of the radio.

Not seen in the pictures is a Big Mouth external speaker that is used with the
radio.
It is mounted to the right of the CB underneath the dash.
I also like how the radio displays your battery voltage so you can keep an eye
on it if using the radio with the engine off.
Fire up the engine, and the voltage immediately goes up.
Parts used:
Same as posted earlier from 2008 above, but I am now running the ATAS 120-a
antenna which works for all the bands this radio is capable of transmitting on.
Very cool antenna, you push a button on the radio, and the antenna moves up and
down (known as a screwdriver antenna) to tune to the correct wave length.
ATAS 120 antenna
Springtail
Solutions MPAC Side Rack For Powertank
Installed 12-3-2011
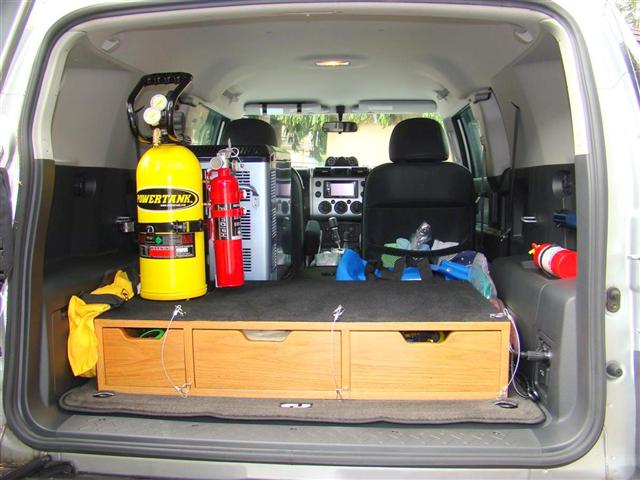
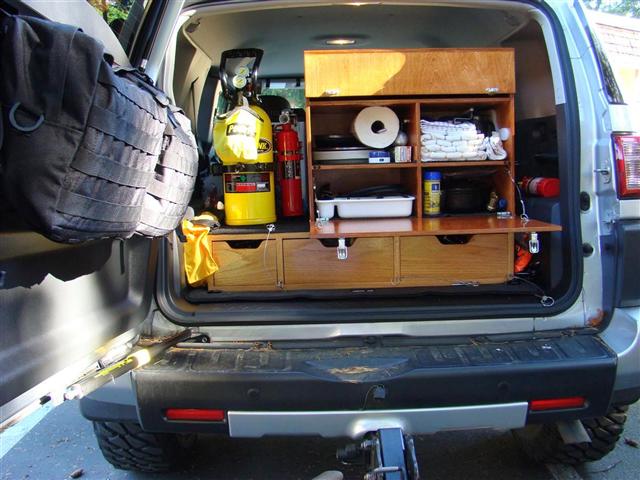
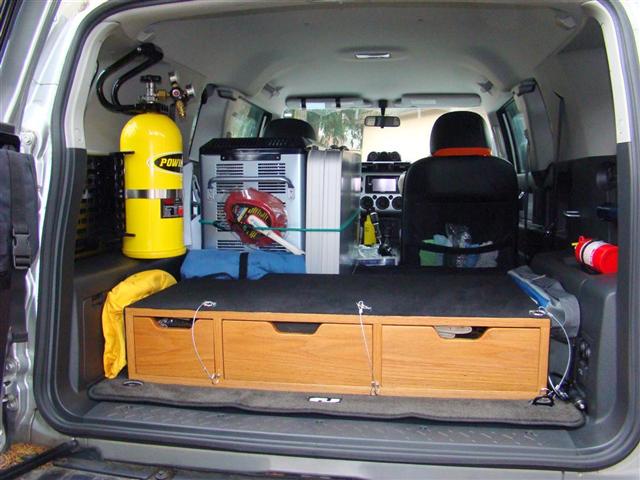
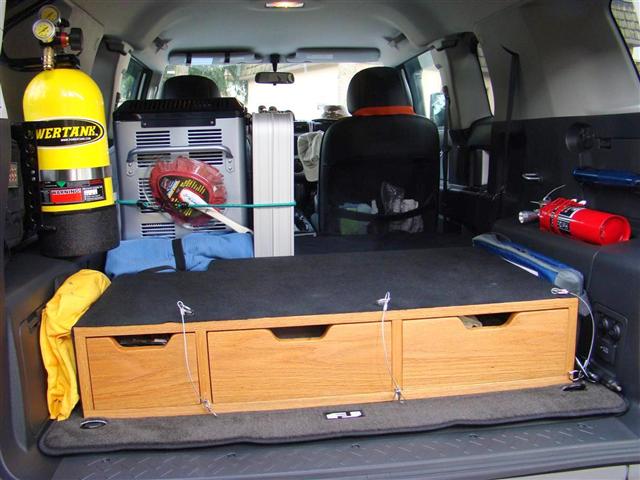
For years now the
Powertank and one of my fire extinguishers has been mounted to the top of the
cargobox as seen in the first picture below.
While this has worked out good, it takes up a lot of room there for valuable
space for camping gear when the rig is loaded with it.
Springtail Solutions has had for quite some time now a side rack (click
here to view it) for mounting a Powertank too and other items via
holes for Molle straps, Quick Fist mounts, and other methods, this new side rack
I installed is just for the Powertank.
This will allow me to have more space for my 7 gallon drinking water jug, a
large propane tank, and
my chuckbox.
Depending on how much space this opens up, it will be much easier to load my
camping gear back there now.

You can see by this older picture with the chuckbox back there that there is not much room on top of the cargobox for other gear with the Powertank there.
Please note this new
rack is a prototype that I am testing for Springtail Solutions, so there is no
URL for it yet on their website at the time of this writing.
This rack may not even get manufactured by Springtail Solutions unless they hear
from other potential customers that there is a demand for these.
Hopefully after readers here see mine there will be enough interest warranted
for them to bring this into full production, and if so, it will be priced around
$20 cheaper than their current side rack.
So if there is, please contact Doc at Springfield Solutions and let them know
there is a desire to have these built.
My old large fire extinguisher bracket I have had since around 2000 or so for a
Powertank in the 4Runner and then the FJ Cruiser is to big for the new rack, so
Doc at Springtail Solutions suggested the Super Bracket from Powertank is the
one I wanted to pick up, plus Doc's side rack is pre-drilled for the Super
Bracket from Powertank.
I ordered the black Super Bracket one from Steve Sasaki owner of Powertank, and
it arrived in a two days.
Steve, you guy's rock
Below is a picture of all the parts spread out.
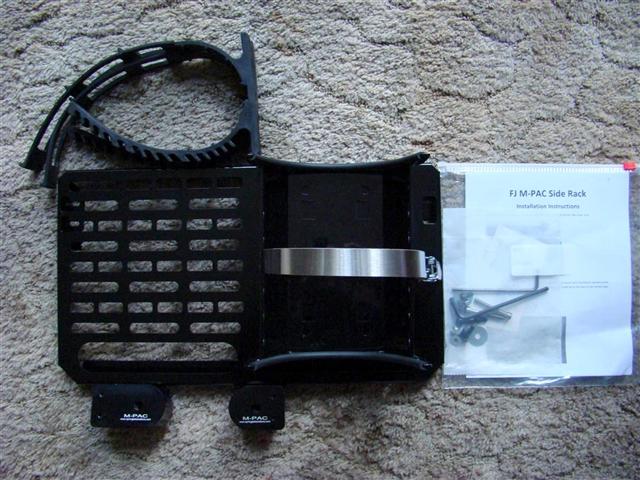
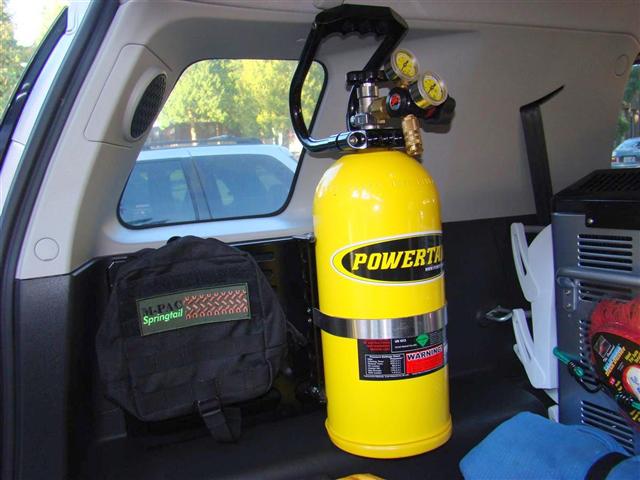
Here is a picture of
the side of the FJ Cruiser showing the grocery hooks in place from the factory
where the new rack will go.
Remove the stock bolts with a 10mm socket.
Here is a picture of the black billet aluminum mounts that replace the stock
grocery hooks.
They install with 45mm stainless steel bolts and an included Allen wrench.

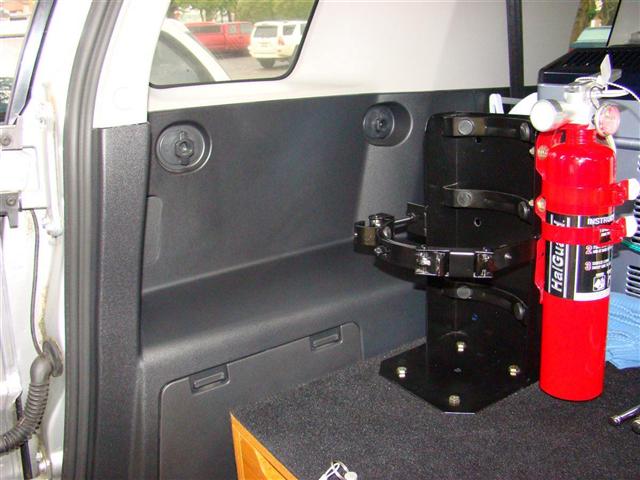
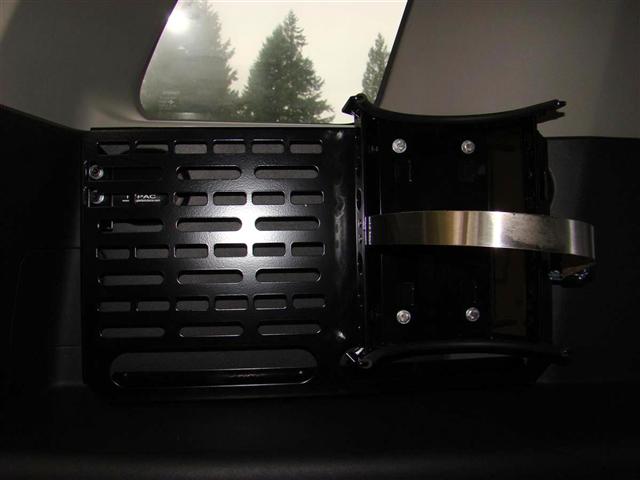
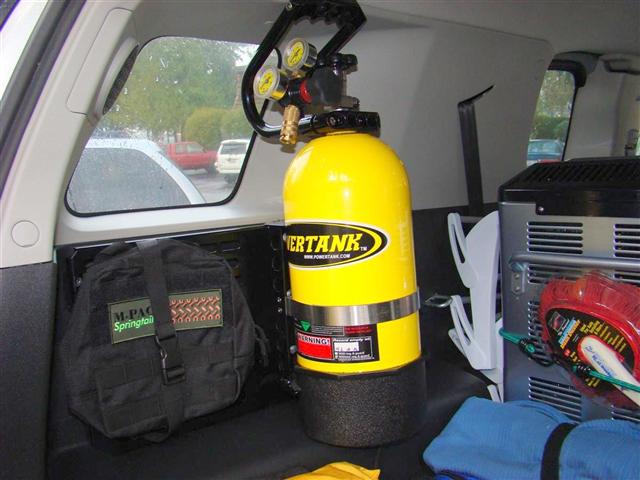
Here is a picture of the side rack and the Powertank Super Bracket in place.
The side rack is held to the billet mounts with 6mm bolts and washers.
If mounting a heavy item such as a Powertank or a fire extinguisher the below
step should be taken.
There are two holes on the bottom of the side rack, and you drill two 15/64
holes through the plastic wheel well.
You then secure it with 6mm button head bolts and fender washers/locking nuts
with another (smaller) included Allen wrench and a 10mm socket.
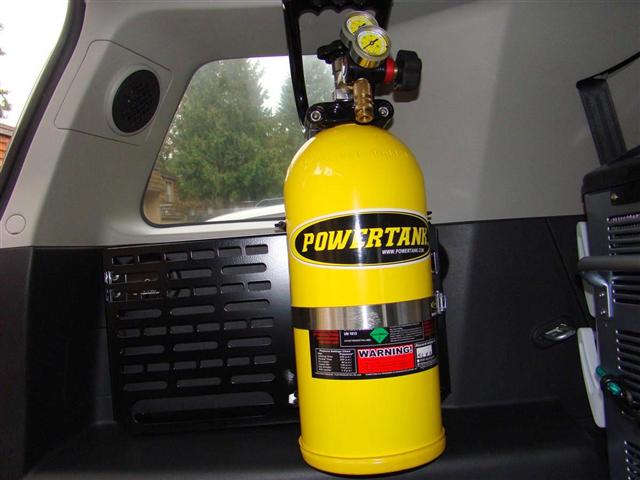
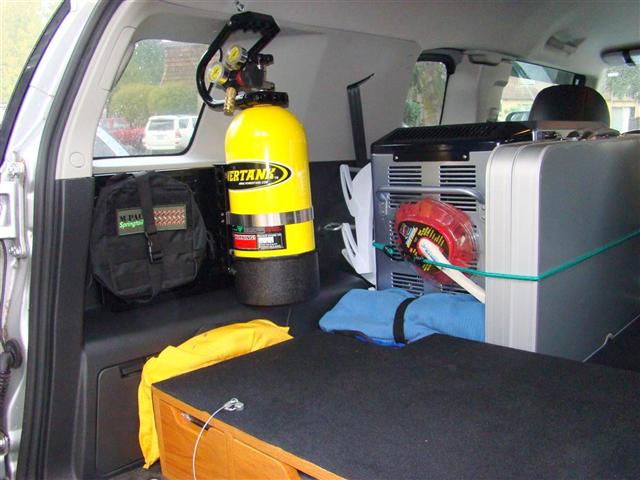
Here is a picture with the Powertank now in its new location, and another
picture showing how much room was opened up by relocating the Powertank to its
new location.
Doc has an excellent installation guide over at fjcruiserforums site, and the
install is the same for the new prototype rack I have.
The link to it is at the end of this article.
I will update this at a later date when I have the rig loaded up with camping
gear to show you what it looks like with the gear and the new rack installed to
the side now.
Here is
a picture from 2010 showing how much valuable
room the Powertank and fire extinguisher is taking.
I want to also add that this rack is beefy.
It is not going to flex on you, it is very well constructed, just like my MPAC
rear door rack I have.
Installed the new molle pack a few days later.
Once it is mounted via its two straps, you can grab the bag and separate it from
its Velcro backing, thus leaving just the mount hooked to the rack, and you take
the bag with you which has a carrying strap on top of it.

Shortly after installing the new setup, I received a tank boot from Powertank.
After all these years I chucked the yellow aircraft tubing protector cap I had
on the bottom of my Powertank and put a tank boot on it.
The new boot protects the lower portion of the tank better than the cap I was
using.
Parts used:
Springtail Solutions
Springtail Solutions side rack for just mounting a Powertank only (Not listed
since this is a prototype still)
Quickfist Mounts for the racks available from Springtail
Solutions
Doc's installation guide for the regular style side rack
over at fjcruiserforums
Powertank Super Bracket part # BKT-2260-BK
Tank Boot, (Fits the 10# and 15# tanks) Part Number:
TBT-6090
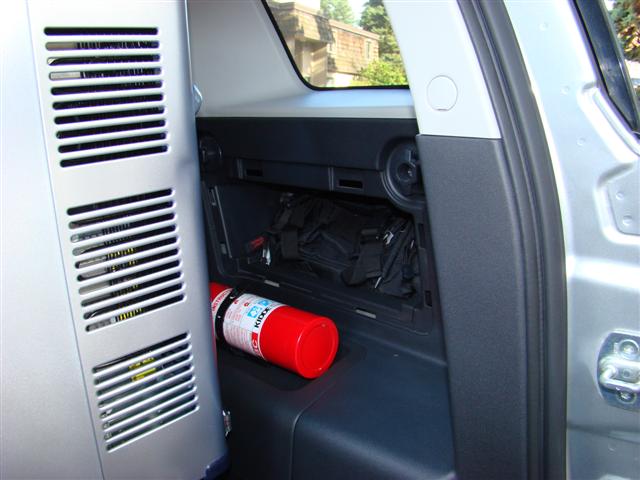
HalGuard HG250R
Fire Extinguisher Relocated
Installed 12-31-2011
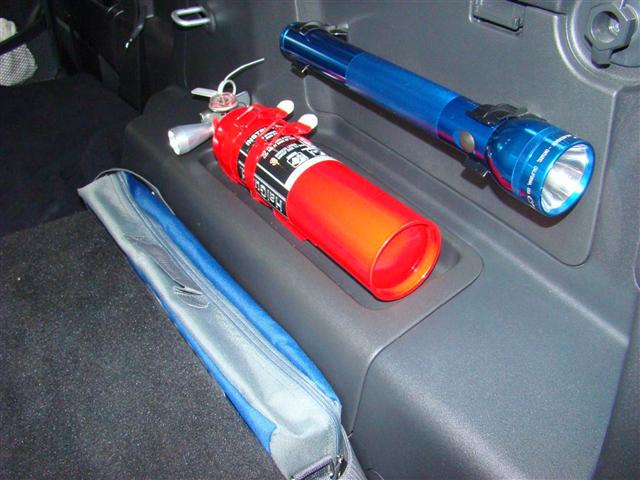
Since I moved the
Powertank earlier this month I lost my location for my
HalGuard HG250R fire extinguisher.
I decided I did not need the el cheapo Kidde in the rig anymore since it is only
for outside fires, you never want to use that type on your rig as it is bad for
your wiring inside the rig and underneath the hood.
I am going to throw the Kidde into my camping gear footlocker to battle outside
fires with.
I ended up putting the HalGuard in the same location as the Kidde one was.
I just had to take out the plastic tray over the wheel well and drill new bigger
holes, and used the old hardware from when the HalGuard was mounted to the old
Powertank bracket.
The HalGuard one is for battling fires inside of your rig and underneath of the
hood since it is a
"clean agent", and will not ruin your wiring.
Next mod
Installed ?-?-2008
Insert text here ;)
Parts used:
As you can see
above, I am prepping the page here by putting in a few of the future mod
templates ahead of time.
The rig is finally nearing completion (famous last words), and it will continue
to evolve into one badass camping/overlanding/expedition
type beast.
Please click here to go to back to page 2
Please click here to go to back to page 1